
PRO1 R250W Wireless System Thermostat Owner’s Manual


Installing Batteries
Installing Batteries
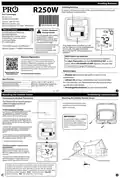
To install 2 AA batteries remove the cover of the front housing and
insert batteries as show below.
R250W
Pro1 Technologies
P.O. Box 3377
Springfield, MO 65804
Toll Free : 888-776-1427
Hours of Operation: M-F 9AM - 6PM Eastern
PM-R250W-IM-2407
*PM-R250W-IM-2407*
Table of Contents
Page
Set At
Caution: Equipment
Damage Hazard
Specifications and Warranty
Installing Batteries
Mounting the Outdoor Sensor
Establishing Communication
Technician Setup
1
2
3
4
5-7
8
FAN ON
COOL ON
Do not operate the cooling
system if the outdoor
temperature is below 50˚F
(10˚ C) to prevent possible
compressor damage.
FCC Information
After batteries are installed you will
see the light turn on for approximately
10 seconds. The light will briefly
illuminate WHITE when batteries are
installed.
The R250W requires the PROsync™
Una version en espanol de
este manual se puede
descargar en la pagina web
de la compania.
LEAVE
Wireless System T755WHO thermostat.
NOTE About Low Batteries:
Warranty Registration
When the outdoor sensor batteries need to be changed
the Main Thermostat will flash OUTDOOR LO BAT as seen
above. When OUTDOOR LO BAT appears, the user has
~3 months to change the batteries.
Your new thermostat has a 5 year limited warranty.
You must register your thermostat within 60 days of
installation. Without this registration the warranty
period will begin on date of manufacture. For
warranty issues please contact the HVAC professional
that installed this product. Please register your new
thermostat online.
Battery types
Please Register Your
Thermostat Here
• Alkaline AA batteries will perform well in most
applications.
Specifications
• Lithium AA primary cell batteries are recommended
for cold climates. See the battery manufacturer product
specifications for details.
Operating Temperature ...................... -40˚F to 140˚F (-40˚C to 60˚ C)
Operating humidity............................... 90% non-condensing maximum
Dimensions of sensor .......................... 3.875”W x 3.875”H x 1.125”D
• Rechargeable batteries are not recommended.
U.S. Registered Trademark. Patents pending
Copyright 2024 All Rights Reserved.
1
2
Rev. 2407
Mounting the Outdoor Sensor
Connecting to the Main Thermostat
Establishing Communication
Mounting the Outdoor Remote Sensor
The Outdoor Sensor must be paired to
a PROsync Equipment Module.
(sold separately)
To install remove the front cover
and place a screw in the left and
right screw holes.
On the Equipment Module:
1. Press the PAIR button below the LED.
The equipment module will begin
double blinking pink for 2 minutes
while it waits for a remote to join.
IMPORTANT:
2. Press the button on the inside of the
outdoor remote sensor (A). The LED on
the outdoor remote sensor will begin to
flash pink (B).
Do not install in direct sunlight.
For best results, install on a
north-facing wall, sheltered by
a roof overhang or something
similar.
3. When the equipment module receives
the pairing message, it will blink blue
repeatedly, then return to blinking
green.
4. The outdoor remote sensor will blink
green when it is paired, then the LED on
the outdoor sensor will turn off.
5. Install the outdoor sensor.
Checking outdoor remote sensor
temperature:
After the outdoor remote sensor is
paired, on the indoor remote sensor
press the light button(A) and WAIT 30
seconds.
Zone
Menu
The antenna icon(B) will flash 3 times,
and the outdoor temperature(C) will
appear at the top of the LCD screen.
Roof Shelter
North Facing Wall
To check the connection of the outdoor remote sensor to the equipment
module at the installation site, press the button on the outdoor sensor
(located under the front cover) and wait 15 seconds. The LED will blink
white while the outdoor sensor is checking the connection and then show
the following status indicators: BLUE - Good Connection - YELLOW -
Weak Connection - RED - No Connection / out of range.
4


| General | Details |
|---|---|
| Name | PRO1 R250W Wireless System Thermostat Owner’s Manual |
| Make | PRO1 |
| Language | English |
| Filetype | PDF (Download) |
| File size | 0.19 MB |
 (1 votes, average: 5.00 out of 5)
 Loading...

PRO1 T751i Thermostat Installation Guide

PRO1 T731W Wireless PTAC Non-Programmable Thermostat Installation Guide

PRO1 T805 Non Programmable Thermostat Instruction Manual

PRO1 T701 Digital Non Programmable Thermostat Instruction Manual

PRO1 IAQ T721i Digital WIFI Programmable Thermostat User Manual

PRO1 T725 Thermostat User Guide

PRO1 T755 Heat 2 Cool Dual Fuel Thermostat User Manual

PRO1 T771 Programmable Electronic Thermostat Instructions

PRO1 R250W Wireless System Thermostat Owner’s Manual Overview
Summary of Contents
- Page 1: Installing batteries involves removing the cover of the front housing and inserting 2 AA batteries. After batteries are installed, the light will turn on for approximately 10 seconds and briefly illuminate white. The R250W requires the PROsync™ wireless system T755WHO thermostat. When outdoor sensor batteries need to be changed, the main thermostat will flash OUTDOOR LO BAT. Your new thermostat has a 5-year limited warranty, which must be registered within 60 days of installation. Alkaline AA batteries are recommended for most applications, while lithium AA batteries are suggested for cold climates. Rechargeable batteries are not recommended for use. The outdoor sensor must be paired to a PROsync Equipment Module. For best results, install the outdoor sensor on a north-facing wall, sheltered from direct sunlight. Connection status indicators for the outdoor sensor include blue for good connection, yellow for weak connection, and red for no connection.
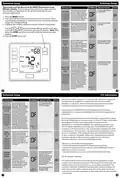
- Page 2: Technician setup must be done from the main thermostat in your PROsync system. The thermostat has a technician setup menu for easy installer configuration. Free cooling can be enabled if the outdoor temperature is significantly lower than the setpoint temperature. Press the MENU button and hold the technician setup button for 3 seconds to access installer settings. The selected terminal for free cooling cannot be used for reversing valve operations when the heat pump setting is turned on. Balance point with electric auxiliary will optimize heat pump usage. The thermostat will energize only the Y terminals in a call for heat when the outdoor temperature is above the balance point. The thermostat will allow the Y terminal(s) and the W2 terminal to energize when the outdoor temperature falls below the AUX CUT OUT selection. Any changes not approved by the responsible party could void the user’s authority to operate the equipment. The device complies with FCC radiation exposure limits and should be installed with a minimum distance of 20cm between the radiator and your body.

Danfoss 088N3688 Room Thermostat Installation Guide

warmup RFT-P Programmable Radiant Floor Thermostat User Manual

LUX TX700U Universal Thermostat Instruction Manual

AIRQUEST TSTATIIEWF ION Gray Smart Thermostat Owner’s Manual

Honeywell TH2320WF4011 FocusPRO Smart S200 Series Thermostat User Guide

tado 104388 Smart Thermostat

Honeywell RTH6500WF Wi-Fi Programmable Thermostat User Guide

Danfoss Link Connect Thermostat User Guide

GENERAL ARUNA 300S Smart Room Thermostat User Manual

heatmiser Slimline-RF V3 Programmable Wireless Thermostat Instructions