Home > Blue Universal > Blue Universal OH-1202 Touchscreen Thermostat Instruction Manual
Blue Universal OH-1202 Touchscreen Thermostat Instruction Manual
Blue Universal Touchscreen Thermostat with
Automatic Heat/Cool Changeover Option
Single Stage, Multi-Stage, Heat Pump
Installation and Operating Instructions
Save these instructions for future use!
FAILURE TO READ AND FOLLOW ALL INSTRUCTIONS
CAREFULLY BEFORE INSTALLING OR OPERATINGTHIS
CONTROL COULD CAUSE PERSONAL INJURY AND/OR
PROPERTY DAMAGE.
Model
Programming Choices
7 Day 5+1+1 Day
Non-Programmable
OH-1202
APPLICATIONS
THERMOSTAT APPLICATION GUIDE
Touchscreen Thermostat
Maximum
Stages
Heat/Cool
Thermostat
Configuration Options
Thermostat
Applications
Gas, Oil, Electric, Heat Only,
Cool Only or Heat/Cool
Systems, 2 or 3 wire Hydronic
Zone (Hot Water or Steam)
Systems, 24 Volt or Millivolt
Single Stage 1
No Heat Pump (SS1)
1+1
2+2
Multi Stage 2
No Heat Pump (MS2)
Heat Pump 1 Single Stage Compressor
Single Stage Compressor Heat Pump Systems - up to 2
3+1
4+2
Heat Pump (HP1)
Stages Aux./Emergency Heat
Heat Pump 2
Two Stage or Two
Compressor Heat Pump
(HP2)
Two Stage or Two Compressor
Heat Pump systems - up to 2
Stages Aux./Emergency Heat
SPECIFICATIONS
Electrical Rating:
Battery Power. . . . . . . . . . . . . . . . . . . . . . . . . . mV to 30 VAC, NEC Class II, 50/60 Hz or DC
Input-Hardwire . . . . . . . . . . . . . . . . . . . . . . . . . 20 to 30 VAC
Terminal Load . . . . . . . . . . . . . . . . . . . . . . . . . . . . . 1.5A per terminal, 2.5A maximum all terminals combined
Setpoint Range . . . . . . . . . . . . . . . . . . . . . . . . . . . . 45 to 99°F (7 to 37°C)
Rated Differentials:
Fast.
0.6°F
1.2°F
1.2°F
0.6°F
Slow
1.5°F
1.7°F
1.7°F
1.7°F
Heat (Single Stage/Multi-Stage). . . . . . . . . . . .
Cool (Single Stage/Multi-Stage) . . . . . . . . . . . .
Heat Pump . . . . . . . . . . . . . . . . . . . . . . . . . . . .
Emer Heat . . . . . . . . . . . . . . . . . . . . . . . . . . . .
Operating Ambient. . . . . . . . . . . . . . . . . . . . . . . . . . 32°F to +105°F (0 to +41°C)
Operating Humidity . . . . . . . . . . . . . . . . . . . . . . . . . 90% non-condensing max.
Shipping Temperature Range . . . . . . . . . . . . . . . . . -40 to +150°F (-40 to +65°C)
Dimensions Thermostat. . . . . . . . . . . . . . . . . . . . . . 4-9/16"H x 5-13/16"W x 1-3/16"D
ATTENTION: MERCURY NOTICE
This product does not contain mercury. However, this
product may replace a product that contains mercury.
CAUTION
!
To prevent electrical shock and/or equipment damage,
disconnect electric power to system at main fuse or
circuit breaker box until installation is complete.
Mercury and products containing mercury must not be
discarded in household trash. Do not touch any spilled
mercury. Wearing non-absorbent gloves, clean up any
spilled mercury and place in a sealed container. For proper
disposal of a product containing mercury or a sealed
container of spilled mercury, place it in a suitable shipping
location to send the product containing mercury.
Index
Page
2
Installation
Wiring Diagrams
Thermostat Quick Reference
Installer Configuration Menu
Operating Your Thermostat
Programming
3
4
5
9
WARNING
!
10
13
For California Residents: This product contains a
chemical known to the state of California to cause
cancer and birth defects and other reproductive harm.
Troubleshooting
PART NO. 37- 7403B
Replaces 37-7403A
1639
| General | Details |
|---|---|
| Name | Blue Universal OH-1202 Touchscreen Thermostat Instruction Manual |
| Make | Blue Universal |
| Language | English |
| Filetype | PDF (Download) |
| File size | 0.4 MB |

Blue Universal OH-1202 Touchscreen Thermostat Instruction Manual Overview
Summary of Contents
- Page 1: Blue universal touchscreen thermostat with automatic heat/cool changeover option. Single stage, multi-stage, heat pump installation and operating instructions. Failure to read and follow all instructions could cause personal injury and/or property damage. Thermostat application guide includes gas, oil, electric, heat only, cool only, or heat/cool systems. Electrical rating: battery power from 20 to 30 VAC, NEC Class II, 50/60 Hz or DC. Setpoint range is 45 to 99°F (7 to 37°C). Operating ambient temperature ranges from 32°F to +105°F (0 to +41°C). This product does not contain mercury, but may replace a product that does. To prevent electrical shock and/or equipment damage, disconnect electric power before installation. For California residents: this product contains a chemical known to cause cancer and birth defects.
- Page 2: Installation Thermostat installation and all components of the control system shall conform to Class II circuits per the NEC code. Battery powered, no 24 Volt system power available. Before removing wires from old thermostat, mark wires for terminal identification. Pull the thermostat body off the thermostat base. Forcing or prying on the thermostat will cause damage to the unit. Fasten base snugly to wall using mounting holes and two mounting screws. Connect wires to terminal block on base using appropriate wiring schematic. Push excess wire into wall and plug hole with a fire resistant material to prevent drafts. Remove the battery tag to engage the batteries. For best results, use a premium brand AA alkaline battery. The Power Stealing Switches should be left in the On position for most systems.
- Page 3: Wiring diagrams for single stage or multi-stage systems are provided. The system can operate without a heat pump using a single transformer. Installer configuration menu allows selection of O or B for changeover function. The thermostat is designed for single-transformer or two-transformer systems. Refer to equipment manufacturers’ instructions for specific system wiring information. The dual fuel option de-energizes heat mode stages when auxiliary heat is energized. Blower/circulator fan is energized on a call for cool or fan on. Heat pump connections are specified for both single stage and multi-stage systems. Remote temperature sensor connections are included in the wiring diagrams. After wiring, refer to the installer configuration section for proper thermostat configuration.
- Page 4: Thermostat quick reference provides essential information about the home screen display, including room temperature, set temperature, and time of day. The battery level indicator shows the current power level of the batteries, with specific messages for full power, half power, and when batteries need to be replaced. The menu key allows access to different modes such as cleaning, configuration, setting time, and scheduling. Keypad lockout mode and temperature limit features are indicated on the display when activated. The display also shows reminders for changing filters or UV lamps after a programmed time period. The thermostat indicates when it is in hold mode or temporary hold mode, along with the status of the heating or cooling system. Remote temperature sensors can be accessed, both indoor and outdoor, as indicated on the display. The auto schedule key is available for programming the auto schedule function. A call for service message indicates a fault in the heating or cooling systems, not in the thermostat itself. The display provides information on the current programming steps and system configuration settings.
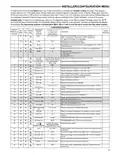
- Page 5: Installer/configuration menu instructions include pressing the menu touch key and holding the installer config touch key for 5 seconds. Screen reference numbers appear in the top right corner of the display. Shaded items are not available if selected for non-programmable. To default the programming, press the and system keys simultaneously. Configuration menu items must match the heat pump system for heat pump systems. Options include selecting between multi-stage, heat pump, or single stage. Settings determine whether the thermostat or furnace controls the blower. System switch configuration varies between non-heat pump and heat pump modes. Adjustable anticipation and cycle rates can be selected for heating and cooling. Temperature display units can be set to Fahrenheit or Celsius.
- Page 6: Installer/configuration menu provides options for system settings. Configuration menu includes various screen references and options. Dual fuel feature can be selected on or off based on system configuration. Setpoints for dual fuel can be adjusted with or without an outdoor sensor. Compressor off delay and auxiliary heat cut out temperature settings are available. Change UV lamp and filter features can be configured with specific durations. The control can be configured for multi-stage or single-stage systems. Cycle rate selection allows for fast or slow cycling modes. Programs can be set for independent days or non-programmable modes. Temperature display adjustment allows for calibration of room temperature readings.
- Page 7: Installer/configuration menu Power stealing switches on (factory default) Backlight option Select daylight saving time calculation – This feature will allow the thermostat to calculate the DST automatically. Select automatic schedule – This feature allows programming a “Comfort Temperature” into all program periods with the Auto Schedule key. Select cool savings™ – Cool savings™ provides an energy saving temperature offset under peak cooling load conditions. Comfort alert with active protection – Turn this feature on to enable active protection. Heat temperature limit range – This feature adjusts the highest setpoint temperature for heat. Cool temperature limit range – This feature adjusts the lowest setpoint temperature for cool. Keypad lockout – This step allows you to select the type of lockout or limited range security required.
- Page 8: Installer/configuration menu Keypad lockout and partial lockout allow only the selected temperature limits to operate. When the outdoor temperature falls below the selected temperature, the gas heat will begin. The dual fuel setting influences when the second stage comes on, with a factory default of 05. The compressor delay is factory set to 60 seconds but can be adjusted from 0 to 99 seconds. Auxiliary off setting inhibits the auxiliary heating stage based on outdoor temperature. The fast cool feature operates the cooling stages similarly to fast heat when the temperature is lowered. Remote temperature sensor enabled allows a remote sensor to display temperature in the clock digits. The dual fuel feature is applicable only in heat pump modes and can be enabled or disabled. The Change UV Lamp feature reminds users to maintain the UV system after a set time of operation. The Change Filter feature reminds users to change or clean the air filter after a specified blower operation time.
- Page 9: Operating your thermostat Caution: Check thermostat operation to prevent compressor and/or property damage. Cooling: Select Cool and adjust the thermostat setting below room temperature to activate the cooling system. Fan operation: Turn on power to the system and adjust the temperature setting to initiate cooling. Caution: Do not allow the compressor to run unless the oil heaters have been operational for 6 hours. Choose the fan setting: Fan Auto runs the fan only when the heating or cooling system is operating. Heating: Select Heat and adjust the thermostat setting to initiate the heating system. Emergency mode: Bypasses the heat pump to use the heat source wired to terminal W/E, W2. Choose the system setting: Options include Cool, Off, Heat, Emergency, and Auto. Manual operation for non-programmable mode: Adjust temperature settings to control heating or cooling. Emergency heating system: Adjust the thermostat setting to activate the emergency heating system.
- Page 10: Operating your thermostat involves understanding the override period, which can range from 15 minutes to 7 days. Manual operation allows you to bypass the program and adjust the temperature as desired. The temporary hold period can be canceled at any time by pressing Run Schedule. To copy a program from one day to another, enter the program for the day or select the day you wish to copy. The display will show Copy next to the SYSTEM key when copying a program. The real-time clock adjusts automatically for daylight saving time, incrementing one hour in March and decrementing in November. You can enable or disable the daylight saving feature in the installer configuration menu. When programming, you may copy the program from one day to another using the Copy key. Press Run Schedule to return to normal operation after programming is complete. The thermostat will run your program once all times and temperatures match your desired heating schedule.
- Page 11: Programming Cooling example: Press Auto Schedule once to select a comfortable cooling temperature. Enter the cooling program by pressing the SYSTEM key until the Cool icon appears. Your thermostat is now programmed for 75° for all cooling time periods. Auto Schedule Cool will program all of the cooling time periods to the same temperature. Note: Auto Schedule is available only when the thermostat is first powered on or after it has been reset. Programmable fan option allows selection of fan operation during a program period. In Heat mode, press Auto Schedule once to select a comfortable daytime temperature. Your thermostat is now programmed for 72° from 6:30 AM until 10:30 PM. Energy saving factory pre-program includes settings for all days of the week. The thermostat comes configured for 7 day programming and can also be configured for 5+1+1 programming.
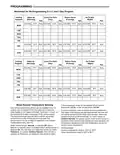
- Page 12: Programming worksheet for reprogramming 5+1+1 and 7 day program. Heating program includes wake up, leave for work, return home, and go to bed settings. Cooling program includes wake up, leave for work, return home, and go to bed settings. Wired remote temperature sensing allows for temperature display from the thermostat or remote sensor. One remote temperature sensor can be installed indoors or outdoors with a maximum cable length of 100 meters. The thermostat must have a 24 VAC common connection for the remote sensor to operate. The remote sensor can be enabled or disabled in the installer/configuration menu. When enabled, the display alternates between time and remote temperature. Indoor and outdoor temperature ranges are specified for the remote sensor. Remote sensor settings include options for indoor or outdoor selection.
- Page 13: Programming Averaging or weighting remote sensors The thermostat will weight or average the temperature of the indoor remote sensor with the local sensor in the thermostat for each program period. The averaging will be active only when the local sensor and the indoor remote sensor are both functional and enabled in the Installer/Configuration menu. When the thermostat is configured for Heat Pump mode and the Dual Fuel feature is selected on, the thermostat can monitor the outside temperature using remote sensor F145-1378 or use software logic to determine when to switch to gas heat and shut down the compressor. The user selectable temperature is called the dual fuel temperature setpoint, dF and is set in the Installer/Configuration menu. A higher temperature or dual fuel setting will provide a smaller stage separation between the heat pump and Aux to give more comfort. In normal operation of the thermostat, the current temperature displayed will be the weighted average of the local sensor and the remote sensor. After the dual fuel temperature setpoint is set, a delay, Cd, can be set for compressor shutdown after the auxiliary stage is energized. Blower balance point for heating Comfort Alert Codes The Comfort Alert diagnostics product monitors the air conditioning outdoor systems with single phase Copeland Scroll compressors.
- Page 14: Troubleshooting Reset operation: If a voltage spike or static discharge causes erratic thermostat operation, reset by removing batteries for 2 minutes. No heat/no cool/no fan: Common problems include a blown fuse, tripped circuit breaker, or loose connections. No heat: Possible causes include an unlit pilot light or a furnace lock-out condition. Diagnostic: Set the system switch to heat and raise the setpoint above room temperature to check thermostat operation. No cool: Similar diagnostic steps as no heat, but set the thermostat to cool and lower the setpoint. Heat, cool, or fan runs constantly: Check for wiring shorts or thermostat issues. Thermostat setting & thermometer disagree: The thermometer can be adjusted +/- 4 degrees. Furnace cycles too fast or too slow: Cycle rate may be influenced by thermostat location or heating system size. Forgot keypad lockout code: Press the menu key for 20 seconds to unlock the thermostat. Blank display or keypad not responding: Use the reset operation to resolve issues.