
VENSTAR Fan Coil Thermostat T2100 / T2150 User Guide


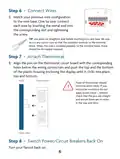




Step 6 - Connect Wires
1) Match your previous wire configuration
to the new base. One by one, connect
each wire by inserting the metal end into
the corresponding slot and tightening
the screw.
TIP: Use pliers to straighten wire before inserting into new base. Be sure
to cut any excess wire so that the insulation extends to the terminal
block. When the wire is installed properly to the terminal block, there
should be no copper exposed.
Step 7 - Attach Thermostat
1) Align the pins on the thermostat circuit board with the corresponding
holes below the wiring connectors and push the top and the bottom
of the plastic housing enclosing the display until it clicks into place,
top and bottom.
Wall
Thermostat
Front of thermostat should
click into place easily. If you
encounter resistance do not
apply excess force – remove,
check that the pins are straight
and ensure there are no wires
in the way and retry.
Side View
Step 8 - Switch Power/Circuit Breakers Back On
Turn your fancoil back on.
6

| General | Details |
|---|---|
| Name | VENSTAR Fan Coil Thermostat T2100 / T2150 User Guide |
| Make | VENSTAR |
| Language | English |
| Filetype | PDF (Download) |
| File size | 0.34 MB |
 (1 votes, average: 5.00 out of 5)
 Loading...


Danfoss DEVIreg 316 Electronic Thermostat Installation Guide

Total Home TTHWD Wired Digital Room Thermostat User Guide

emos P5606OT Programmable Electronic Indoor Thermostat User Manual

ENGO CONTROLS EFAN-24W Fan Coil Thermostat User Guide

HIVE HAH2INSTAMZ-01 Active Heating Thermostat User Guide

VEVOR ET-72G Programmable Thermostat Instruction Manual

GENERAL LIFE Senna 330S RF Wireless Room Thermostat User Manual

Livn 147 Thermostat User Guide

ecoer EST01 Wi-Fi Programmable Thermostat User Guide

Raychem Elexant 450c Thermostat Instruction Manual