ecoer EST01 Wi-Fi Programmable Thermostat User Guide


EST01 Wi-Fi
Programmable Thermostat
Install and User Guide
1. Introduction------------------------------------3
2. Install your Thermostat---------------------5
3. Setup---------------------------------------------7
3.1 Time setting--------------------------------7
3.2 Working mode----------------------------8
3.3 Setup Wi-Fi---------------------------------10
3.4 Schedule set------------------------------13
3.5 User setup----------------------------------16
3.6 Factory set---------------------------------19
3.7 Clean screen-----------------------------28
3.8 Reset-----------------------------------------28
4. Warranty --------------------------------------29
5. Regulatory info.-----------------------------29
Appearance of the product may vary.
Manufacturer reserves the right to change specifications or designs without notice.
07 2022

| General | Details |
|---|---|
| Name | ecoer EST01 Wi-Fi Programmable Thermostat User Guide |
| Make | ecoer |
| Language | English |
| Filetype | PDF (Download) |
| File size | 0.83 MB |


ecoer EST02 Smart Wi-Fi Thermostat User Guide

ecoer EST01 Wi-Fi Programmable Thermostat User Guide Overview
Summary of Contents
- Page 1: Introduction Install your thermostat Setup Time setting Working mode Setup Wi-Fi Schedule set User setup Factory set Warranty
- Page 2: EST Install and User Guide Manufacturer reserves the right to change specifications or designs without notice.
- Page 3: Features Compatible with most 24V controlled heating, cooling, and heat pump systems. Set your temperature remotely from your smartphone. Wi-Fi connectivity through app. 4.3’’ touch screen LCM display. Quick connecting terminals to save installer’s time. Be able to control fan speed of E Series Air Handler for better dehumidification control. 3-year limited warranty. Caution Electrical hazard can cause electrical shock or equipment damage. Disconnect power before beginning installation. Equipment damage hazard: compressor protection is bypassed for Ecoer condensing units. Mercury notice: if this product is replacing a control that contains mercury in a sealed tube, do not place the old control in the trash.
- Page 4: Introduction Parts in the packaging box Screws and anchors Install and user guide EST01 Wi-Fi thermostat Mounting system Stickers Power supply AC 24V Temperature setting range
- Page 5: Thermostat layout includes desired temperature, mode, indoor humidity, and working status. Mode allows selection of system modes: OFF, COOL, AUTO, HEAT, and EM HEAT. Fan options include AUTO, ON, and CIRC for different operational settings. Adjust temperature by touching the + or – icon. The menu button provides access to time settings, working modes, Wi-Fi, schedules, and other settings. The screen will wake up by touching the indoor temperature area. Manufacturer reserves the right to change specifications or designs without notice.
- Page 6: Install your thermostat. Power off the system before removing your old thermostat. Look at the wires going out of the wall and take a photo for reference. Label each wire going into your old thermostat with the provided stickers. The EST01 Wi-Fi thermostat does not work for 120-240V systems. The EST01 Wi-Fi thermostat does not work with millivolt systems. The EST01 Wi-Fi thermostat requires a 24 VAC power supply (C wire). The EST01 Wi-Fi thermostat does not need jumpers because RC and RH are connected already. The EST01 Wi-Fi thermostat does not support universal input (S terminals) for indoor and outdoor sensors. The manufacturer reserves the right to change specifications or designs without notice.
- Page 7: Wiring terminals in mounting system Connection to touch screen Common 24 VAC power (RH and RC are already connected each other - Must Dial to S) Mode changeover First stage of auxiliary heat or emergency heat for heat pump systems Fan for standard mode First stage of cooling or first stage heat pump Second stage of auxiliary heat for heat pump systems Manufacturer reserves the right to change specifications or designs without notice.
- Page 8: Setup Time setting Press Menu at homepage to display DATE TIME. Press Edit to change SETUP YEAR. Use + or - to adjust the year. Press Next for SETUP MONTH, DATE, HOUR, and MINUTE. Press Done to save time setting. Pressing Menu during setting exits without saving. Manufacturer reserves the right to change specifications or designs without notice. 07 2022
- Page 9: Working mode Press Menu at homepage to display DATE TIME, then press Next to WORKING MODE. Press Edit to display HOLD, press SCHEDULE or to switch between HOLD and SCHEDULE. Press Done to save. Note: Press Menu during setting will exit you directly and nothing will be saved. HOLD keeps the desired temperature set all the time. SCHEDULE follows a 7-day plan (4 time periods per day). To activate the scheduling, it's required to choose AUTO at thermostat homepage or on Ecoer Home App control interface. Manufacturer reserves the right to change specifications or designs without notice.
- Page 10: Activate 7-day scheduling by Ecoer Home App. Select mode to auto. Turn on schedule (i.e. choose 'follow schedule'). Manufacturer reserves the right to change specifications or designs without notice.
- Page 11: Setup Wi-Fi Search ‘Ecoer Home' on Google Play or App Store to install the App. Register with your phone number or email, log in App to add device. Press Menu at homepage, the screen will display DATE TIME, press Next twice to SETUP WIFI. Press Edit, the screen displays SMART MODE. Press Done, then Wi-Fi icon will blink 120 seconds on the upper-right corner. You may need to try AP MODE (Wireless Access Point) to connect device if SMART MODE does not work successfully.
- Page 12: Add device on ‘Ecoer Home’ App Press + icon on the upper-right corner of the App. Touch Confirm signal icon is blinking. Connect your smart phone to Wi-Fi (Select 2.4 GHz Wi-Fi and input password). It takes 30 to 60 seconds to complete. Touch Help to troubleshoot if you fail to make it online. The design of Ecoer Home App may be subject to change. Manufacturer reserves the right to change specifications or designs without notice.
- Page 13: Ecoer Home app control interface includes various settings. Users can rename the thermostat and switch the temperature scale. Firmware updates are available through the app. The app displays indoor temperature and humidity levels. Users can set desired temperature and humidity. Modes can be changed, and the fan can be controlled with options for on, auto, or circulating indoor air when AC/HP stops. The app supports 7-day scheduling with four periods per day. Schedule status can be set to ON to follow the schedule or OFF to hold on. The design of the Ecoer Home app may change, and the manufacturer reserves the right to alter specifications or designs without notice.
- Page 14: Schedule set instructions include pressing Menu to access DATE TIME. Navigate to SCHEDULE SET by pressing Next. Use Edit to set a detailed schedule with default desired temperatures for each day. The schedule includes wake, away, home, and sleep times. Desired temperatures for cooling and heating are specified. Press Done to save the schedule. Exiting with Menu during setup will result in unsaved changes. The manufacturer reserves the right to change specifications or designs without notice.
- Page 15: Detailed schedule setting at thermostat Press + or - to choose the group or the day of the week. If the schedules are the same on different days, it will be more convenient to set it by group. Press Next to set from the first period 06:00 of the selected day, press + or - to adjust time. Press Next to set desired COOL temperature by pressing + or - icon. Press Next to set desired HEAT temperature by pressing + or - icon. Press Next to set schedule for other period of the selected day. Continue to set schedule for other day of the week. Press Done to save. Manufacturer reserves the right to change specifications or designs without notice.
- Page 16: Detailed schedule setting via ‘Ecoer Home’ app Click to enter scheduling. Click the period you want to set, then scroll start time, cool temp., and heat temp. Touch “COMPLETE” to save your settings. Manufacturer reserves the right to change specifications or designs without notice.
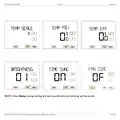
- Page 17: User setup instructions include accessing the menu from the homepage. The user setup interface can be entered by pressing Edit. Temperature scale can be switched between Fahrenheit and Celsius. Temperature adjustment allows compensation for indoor temperature. Temperature efficiency adjusts the difference between indoor temperature and desired temperature for cooling or heating. Brightness settings include options for screen display during sleep mode. Time synchronization can be enabled or disabled when connected to Wi-Fi. The fan circulation function can be set to different durations or turned off. Manufacturer reserves the right to change specifications or designs without notice. Document version is noted as July 2022.
- Page 18: - Pressing Menu during setting will exit you directly and nothing will be saved. - Manufacturer reserves the right to change specifications or designs without notice.
- Page 19: FAN CIRC setting by Ecoer Home App The app can set FAN CIRC when the mode is off. FAN CIRC circulates indoor air when the air conditioner or heat pump stops for a long period. Manufacturer reserves the right to change specifications or designs without notice.
- Page 20: Factory set (professional only) Press Menu at homepage to display date time, then press Next until you see factory set. Press Edit to display system type. Press + or - to set. Press Next to set comp protect, EM heat mode, change over, etc. as required. Reversing valve O (default) / B signal. Delay 0 (default) ~ 10min to start the compressor. Enable or disable auto mode. Target humidity for two-stage fan control. Press Done to save the setting. Manufacturer reserves the right to change specifications or designs without notice.
- Page 21: System types list Descriptions Application Required terminals Cool only Furnace Boiler Heat only Heat only (2 stage) Manufacturer reserves the right to change specifications or designs without notice.
- Page 22: Ecoer variable speed air conditioner matches with fan coil. Ecoer variable speed air conditioner matches with gas or oil furnace. Manufacturer reserves the right to change specifications or designs without notice.
- Page 23: Ecoer variable speed heat pump matches with fan coil. Ecoer variable speed heat pump matches with furnace or boiler. Manufacturer reserves the right to change specifications or designs without notice.
- Page 24: EST Install and User Guide Ecoer variable speed heat pump matches with fan coil. Manufacturer reserves the right to change specifications or designs without notice.
- Page 25: Type 9 1H/2C with two-stage fan control in cooling. Ecoer variable speed heat pump matches with E Series air handler. Manufacturer reserves the right to change specifications or designs without notice.
- Page 26: EST Install and User Guide Ecoer variable speed heat pump matches with fan coil for 2 stage heating. Manufacturer reserves the right to change specifications or designs without notice.
- Page 27: Type 11 2H/2C - 4H/2C with two-stage fan control in cooling Ecoer variable speed heat pump matches with E series air handler and electric heat (Dual-fuel). Manufacturer reserves the right to change specifications or designs without notice.
- Page 28: Type 12/13 Cool only with two-stage fan control (G/ DH [G2]) AC only (including Ecoer variable speed AC) matches with E Series air handler Type 12 Optional Must set “COMP PROTECT” to “3” or higher for other brand AC Wiring between W terminal of EST01 to Air Handler W1 must be connected Manufacturer reserves the right to change specifications or designs without notice 07 2022
- Page 29: Clean screen instructions include pressing Menu and navigating to CLEAN SCREEN. Users can clean the screen for 30 seconds without changing settings by pressing Done. Reset instructions involve accessing the RESET option through the Menu. Pressing Done after selecting RESET allows entry into the reset process. Users can reset the thermostat to factory default settings by selecting ON and pressing Done. The manufacturer reserves the right to change specifications or designs without notice. The document includes a date reference of July 2022.
- Page 30: Warranty information outlines a three-year coverage against defects in materials or workmanship under normal use and maintenance. If the product is defective during the warranty period, Ecoer will repair or replace it at their option. Consumers should contact Ecoer Support for assistance with defective products. Warranty claims should be filed through Ecoer’s website by the distributor or dealer. The warranty does not cover removal or reinstallation costs. The warranty is void if the defect is caused by damage while in the consumer's possession. The device conforms to FCC Rules and Regulations under Part 15 Subpart B. Operation of the device is subject to conditions regarding harmful interference. Changes or modifications not approved by the responsible party may void user authority to operate the equipment. The manufacturer reserves the right to change specifications or designs without notice.
- Page 31: - EST Install and User Guide - Manufacturer reserves the right to change specifications or designs without notice.
- Page 32: EST Install and User Guide Manufacturer reserves the right to change specifications or designs without notice.

ASA Electronics ACTH12 Digital LCD Thermostat Instruction Manual

STELPRO ST302P Programmable Electronic Thermostat Owner’s Manual

EMOS P5601UF Floor Heating Thermostat User Manual

BEOK CONTROLS BOT-R6W Gas Boiler Thermostat Instruction Manual

ENGO CONTROLS FAN-24W 24V Fan Coil Thermostat User Guide

Honeywell L641 Surface Contact Thermostat Instructions

STELPRO ST252NPFF Non-Programmable Electronic Thermostat for Fan Heaters Owner’s Manual

GENERAL HT220S Digital Room Thermostat User Manual

URC Support TIDE DIAL Smart Thermostat User Guide

SALUS CONTROLS IT700 Smart Thermostat Instruction Manual