Home > Nest > nest B08K2M13NY Thermostat E Smart Thermostat Installation Guide

nest B08K2M13NY Thermostat E Smart Thermostat Installation Guide

Thermostat E  
Installation Guide  
GeneralDetails
Namenest B08K2M13NY Thermostat E Smart Thermostat Installation Guide
MakeNest
LanguageEnglish
FiletypePDF (Download)
File size0.19 MB
Download PDF
1 Star2 Stars3 Stars4 Stars5 Stars (1 votes, average: 5.00 out of 5)
Loading...
Google Nest Learning Thermostat (4th gen) Installation Guide

nest B08K2M13NY Thermostat E Smart Thermostat Installation Guide
Get the free PDF manual for the nest B08K2M13NY Thermostat E Smart Thermostat Installation Guide and access setup steps, usage instructions, and troubleshooting tips. 👉 View online or download now to keep your thermostat running smoothly!
nest B08K2M13NY Thermostat E Smart Thermostat Installation Guide Overview
Summary of Contents

  • Page 1: Thermostat E Installation guide
  • Page 2: We take your privacy seriously. We’re committed to being open and honest about how we use data. We’ll always ask for permission before sharing personally identifiable information. We keep your data safe with industry standard security tools. To learn more about our Privacy Policy, go to nest.com/privacy.
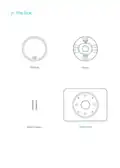
  • Page 3: In the box Display Base Wall screws Trim plate
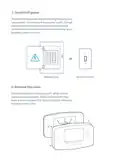
  • Page 4: Switch off power. This protects you and avoids blowing a fuse in your equipment. To make sure the power is off, change the temperature with your current thermostat and wait at least five minutes to be sure that your system doesn’t turn on. Remove the cover. Some thermostat covers pop off, while others need to be unscrewed. Older thermostats may have a second plate that should also be removed to expose the wires.
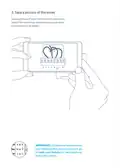
  • Page 5: Take a picture of your thermostat’s wires and save it for reference. Make sure you can read the wire terminal labels. If there are two labels on your thermostat’s wire connectors, go to nest.com/labels for detailed help and instructions.
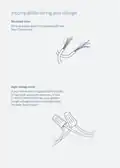
  • Page 6: Incompatible wiring and voltage Stranded wires aren’t compatible with the Nest Thermostat. If your thermostat is labeled 120V or 240V, it is high voltage and isn’t compatible with the Nest Thermostat. Your system has thick wires with wire nuts or L1 and L2 terminal blocks, indicating high voltage compatibility issues.
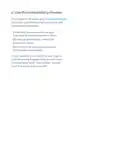
  • Page 7: Use the compatibility checker. Go to nest.com/works and enter your thermostat’s wires into the compatibility checker. Enter only the connectors on your thermostat that have wires in them. Do not use wire colors – enter the connector labels. Do not enter any jumper wires into the checker. If your system is compatible, you’ll get a custom wiring diagram. You will need the wiring diagram to install your Nest Thermostat. You can print it or email it to yourself.
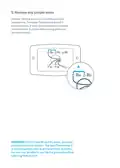
  • Page 8: Label the wires. Peel off the labels below and attach them to the thermostat’s matching wires. If you have an Rc or Rh wire, put the R label on it. Wire colors can vary, but common or C wires are generally blue. If there’s an orange wire in the connector labeled both W and O/B, then you likely have a heat pump. If there’s a white wire in the connector labeled both W and O/B, then you probably don’t have a heat pump. Put the orange wire in the Nest Thermostat’s O/B connector. Put the white wire in the Nest Thermostat’s W connector. If you’re unsure about wiring your thermostat, go to nest.com/install to contact a Nest Pro in your area.
  • Page 9: Disconnect wires and remove the base. After removing the thermostat base, gently wrap the wires around a pen or pencil so they don’t fall back into the hole in the wall. Remember, the power to your HVAC system must be off to avoid blowing a fuse in your equipment. Mark where screws will go. Use the built-in bubble level to make sure the base is level.
  • Page 10: Use the included trim plate if needed. You can use the optional trim plate to cover holes or marks left by your old thermostat. Snap the thermostat base and trim plate together, then screw the plate to the wall. If you have an electrical box, you’ll need to purchase a steel plate and screws for installation. Secure the steel plate to the electrical box with two screws. Use the other two screws to attach the Nest base and trim plate.
  • Page 11: Install the Nest base. Pull the wires through the center of the base. Attach it to the wall with the screws.
  • Page 12: Connect wires using the wiring diagram from the compatibility checker. The exposed wire should be straight. If you have an R, Rc or Rh wire, you can put it into the R connector on the Nest Thermostat. If you have a W2, Y2 or O/B wire, you can put it into the O/B connector if needed. Gently tug each wire to check they’re secure. Make sure each connector that has a wire stays down. After all the wires are securely connected, push them down to make sure they’re flush with the base.
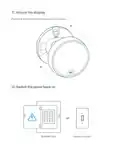
  • Page 13: Attach the display by pushing it onto the base until it clicks. Switch the power back on.
  • Page 14: Setup involves turning on the Nest Thermostat and walking through the setup process. You can select a language and connect to Wi-Fi. The thermostat will ask for information about your home and system to help save energy. The Nest Thermostat does not have a touchscreen; you can select options by turning the display and pressing it down. You can control the thermostat with the free Nest app available for download. The app allows you to manage your thermostat from your phone. You will receive a monthly Home Report showing your energy use. The app can be found on Google Play or the App Store, or accessed via home.nest.com if you don't have a phone.
  • Page 15: Add your thermostat to your account. If you’re new to Nest, tap the plus sign on the app home screen, then select Nest Thermostat. If you already have Nest products in your account, tap the Settings icon, then select thermostat. The app will show you how to add your thermostat to your Nest Account. Your thermostat can automatically start learning your schedule, or you can choose a schedule with preset times and temperatures. You can edit your schedule at any time. For help getting started, learning about Nest Thermostat features, energy saving tips and more, go to nest.com/thermostatbasics.
  • Page 16: This limited warranty contains important information about your rights and obligations, as well as limitations and exclusions that may apply to you. Nest Labs, Inc. warrants to the owner of the enclosed product that it will be free from defects in materials and workmanship for a period of one year from the date of delivery. If a Nest Pro sells and installs the product, an additional two years of coverage may apply, resulting in a total warranty period of three years. Nest Labs will either repair or replace any defective product or component, or accept the return of the product and refund the original purchase price. Repair or replacement may be made with a new or refurbished product at Nest Labs' discretion. This limited warranty is transferable from the original purchaser to subsequent owners, but the warranty period will not be extended. If you are not satisfied with the product, you may return it in its original condition within thirty days for a full refund. To claim under this limited warranty, the owner must notify Nest Labs of the intention to claim during the warranty period. The owner must provide a description of the alleged failure and comply with Nest Labs' return shipping instructions. Nest Labs will have no warranty obligations if it determines that the product is an ineligible product after examination.
  • Page 17: Labs will bear all costs of return shipping to owner and will reimburse any shipping costs incurred by the owner, except with respect to any ineligible product. All product information is provided for your convenience, as is, and as available. Nest Labs does not represent, warrant, or guarantee that product information will be available, accurate, or reliable. This limited warranty does not cover ineligible products, including those marked as sample or Not for Sale. The warranty does not cover products that have been subjected to modifications, improper maintenance, or misuse. Nest Labs recommends using only authorized service providers for maintenance or repair. Product information provided by the services is not intended as a substitute for direct means of obtaining information. This limited warranty gives you specific legal rights, which may vary by state, province, or jurisdiction. Nest Labs disclaims all express, implied, and statutory warranties and conditions with respect to the product. In no event will Nest Labs be liable for any consequential, incidental, exemplary, or special damages related to this limited warranty or the product.