
VIMAR 02913 Surface LTE Thermostat Installation Guide


SMART CLIMA
02913 - LTE thermostat
Electronic LTE thermostat for local control and advanced remote temperature management
via View App, heating and air conditioning in ON/OFF and PID mode, class I temperature
control device (contribution 1%) in ON/OFF mode, class IV (contribution 2%) in PID mode,
configuration via View App on standard Bluetooth technology, 1 additional output and 1
digital input, 1 relay output 5(2) A 240 V~, power supply 100-240 V~ 50/60 Hz, white LED
backlighting, surface mounting, white.
• Consumption at 240 V~:
- brightness L1 (low) and relay OFF 0.5 W
- brightness L3 (high) and relay ON 1 W
• Bluetooth technology:
- RF transmission power: < 100 mW (20 dBm)
- Frequency range: 2400-2483.5 MHz
• Transmission bands:
- B1 (2100MHz)
Download the View
App from the stores onto the tablet/smartphone you will be
- B3 (1800MHz)
- B7 (2600MHz)
using for configuration.
- B8 (900MHz)
- B20 (800MHz)
You will also need:
• Terminals:
Amazon Alexa, Google Assistant voice assistants for possible voice operation
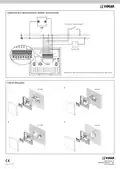
- 2 (L and N) for line and neutral
- 2 for digital input 120 - 240 V~ for alarm signalling (for instance boiler shutdown)
Maximum length of the 30 m contact connection cable
- 2 (NO-C) for relay output with voltage-free contact: 5(2) A 240 V~
- 2 for output 100 mA 120 - 230 V~ to control an auxiliary relay (for instance to switch a boiler
or a light on/off)
CONFIGURATION IN
1.Create your Administrator or Installer account on MyVimar (on-line).
2.Wire the thermostat.
3.Start the View App and log in with the credentials you just created.
4.To associate the thermostat:
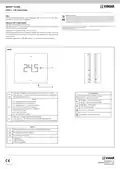
• 2 front buttons with rocking action for control and settings.
• 1 button (positioned at the bottom) for configuration and reset.
• Side LEDs:
• In the event of new systems, select “Create smart system” and give it a name. Select the
smart system you just created “Customise” “Smart devices” “Add a device”
“VIMAR Smart Thermostat” “Start”
- 2 on the left for signalling Cloud connection and LTE network connection
- 3 on the right for signalling ON/OFF, relay state and auxiliary output state
• White LED display for displaying temperature, set point and configuration state signalling.
• Current settable setpoint: 4 °C ÷ 40 °C.
• Temp. measurement precision (integrated probe): 0.5°C between +15°C and 30°C, 0.8°C at
the extremes
• In the case of an existing system, select the smart system “Customise” “Smart devices”
“Add a device” “VIMAR Smart Thermostat” “Start”
• Press button B for 5 s; activate the Bluetooth connection on your tablet/smartphone and
approach the thermostat
• Select “Proceed” and enter the APN of your phone operator following the instructions pro-
vided by the wizard
• For use for Heating/Air Conditioning (winter/summer).
• Operating modes: Automatic, Manual, Reduction, Absence, Protection, Off, Timed Manual.
• Temperature control algorithms: configurable PID or ON/OFF.
• Operating temperature: T40 (0 °C ÷ +40 °C) (indoor use).
• Protection degree: IP20.
Main APN
TIM
ibox.tim.it
web.omnitel.it
internet.it
iliad
Vodafone
Wind3
Iliad
• ErP classification (EU Reg. 811/2013): - ON/OFF: class I, contribution 1%. - PID: class IV,
contribution 2%.
• Device in class II
• Number of manual cycles: 3,000
• Number of automatic cycles: 100,000
• Type of contact opening: micro-disconnection
• Type of action: 1.C
• Name the thermostat and the actuator of the auxiliary output and then set the time zone
• Go to the “Smart Devices” section and set the thermostat parameters
• Tracking index: PTI175
For details please refer to the manual entitled “Programming thermostats 02912-02913”
• Degree of pollution: 2
• Rated pulse voltage: 4000 V
OPERATION WITHOUT CONFIGURATION VIA APP.
If configuration is not done via the View App, the thermostat is designed to accommodate
operation in manual mode.
• Software class: A
• Reading resolution: 0.1 °C
• Settings resolution: 0.1 °C from App and 0.5 °C from device
• Update of temperature displayed: every 10 s
• Room temperature display: 0 °C +40 °C
• Hysteresis adjustable via App: from 0.1 °C to 1 °C
• Hourly temperature setting (via App)
RESETTING THE THERMOSTAT
The reset restores the factory settings. Within the first 5 minutes within which it is powered, press
button B for 30 s.
• Room temperature during transportation: -25 °C +60 °C
• Clock error: ≤ 1 s per day
INSTALLATION RULES.
• Installation and configuration must be carried out by qualified persons in compliance with the
current regulations regarding the installation of electrical equipment in the country where the
products are installed.
• Configuration via View App using Bluetooth technology
• Controllable via View App, Amazon Alexa and Google Assistant voice assistants.
• Dimensions: 106 x 118 x 23.5 mm.
• The C-NO contact of the relay must be protected against overloads by installing a device, fuse
or automatic 1-way switch, with a rated current not exceeding 10 A.
OPERATION.
• Do not connect a SELV circuit to the NO-C, IN-N and L-1 (auxiliary output) terminals as there
is no double insulation compared to the L-N terminals.
Using the View App, making use of the Internet connection the following can be set:
• Time schedules (times and temperature levels T1, T2 and T3)
• The device must be installed at a height of 1.5 m above floor level, in a suitable position for the
correct detection of the room temperature, avoiding installation in recesses, behind doors and
curtains, areas affected by heat sources or subject to the flow of forced heating/cooling venti-
lation sources or affected by atmospheric factors. Avoid in particular installation on perimeter
walls or in association with devices which generate heat (e.g. dimmers or lamps).
• Setpoint for all operating modes (Manual, Reduction, Absence, Protection). The operating
mode can be changed from the View App after one ON/OFF cycle
• Manual operation time: between 1 min and 23 hours (with 1-min steps); default = 60 min
• Lighting in standby: high, medium, low, off with default = medium
• Temperature calibration for heating: between -5°C and +5°C with default = 0°C
• Temperature calibration for air conditioning: between -5°C and +5°C with default = 0°C
• Relay output status: normally open, normally closed; default = normally open
• Auxiliary output state: ON/OFF, timed.
IMPORTANT WARNINGS
• The LTE connection varies depending on the phone operator; check in advance the one in
your area which guarantees best coverage and purchase the corresponding SIM card.
• We recommend you use a SIM card with a data contract with traffic of at least 50 MB/
month.
• Control type: On/Off, PID; default = On/Off
• Hysteresis for On/Off control: between 0.1°C and 1°C; default = 0.2°C
• Proportional band for PID control: between 0.5°C and 5°C; default = 3°C
• Integrative time for PID control: between 5 min and 120 min; default = 20 min
• Derivative time for PID control: between 0 and 255 s, disabled; default = 0
• Cycle time for PID control: between 10 min and 30 min; default = 10 min
• Before inserting the SIM card in the thermostat, disable the PIN code prompt.
To do this, insert the SIM card in your smartphone and follow the instructions provided to
disable the PIN.
CHARACTERISTICS.
• Rated supply voltage: 100-240 V~, 50/60 Hz.
In the event of a power outage, once the power is restored, the thermostat restarts with the
operating mode prior to the outage. If the mode set was “Automatic” the thermostat will restart
in “Manual” mode and the first time it reconnects to the Cloud, it will synchronise the time/date
again and then switch to “Automatic” mode.
• Consumption at 100 V~:
- brightness L1 (low) and relay OFF 0.3 W
- brightness L3 (high) and relay ON 0.85 W
Viale Vicenza 14
36063 Marostica VI - Italy
02913 03 2206


| General | Details |
|---|---|
| Name | VIMAR 02913 Surface LTE Thermostat Installation Guide |
| Make | VIMAR |
| Language | English |
| Filetype | PDF (Download) |
| File size | 0.5 MB |
 (1 votes, average: 5.00 out of 5)
 Loading...

VIMAR 30810.x-02973 Smart Home View Wireless Connected Dial Thermostat Instruction Manual

VIMAR 02912 Wi-Fi Thermostat Instruction Manual

VIMAR 02952 Well-Contact Plus Electronic Touchscreen Thermostat Instruction Manual

VIMAR 01910 Electronic Timer Thermostat Instruction Manual

VIMAR 02971 Smart Automation Rotary Dial Thermostat Instruction Manual

VIMAR 30810.G View Wireless Connected Dial Thermostat Instruction Manual

VIMAR 02970 Wheel Thermostat Instruction Manual

Vimar 02913 LTE Manual: Questions and Answers
What does the white LED display on the Vimar 02913 LTE show?
Temperature, set point, and configuration state signalling. Installation Guide, p. 1
Can the Vimar 02913 work without configuration through the View App?
Yes, it's designed to operate in manual mode without View App configuration. Installation Guide, p. 1
What do the 2 front buttons on the Vimar 02913 LTE do?
They have rocking action for control and settings adjustment. Installation Guide, p. 1
What's the difference between ON/OFF and PID control modes on Vimar 02913?
ON/OFF uses hysteresis between 0.1°C and 1°C; PID uses proportional band between 0.5°C and 5°C with integrative and derivative times.
| Mode | Key Parameter |
|---|---|
| ON/OFF | Hysteresis: 0.1-1°C (default 0.2°C) |
| PID | Proportional band: 0.5-5°C (default 3°C) |
More Vimar thermostat manuals

bandary FC660 Smart Thermostat User Guide

Danfoss TPOne-B Electronic Programmable Room Thermostat User Guide

beok-controls TOL47 Series Thermostat User Guide

EPH CONTROLS CDTP2 Room Thermostat Instruction Manual

MI-HEAT MST1 Room Thermostat for Underfloor Heating User Manual

Beca BHT-9000 Smart Knob Thermostat User Guide

NT NetX X5 IP Ethernet Thermostat Instruction Manual

ELDOM NHC-RHN-WiFi Electronic Thermostat User Manual

GENERAL LIFE Senna 270S RF Wireless Room Thermostat User Manual

GREYSTONE TLDF Series Flexible Cable Duct Average Low Limit Thermostat Instruction Manual