
Micro-Air EasyTouch RV 353 Touch Screen Thermostat Instruction Manual







Dip Switches
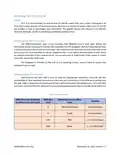
This setting is used to configure your thermostat’s operational settings and is slightly
different for each EasyTouch RV model. Some simply display how the air conditioner
control board is configured that EasyTouch RV communicates with. Others allow for
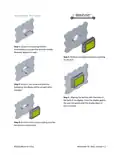
telling EasyTouch RV what appliances it has connected to it. Tap the Switches button to
what must be configured, if any. Micro-Air cannot assist with manipulating and adding
more appliances to your system.
Switches Button
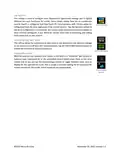
Auto-Generator Start (AGS)
This setting allows for a generator to start prior to any appliances that need line voltage
to run, then turns it off when the cycle completes. Tap the AGS Enable button to green to
enable this behavior or to gray to disable it.
AGS Enable Button
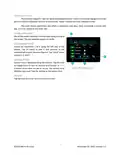
Furnace/Aqua Icons
Most RV systems have auxiliary heat modes in the form of a “forced-air” gas furnace or
hydronic heat. EasyTouch RV or the associated control board treats these as the same
output and so you can tap the Furnace/Aqua button to toggle between what icons to
display for this operational mode. This is simply a cosmetic setting for all EasyTouch RV
models except the 350 model, which should be set appropriately.
Furnace/Aqua
Button
15
©2022 Micro-Air Corp
November 22, 2022, revision 1.2

| General | Details |
|---|---|
| Name | Micro-Air EasyTouch RV 353 Touch Screen Thermostat Instruction Manual |
| Make | Micro-Air |
| Language | English |
| Filetype | PDF (Download) |
| File size | 0.42 MB |
 (1 votes, average: 5.00 out of 5)
 Loading...

micro-air EasyTouch 357 Multi Zone Replacement Thermostat Instruction Manual

Micro-Air 359 Touchscreen Thermostat Instruction Manual

Micro-Air EasyTouch RV 353 Thermostat Instruction Manual

micro-Air EasyTouch RV 351 Thermostat User Manual

Micro Air ETRV EasyTouch RV Thermostat Instruction Manual

micro-air EasyTouch RV 356 True Air RV Thermostat User Manual

micro-Air ASY-357-X02 EasyTouch 357 Touchscreen Thermostat User Manual

micro-Air EasyTouch 352 Thermostat User Manual

Micro-Air EasyTouch 355 Touch Screen Thermostat User Manual

Micro-Air 351 Air Conditioner Digital Thermostat User Guide


EPH CONTROLS RFRP-HW-OT Wireless Cylinder Thermostat Installation Guide

Milesight WT201 Airteq Smart Thermostat User Guide

FRICO TPT16, TPT16WF Thermostat Instruction Manual

AIRZONE AZX6AIQSNSB-AZX6AC1VALR Think Wireless Monochrome Thermostat User Manual

DEVI 140F1143 Electronic Intelligent Timer Thermostat Installation Guide

EMERSON 1D56-310 White-Rodgers Low Voltage Horizontal Mounting Thermostat Instruction Manual

tado Wired and Wireless Smart Thermostat User Guide

Beca BHT-002 Electric Heating Wifi Thermostat User Guide

UNDERFLOOR HEATING WORLD UT5 Touch Screen Thermostat Instruction Manual

Beca BAC-9000 Smart Knob Thermostat User Guide