
Beca BAC-9000 Smart Knob Thermostat User Guide
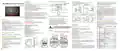


FEATURES
HOME SCREEN QUICK REFERENCE
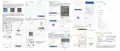
INSTALLATION
In the same way, complete the settings of periods2, 3, 4,5and 6.
Press the icon “ ” once more to enter the Saturday schedule
settings (you will see the SAT of the screen).Repeat the above process
to set the period and temp. and Sunday schedule.
Press the icon “ ” once more to confirm and exit.
Your thermostat is suitable for installation within a standard 86mm
pattress box or European 60mm pattress box.
On Appearance
Wifi(Blinks when
Lock
connected to wifi)
Weather
BAC-9000 Smart Knob Thermostat
1. LED display, more friendly interface;. LED matrix light, simple display, energy
saving, protect your eyes.
2. Touch buttons to make simple operation.
3. The ultra-thin embedded panel perfectly fits all kinds of walls; The visiable
thickenss above the wall is only 12.4mm.
Step 1: Separate the upper and
lower boards
Step 2: Connect the power cord
and device cord
Time
Energysaving
Fan speed
User Guide
Room Temp.
Default settings for program schedule
MON.-FRI.
(①②③④⑤ shows on
SAT.
SUN.
4. Frameless acrylic panel design, simple and elegant;
5. Classic black/white color scheme, seamlessly integrated.
6. Compatible with standard 86mm square cassettes and 60mm European
cassettes to meet all installation environments;
Time
display
Period
(⑥shows on scteen)
(⑦shows on scteen)
Week
scteen)
TIME
TEMP.
20
ON TIME
6:00~8:00
TEMP.
20
ON TIME
6:00~8:00
TEMP.
20
Programmable
Manual
Set Temp.
Period 1
6:00~8:00
7. Interlock to connect gives you easy installation.
Period 2 8:00~11:30
Period 3 11:30~13:00
Period 4 13:30~17:00
Period 5 17:00~22:00
Period 6 22:00~6:00
15
8:00~11:30
11:30~13:00
13:30~17:00
17:00~22:00
22:00~6:00
20
8:00~11:30
11:30~13:00
13:30~17:00
17:00~22:00
22:00~6:00
20
On Functionality
15
20
20
Mode
Fan speed
1. Rich function options, Modbus, WIFI, keycard, etc, to meet all your needs;
2. Strict temperature control accuracy (± 1°C) to provide the warmth you want;
3. Power off protection, save all your settings safely;
4. Preset adjustment of 5+1+1 mode in a week, programmable setting of 6 time
periods a day, green energy saving, Less cost, more intelligent and
environmental protection;
5. Support the creation of product local groups/shares to achieve unlimited
centralized control of the number of products/ multi-terminal control;
6. Perfect access: Tmall Genie, Amazon echo, Google Home, full experience new
voice control method;
15
20
20
22
20
20
Step 3: Fix the screws on t
he cassette
Step 4: Fasten the panel to Step 5: Fix the screws
the mounting plate on the cassette
15
15
15
Power On/off
A separate schedule may be set for weekdays (Mon – Fri) and for
weekends (Sat or Sun).
Note: The weather will be synchronized within 1 hour after the device is connected to
the Internet for the first time, and the weather will be synchronized every hour thereafter.
WiFi type
8. Locking your Thermostat
Press and hold the“
your thermostat.
”and“ ”for 5 seconds to lock/unlock
BEFORE WIRING AND INSTALL
In tem 3 of high senior options, you can select full lock or half lock.
1. Read these instructions carefully. Failure to follow them could
damage the product or cause a hazardous condition.
2. Check the rathings given in the instructions and on the product to
make sure the product is suitable for your application.
3. Installer must be a trained, experienced service technician.
4. After installation is complete, check out product operation as
provided in these instructions.
Welcome
Please confirm that this product is suitable for your heating
equipment before installation;
*Before installation or maintenance, please make sure to keep the power off;
*Please strictly follow the wiring diagram for wiring installation;
*Installation to the wall, please confirm that the fasteners are suitable for
this product;
*Do not pull the cable too hard, otherwise the product will be damaged;
*If a hard plastic wire is used in the installation process, it must be bent to
an appropriate angle in advance;
*Please arrange for professionals to install;
*Please contact the after-sales service for equipment failure, please do not
try to repair it yourself;
TECHNICAL DATA
Setting the Functions and Options
Power Supply: 95 ~240 VAC, 50~60Hz or 24V DC/AC,50~60Hz
Please check the information laser printed on the back of the
thermostat for the actual voltage.
When the power is off, press "
" and " " at the same time for
5 seconds to enter the advanced selection setting. Press "
" to
select the function, Rotate the power knob to adjust the corresponding
value. All advanced option settings will take effect automatically after
restarting the thermostat.
OPERATION
Fan Relay Amps Resistance: 5A; Inductive: 3A
Valve Relay Amps Resistance: 3A; Inductive: 1A
Sensor: NTC3950, 10K
During Power On
Code
Function
Setting and options
Default
Electrical Shock or Equipment Damage Hazard.
1.Power On/Off: Press the knob to turn the thermostat on/off.
Set Temp. Range: 5 -45 ℃
Temperature
compensation
CAUTION DCaisncoshnoncekcitnpdoivwideurasluspoprlyshboerftoerequinipstmalelanttiocinr.cuitry.
1
-9 to 9 ℃
-3
Accuracy: ±1 ℃
2.Selecting System Mode
Dispaly Temp. Range: 5 ~ 99℃
0:When room temp. reaches the set point,the
fan will turn off
Press“ ”to change the system mode HEATING, COOLING
and VENTILATION. In the mode of VENTILATION, the valve is off
but the fan runs.
Ambient Temp.:0~45 ℃
* After installation, please refer to this manual to check again to ensure
normal and safe use, and keep this manual properly.
2
Fan control
1:When room temp. reaches the set point,
the fan will keep low speed running(Only in
auto fan mode)
00
Ambient Humidity: 5 ~ 95 % RH (Non Condensing)
Storage Temp.:-5~ 45 CTiming Error: < 1%
Power Consumption: <1.5W
WIRING
3.Manual & Programmable
Touch and hold“ ”3 sec.,“
rotate the power knob to the left to switch to programming mode "
and to the right to switch to manual mode " ".
4.Setting Temperature
In the manual mode, set temperature can be set by rotate the power knob.
5.Setting the Fan Speed
Press “ ”go to select the fan speed AUTO, HIGH, MED, LOW
Please check the information laser printed on
the back of the thermostat for the actual voltage.
” icon will flash on the display,
Shell Material: PC +ABS ( Fireproof)
Installation Box: 86 * 86mm Square or European 60mm Round Box
Wire Terminals: Wire 2 X 1.5 mm² or 1 x2.5 mm²
Protection Class: IP20
0:All buttons are locked except power button.
1:All buttons are locked.
"
3
4
Button Locking
1
In the box you will find
0:Cooling / Ventilation.
1:Cooling / Heating / Ventilation.
Thermostat 1pc
Screws
2pc
User Guide 1pc
Mode Select Custom
01
QC Passed 1pc
Floor Sensor 1pc (Floor Sensor is Optional)
Buttons: Capactive Touch Buttons
5
6
Min.Set Temp.
Max.Set Temp.
5-15℃
5
15-45℃
35
(Unit:mm)
DIMENSION
ABOUT YOUR THERMOSTATS
BAC-9000 Smart Knob Thermostat are designed to on / off control FCU
the fans and valves in air conditioner applications via comparison of
the room temperature and setting temp. As reaching the aim of
comfort and saving energy.
6. Adjusting/Setting the Clock
Note: The wifi version will automatically synchronize the local time after
connecting to the Internet.
0:Energy saving Mode
1:Non-energy saving Mode
51.1
42.5
13.1
60.0±1.5
7
8
9
Energy-saving Mode
00
26
30
Cooling Energy-
saving temperature
88.0
46.0
10-30℃
Heating Energy-
saving temperature
Touch and hold“ ”3 sec.,“
” icon will flash on the display,
10-30℃
Press "
", the hour of the clock will flash, rotate the power to set the value,
" button again, and rotate the power button to complete the
press the "
MODEL DEFINTION
10
11
Deadzone Temp.
1-5℃
1
0
setting of minutes and week.
A: Two pipe; Control Fan Coil Unit and Two Wired Motorized Valve
M: Two pipe; Control Fan Coil Unit and 0-10V Motorized Valve
E: Four pipe; Control Fan Coil Unit and Two Wired Heat Valve and
Two Wired Cool Valve.
℃/℉
0:℃ 1:℉
49.0
130.0
+3
92.0+0
00: No factory reset
01: Factory reset
50.0
-10 58.5-0
7.Adjusting/Setting the Programmable Schedules
WiFi version can be set in APP.
Non-wifi version, Touch and hold“
the display, Touch “ ” 4 times to enter the the programming mode setting.
At this time, the screen displays (①②③④⑤), the "minute" of the time flashes,
and the period 1 " ". Press " " again to select and set the hour, temperature,
and period. Rotate the power knob to adjust the corresponding value.
12
13
Reset
0
Standby screen
brightness
”,“
” icon will flash on
4-99
20
L:Backlight
Ø24.0
N: Modbus RTU communication
0:on
1:off
14
15
Backlight standby
Version number
0
W : Wifi connection
Example: BAC-9000 ALW
U1


| General | Details |
|---|---|
| Name | Beca BAC-9000 Smart Knob Thermostat User Guide |
| Make | BECA |
| Language | English |
| Filetype | PDF (Download) |
| File size | 1.49 MB |
 (1 votes, average: 5.00 out of 5)
 Loading...

Beca BHT-9000 Thermostat User Guide

beca BAC-005 Series Thermostat User Guide

Beca BHT-6000 Series Round Thermostat User Guide

Beca BAC-1000 Series WiFi Thermostat User Guide

Beca BHT-002 Electric Heating Wifi Thermostat User Guide

Beca BHT-008 Heating Thermostat User Guide

Beca BHT-7000 Smart Knob Thermostat User Manual

Beca BAC-006 Zigbee Thermostat User Guide

Beca BHT-006 Series Thermostat User Manual

Beca BHP-8000 C Room Thermostat User Guide

BECA BAC-9000 Manual: Questions and Answers
BECA BAC-9000 specifications
| Setpoint range | 5 -45 ℃ |
| IP rating | IP20 |
| Power consumption | <1.5W |
What do the buttons on the BECA BAC-9000 control?
Capacitive touch buttons let you change system mode, select fan speed, adjust temperature, and enter programming or clock settings. User Guide, p. 1
What do the icons on the BECA BAC-9000 screen represent?
| Icon or Display Element | Meaning |
|---|---|
| Lock | Thermostat is locked |
| WiFi (blinking) | Connected to WiFi |
| Time | Current time display |
| Weather | Weather information synchronized |
| Energy saving | Energy-saving mode active |
| Fan speed | Current fan setting shown |
What is the difference between manual mode and programming mode?
Manual mode lets you set temperature by rotating the knob. Programming mode stores up to 6 time periods daily with different temperatures for each period. User Guide, p. 1
BECA BAC-9000 compared with other BECA thermostats
| Specification | BECA BAC-9000 | BECA BAC-7000 | BECA BHP-8000 C |
|---|---|---|---|
| Setpoint range | 5 -45 ℃ | 5 -35 ℃ | 42-122 ℉ (5~50℃) |
| IP rating | IP20 | IP20 | IP20 |
| Power consumption | <1.5W | <1.5W | <1.5W |
More BECA thermostat manuals

ST76 Sensi Touch 2 Smart Thermostat Instruction Manual

GENERAL LIFE MITRA 260S Wired Room Thermostat User Manual

HEATIT 54 305 41 WiFi6 Thermostat Installation Guide

King K901-B Wifi Programmable Thermostat Instruction Manual

Schneider Electric 2290B Programmable Room Thermostat Instruction Manual

tecnoswitch 60730-1 Electronic Recessed Thermostat User Guide

FURRION FACW12ZA-BL Multi Zone Wall Thermostat Instruction Manual

NEOMITIS RTE7D, RTE7BD Wired Digital 7 Day Programmable Room Thermostat Instruction Manual

EUROLAMP 147-44030 Digital Heating Smart Thermostat User Manual

Danfoss RAE Radiator Thermostat Installation Guide