Hunter 44110 Set And Save Programmable Thermostat Owner’s Manual


| General | Details |
|---|---|
| Name | Hunter 44110 Set And Save Programmable Thermostat Owner’s Manual |
| Make | Hunter |
| Language | English |
| Filetype | PDF (Download) |
| File size | 0.34 MB |


Hunter 44110 Set And Save Programmable Thermostat Owner’s Manual Overview
Summary of Contents
- Page 1: Programmable thermostat owners manual. Model 44110.
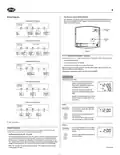
- Page 2: Congratulations! As an ENERGY STAR partner, Hunter Fan Co. has determined that this programmable thermostat meets the ENERGY STAR guidelines for energy efficiency. Your new Hunter thermostat will provide years of reliable service. Please read this manual for complete instructions on installing and operating your thermostat. This thermostat is designed to work on various heating and cooling systems. This thermostat can be programmed between 45˚F and 95˚F (7˚C and 35˚C). This thermostat provides a 3.5 minute delay after shutting off the cooling system before it can be restarted. Two fresh AA alkaline batteries should provide well over one year of service. When the batteries become drained, the Low Battery Indicator will flash on the display. The number of wires in your system can be as few as two (for heat only systems), as many as eight, or any number in between. Before disconnecting any wires, apply the self-adhesive labels provided to the wire as shown in the manual.
- Page 3: Position wallplate on wall and pull existing wires through large opening. Mark holes for plastic anchors provided, if your existing holes do not line up with those on the Hunter wallplate. After labeling wires, disconnect them from the existing thermostat terminals. Drill holes with 3/16” bit and gently tap anchors into the holes until flush with wall. Seal any larger holes with insulating material to prevent air from entering the back of the thermostat. If your thermostat has one wire marked R or RH, leave the jumper wire between the RH and RC terminals on the wallplate. Match and connect the labeled wires to the appropriate coded terminal screws on the wallplate. Be sure to tighten the terminal screws securely to avoid operational problems. Push excess wire back into the hole to prevent interference when installing the thermostat. Insert the two AA size alkaline batteries, observing the polarity marked inside the battery compartment.
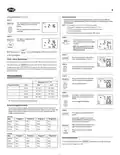
- Page 4: Auto Recovery selector (DISABLE/ENABLE) Your thermostat is set from the factory with the Auto Recovery Feature enabled. If you prefer to use normal recovery, slide the switch to the DISABLE position. F˚ / C˚ Selection (Fahrenheit / Celsius) Your thermostat is set for F˚ mode from the factory. To change to C˚ mode, follow these steps: All programs and settings will be lost when pressing RESET. Setting Day and Time The LCD will show this information when batteries are first installed, or after the Reset button is pressed. During time and day setting mode, the temperature and program displays will go blank. In order for this thermostat to control your system, the system type must be specified by the selector switches on the printed circuit board inside the thermostat.
- Page 5: Setting day and time involves familiarizing yourself with manually changing programs to modify times and temperatures as comfort needs change. The program time can be set in 10-minute increments, and the program temperature can be set in increments of 1˚F (1˚C). After 15 seconds without a key press, the thermostat will return to normal display mode. The system switch must be set to HEAT or COOL to program the corresponding system. If the system switch is in the OFF position, the last position used will be programmed. The thermostat is set from the factory in normal 12-hour time format, which can be changed to 24-hour format. All 7 days of the week have the same default programs. You can revise the factory programs to match your own schedule using a Personal Program Schedule. To review your program settings, press repeatedly to cycle through the programs. You can make changes at any time during the program review.
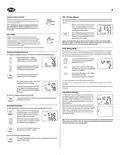
- Page 6: System Selector Switch determines the operating mode of the thermostat. You may select COOL, OFF, HEAT. Change or clean your filter regularly to maximize system performance and energy efficiency. The Filter Change Indicator will flash after 400 hours of system runtime as a reminder to check the filter. Press and hold the Filter Key for 3 seconds to reset the timer after changing or cleaning the filter. The Fan switch should normally be in the AUTO position. To run the Fan continuously, slide the Fan switch to the ON position. The thermostat is set to cycle at 1˚F above and below the set temperature by default. Temporary Manual Override allows you to change the current set temperature without affecting your program. The thermostat has a two-stage low battery warning system.
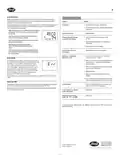
- Page 7: Auto Recovery feature meets the ENERGY STAR guidelines for energy efficiency. Auto Recovery allows the heating or cooling system to recover gradually from an energy-saving setpoint temperature to a comfort setpoint temperature. Auto Recovery calculates how early to turn your system back on for comfort by the start of the program period. Auto Recovery works in both Heat and Cool modes. Auto Recovery can be disabled by sliding the Recovery switch on the circuit board. Error Mode occurs if the thermostat is unable to control your system due to a battery problem. To correct Error Mode, replace the batteries and press the RESET button. Your thermostat will automatically cut-off in Heat mode if the room temperature rises above 95˚F and in Cool mode if it drops below 40˚F. If the unit continues to operate in the Off position, replace the unit. For technical assistance, contact Hunter Fan Company.

Schneider Electric TC900 Series Space Logic Thermostat Instruction Manual

GENERAL LIFE FH250S Floor Heating Thermostat User Manual
Danfoss Icon 2/ 24V RT Room Thermostat User Guide

HotWire R220 WiFi Thermostat Instruction Manual

PRO1 IAQ T721i Digital WIFI Programmable Thermostat User Manual

PECO TW180 Thermostat Instruction Manual

SKYTECH 5320P Programmable Thermostat Fireplace Remote Control Instruction Manual

tado 104388 Smart Thermostat

Quality Heating Plug In Programmable WiFi Thermostat Instruction Manual

Fudajo 52429 Chick Heating Plate with Thermostat Instruction Manual