EPH CDTP2 Room Thermostat Installation Guide


CDTP2
Room Thermostat
Installation and Operation Guide
| General | Details |
|---|---|
| Name | EPH CDTP2 Room Thermostat Installation Guide |
| Make | EPH |
| Language | English |
| Filetype | PDF (Download) |
| File size | 0.58 MB |


EPH CDTP2 Room Thermostat Installation Guide Overview
Summary of Contents
- Page 1: Room thermostat installation and operation guide.
- Page 2: Table of contents Installation instructions Factory default settings Specifications LCD display Buttons Wiring Mounting & installation Operating instructions Adjusting the target temperature Locking the keypad
- Page 3: Adjust the program setting in 5/2 day mode. Temporary override / permanent override. Boost function. Menu function. Operating mode options include normal mode, optimum start control, and time proportional integral mode. Setting high and low limits. Hysteresis settings for HOn and HOFF. Calibration process. Resetting the thermostat.
- Page 4: Mains operated programmable room thermostat Installation instructions
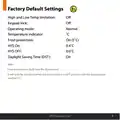
- Page 5: Factory default settings High and low temperature limitation Keypad lock Operating mode Temperature indicator Frost protection HYS On Normal Daylight Saving Time (DST) Frost protection is built into this thermostat. It will only be activated when the thermostat is in OFF position and the temperature reaches 5˚C.
- Page 6: Specifications Power supply / Input: 230VAC Power consumption: Operating <1W, Standby 0.1 mW Temperature range: 5…35˚C, Ambient temperature: 0…45˚C Ambient admissible humidity: 5-95%RH Contact rating: 7(3)A Dimensions: 91 x 91 x 26mm Internal temperature sensor: NTC 100K Program memory backup: 3 months Battery: LIR2032 IP rating: IP20
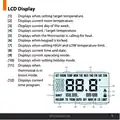
- Page 7: Displays when setting target temperature. Displays current room temperature. Displays current day of the week. Displays current / target temperature. Displays when the thermostat is calling for heat. Displays when keypad is locked. Displays when setting HIGH and LOW temperature limit. Displays current time and date. Displays current operating mode. Displays when setting holiday mode.
- Page 8: Reset button Menu button OK button Time +1h Down button Up button
- Page 9: Wiring Terminal connections Neutral in Live in Terminal 1 Terminal 2 Terminal 3 N/C normally closed connection COM common connection ON N/O normally open connection
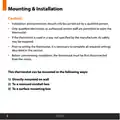
- Page 10: Mounting & installation Installation and connection should only be carried out by a qualified person. Only qualified electricians or authorized service staff are permitted to open the thermostat. If the thermostat is used in a way not specified by the manufacturer, its safety may be impaired. Prior to setting the thermostat, it is necessary to complete all required settings described in this section. Before commencing installation, the thermostat must be first disconnected from the mains. This thermostat can be mounted in the following ways: directly on wall, to a recessed conduit box, or to a surface mounting box.
- Page 11: Remove the thermostat from its packaging. Choose a mounting location so that the thermostat can measure the room temperature as accurately as possible. Mount the thermostat 1.5 metres above the floor level. Prevent direct exposure to sunlight or other heating/cooling sources. Use a Philips screwdriver to loosen the screw on the bottom of the thermostat. The thermostat is hinged and can be opened 90 degrees. Wire the thermostat according to the diagram on page 7. Screw the backplate onto a back box or directly to the surface. Close the front housing and tighten the fastening screw on the bottom of the thermostat.
- Page 12: Page 12
- Page 13: Mains operated programmable room thermostat Operating instructions
- Page 14: Adjusting the target temperature allows you to set it from 5-35˚C. Press to increase or decrease the target temperature. The target temperature is saved after 5 seconds of inactivity. Locking the keypad disables the buttons for security. To lock the thermostat, press and hold specific buttons for 10 seconds. An indicator will appear on the screen when locked. To unlock, press and hold the same buttons for 10 seconds. The lock indicator will disappear when unlocked.
- Page 15: Backlight settings include three options: AUt, OFF, and ON. In 'AUt' mode, the backlight is on for 10 seconds when any button is pressed. In 'OFF' mode, the backlight is permanently off. In 'ON' mode, the backlight is permanently on. To adjust the backlight setting, press and hold for 10 seconds. 'AUt' will appear on the screen during adjustment. Use the designated buttons to change the mode between AUTO, ON, and OFF. Press the confirmation button to finalize the selection and return to normal operation.
- Page 16: Mode selection includes three options: OFF, MAN, and AUTO. OFF means the thermostat is permanently off. MAN indicates that the thermostat is permanently on. AUTO allows the thermostat to operate based on pre-programmed times and temperatures. Press to change between AUTO, OFF, and MAN modes. The current mode will be underlined on the screen. Press again to scroll through the three modes or wait 5 seconds to confirm. In Manual mode, the thermostat displays the current room temperature and the word 'MAN'. In OFF mode, it shows the current room temperature and the word 'OFF'. In AUTO mode, it displays the current room temperature, the number of the current program, and the word 'AUTO'.
- Page 17: Setting the date, time & programming mode involves pressing buttons to adjust the year, month, day, hour, and minute. You can switch between 5/2d and 7d or 24h mode. There is an option to turn daylight saving time on or off. Holiday mode will switch the thermostat off while enabling frost protection. You can set the start and end time for holiday mode. The thermostat will switch off for the holiday period. There is a function to cancel the holiday mode.
- Page 18: How your programmable thermostat works When the thermostat is in the AUTO mode, it will operate according to the times and temperatures that have been programmed. The user can select from 6 different programs per day, each with a time and a temperature. There is no OFF time, only a higher and a lower target temperature. If the user wants the thermostat to be OFF at a certain time, set the temperature for this time to be low. The thermostat will turn ON if the room temperature is lower than the target temperature for the current period. Example: If P1 is set to be 21˚C at 6am, and if P2 is set to be 10˚C at 8am, the thermostat will look for the temperature to be 21˚C between 6am and 8am.
- Page 19: Factory program setting includes various time and temperature settings for different days of the week. The schedule is divided into P1, P2, P3, P4, P5, and P6 settings. Typical temperature settings include 21˚C and 10˚C at specified times. The program operates on a Mon-Fri and Sat-Sun schedule. There is a 24-hour setting option available. The time slots include early morning, midday, and evening adjustments. The document mentions EPH Controls Ltd. The settings are designed for efficient temperature control throughout the day. The program allows for customization based on user preferences. The document outlines specific temperature adjustments for different times.
- Page 20: Programming modes of the CDTP2 Room Thermostat include 5/2 Day mode, 7 Day mode, and 24 Hour mode. 5/2 Day mode allows programming Monday to Friday as one block and Saturday and Sunday as a second block, with each block having 6 different times and target temperatures. 7 Day mode enables programming all 7 days individually with different times and target temperatures. 24 Hour mode programs all 7 days as one block with the same times and target temperatures. In 7 Day mode, each day can have 6 individual times and temperatures. In 24 Hour mode, each day can only have the same 6 times and temperatures.
- Page 21: Adjust the program setting in 5/2 day mode. Programming for Monday to Friday is now selected. Press to adjust the P1 time. Press to adjust the P1 temperature. Repeat this process to adjust P2 to P6 times and temperatures. Programming for Saturday to Sunday is now selected. Press to adjust the P1 time. Press to adjust the P1 temperature. Repeat this process to adjust P2 to P6 times and temperatures. Press to return to automatic mode.
- Page 22: Temporary override allows adjustment of the target temperature in AUTO mode. Press to adjust the target temperature. The thermostat will operate to this new target temperature until the next switching time. Permanent override can be activated by selecting 'MAN' or manual mode. Adjust the target temperature in manual mode. The thermostat will operate to this target temperature after 5 seconds. To cancel permanent override, press until 'AUTO' or 'OFF' mode is selected.
- Page 23: Boost function allows the thermostat to be set to a specific temperature for 1, 2, or 3 hours. This function is available in all modes except holiday mode. Pressing 1, 2, or 3 times will display the end time of the boost program on the screen. Adjust the target temperature by pressing the appropriate buttons. Wait for 5 seconds or press to activate the boost. The screen will display 'BOOST TO' along with the end time for the boost program. Press again to deactivate the boost. The thermostat will revert to its previous operating mode after deactivation.
- Page 24: Menu function allows the user to adjust additional functions. To access the menu, press and hold two buttons together for 5 seconds. There are three settings for selection: Normal, Optimum Start, or TPI mode. The default setting is Normal. Press and hold two buttons together for 5 seconds to access the mode selection. ‘P01’ will appear on the screen for operating mode selection. Use the buttons to select between Normal mode, Optimum start mode, and Time proportional integral mode. Press to confirm the selected mode.
- Page 25: Normal mode activates when the temperature falls below the target temperature. The thermostat will demand heat until the temperature rises above the target. When the temperature exceeds the target, the demand for heat is canceled. A graph illustrates the normal mode control with temperature readings. Target temperature is set at 21˚C. Temperature readings range from 17˚C to 22˚C. Time intervals are marked in minutes from 0 to 100. EPH Controls Ltd. is mentioned in the document.
- Page 26: Optimum Start Control (OS) allows the thermostat to reach the target temperature by the start of the next switching time. The time interval (Ti) can be set to 10, 15, 20, 25, or 30 minutes for temperature adjustment. The thermostat aims to increase the room temperature by 1°C within the set time interval. To achieve the target temperature, the thermostat reads the room temperature (RT), setpoint temperature (ST), and target temperature difference (TTD). TTD is the difference between the setpoint temperature and the room temperature. Optimum Start Time (OST) is the time required to overcome TTD, with a maximum value of 3 hours (180 minutes). OST is subtracted from the start time to determine when to begin heating. The thermostat recalculates OST as the temperature increases.
- Page 27: Optimum start control graph with Ti = 20. Optimum start control graph with Ti = 15. Optimum start control graph with Ti = 10. Example when Ti = 20: The thermostat will start the heating at 05:30am to reach 21°C for 06:30am. Example when Ti = 10: The thermostat will start the heating at 06:00am to reach 21°C for 06:30am. Target temperature difference. Program 1 on the thermostat is 21°C for 06:30am and the room temperature is 18°C. Target temperature difference ˚C. EPH Controls Ltd.
- Page 28: Operating mode Time proportional integral mode (TPI) In TPI mode, the thermostat adjusts operation based on temperature changes. TPI helps prevent overshooting or undershooting the target temperature. The thermostat turns on and off to maintain a comfortable heat level. Two settings influence thermostat operation: the number of heating cycles per hour and the proportional bandwidth. The number of heating cycles per hour can be set to 2, 3, 6, or 12.
- Page 29: Proportional bandwidth refers to the temperature below the target at which the thermostat will start to operate in TPI control. You can set this temperature from 1.5°C to 3.0°C in 0.1°C increments. Graph (27.1) illustrates TPI control with various temperature readings and time intervals. Target temperature is set at 22˚C, with operational temperatures ranging from 19˚C to 22˚C. The graph indicates heating on and off periods over time.
- Page 30: Operating mode: Time Proportional Integral Mode (TPI) Once TPI mode is selected, 'CYC' and '06' will appear on the screen. Use the controls to select from 2, 3, 6, or 12. Press to confirm. 'P Band' and '2.0' will appear on the screen. Use the controls to select from 1.5 to 3.0. Press to confirm. Press to return to normal operation.
- Page 31: Setting high and low limits allows the installer to change the minimum and maximum temperatures for the thermostat. To access this setting, press and hold the appropriate buttons together for 5 seconds. ‘P01’ will appear on the screen. Press until ‘P02’ appears on the screen. ‘HI LIMIT’ will appear, and the temperature will begin to flash. Use the designated buttons to select the high limit for the thermostat. Press to confirm. ‘LOW LIMIT’ will appear, and the temperature will begin to flash. Use the designated buttons to select the low limit for the thermostat. When this setting is enabled, ‘LIMIT’ will appear permanently on the screen.
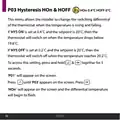
- Page 32: Hysteresis HOn & HOFF This menu allows the installer to change the switching differential of the thermostat when the temperature is rising and falling. If ‘HYS ON’ is set at 0.4˚C and the setpoint is 20˚C, then the thermostat will switch on when the temperature drops below 19.6˚C. If ‘HYS OFF’ is set at 0.2˚C and the setpoint is 20˚C, then the thermostat will switch off when the temperature reaches 20.2˚C. To access this setting, press and hold & together for 5 seconds. ‘P01’ will appear on the screen. Press until ‘P03’ appears on the screen. Press . ‘HOn’ will appear on the screen and the differential temperature will begin to flash.
- Page 33: Use the controls to select the 'HOn' temperature and press to confirm. 'HOFF' will appear on the screen and the differential temperature will begin to flash. Use the controls to select the 'HOFF' temperature. Press to confirm and return to normal operation.
- Page 34: Calibrate menu allows the installer to calibrate the temperature of the thermostat. To access this setting, press and hold together for 5 seconds. ‘P01’ will appear on the screen. Press until ‘P04’ appears on the screen. Press to select. ‘CALI’ and the actual temperature will appear on the screen. Press to calibrate the temperature. Press to confirm the temperature. Press to return to normal operation.
- Page 35: Resetting the thermostat to factory settings involves locating the reset button on the left-hand side. Press and release the reset button. 'RST' will appear and 'NO' will flash on the screen. Press 'YES' to confirm. The thermostat will restart and revert to its factory settings.
- Page 36: Page 36

namron 4512738 Touch Zigbee 16A Thermostat Instruction Manual

GENERAL Life HT250 Wired Room Thermostat User Guide

HERSCHEL iQ T2 Wireless Thermostat Instruction Manual

Commercial Electric HTSA15CWB Smart Thermostat User Guide

Mi-Heat GH35EU Digital Greenhouse Thermostat User Manual

AJAX108846 White Smart Wifi Thermostat Instruction Manual

Danfoss MBC 8000 Heavy Duty Thermostat Installation Guide

GE APPLIANCES RAK150VF2 Wall Thermostat Instruction Manual

heatit WiFi TRM3 Intelligent Smart Home Thermostat User Guide

ST76 Sensi Touch 2 Smart Thermostat Instruction Manual