Amber DT-two Programmable Thermostat User Guide
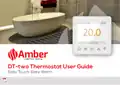


DT-two Thermostat User Guide
Easy Touch. Easy Warm.

| General | Details |
|---|---|
| Name | Amber DT-two Programmable Thermostat User Guide |
| Make | Amber |
| Language | English |
| Filetype | PDF (Download) |
| File size | 0.38 MB |


Amber DT-two Programmable Thermostat User Guide Overview
Summary of Contents
- Page 1: DT-two thermostat user guide. Easy touch. Easy warm.
- Page 2: Page 2
- Page 3: Introduction Function & operation On/Off Manual temperature override Key-lock Technical specifications Wiring diagram Thermostat controls Benefits of underfloor Troubleshooting
- Page 4: Introduction The DT-two is an intuitive programmable thermostat used to control your underfloor heating. It features a colour screen, 7 day schedule and open window technology. It will keep your home at a comfortable temperature whilst minimising energy use. Technical Specifications Supply Voltage: 85-265Vac 50/60Hz Standby Power: < 1W Max Load: 16A IP Class: IP21 Cable Specification: ≤2.5mm²
- Page 5: Installation instructions include loosening the fixing screw to remove the front panel from the back panel. The thermostat should be connected according to the wiring diagram. Align the top part of the front panel with the back panel to reconnect them. Replace the fixing screw at the bottom after reconnecting. Insert the back panel into the wall box using the provided screws.
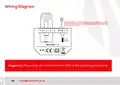
- Page 6: Wiring diagram Floor sensor must be installed in conduit to enable replacement and validate your thermostat warranty. Power specifications: 85V-265V, 50/60Hz. Max load is 16A. It is suggested to keep the max load around 90% of 16A to prolong the lifetime.
- Page 7: Thermostat symbols Clock Lock / heat / sensor Temperature Period Return key Confirm key Power key Up key Down key
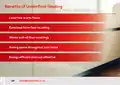
- Page 8: Benefits of underfloor heating include luxurious warm floors and even heat from floor to ceiling. It works with all floor coverings and saves space throughout your home. Additionally, it is energy efficient and cost effective.
- Page 9: Page 9
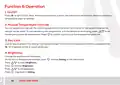
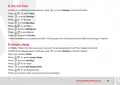
- Page 10: Function & operation On/Off: Press to turn On/Off. When frost protection is active, the thermostat will maintain the frost protection temperature when on standby. Manual temperature override: You can temporarily override the current temperature for the current timed period, and it will not be saved. Key-lock: Lock all keys to prevent the settings from being changed. Press and hold for 3 seconds to lock or unlock all the keys. Brightness: Change the brightness of the display. Press to select brightness and enter the setting on the thermostat.
- Page 11: Set the time on the thermostat by entering the settings menu. Select the day, hour, and minute to set the time. If connected to WiFi, the thermostat will update the time automatically. Holiday mode maintains the set temperature until the holiday ends. Enter the settings menu to select holiday mode. Set the days for holiday mode. Set the temperature for holiday mode. Return to the actual temperature interface after setting.
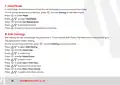
- Page 12: Hold Mode allows the thermostat to maintain the set temperature until canceled. To enter Hold Mode, access the settings from the actual temperature interface. Select Hold Mode to set the desired temperature. Edit Settings enables the user to set and change parameters. Choosing Auto Mode allows the thermostat to operate based on Edit Settings parameters. Access Edit Settings from the actual temperature interface. Select the day and event for the settings. Set the start time by selecting the hour and minute.
- Page 13: Default parameters include settings for different times of the day such as wake, leave, return, and sleep. The thermostat has advanced settings to accommodate various situations. The advanced settings menu is typically changed by the installer or upon advice from Amber. To access advanced settings, press the designated button on the thermostat. Select advanced setting to enter the menu. Parameters can be accessed and adjusted as needed.
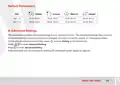
- Page 14: Advanced settings include temperature calibration for room and floor. Anti-frozen switch and temperature settings are available. Options for temperature tolerance range from -5.0°C to 30°C. Sensor selection allows for different configurations. Schedule settings can be adjusted for floor, room, or both. Time delay options include 0S, 30S, 60S, and 90S. Language settings are available in English, German, Spanish, and French. Adaptive function and open window settings can be toggled on or off. Power set options range from 0W to 4500W. Factory reset option is included for restoring default settings.
- Page 15: Room temperature calibration: Calibrate the room temp detected by room sensor. Floor temperature calibration: Calibrate the floor temp detected by floor sensor. Anti-frozen switch: This option allows you to turn frost protection on/off. Anti-frozen temperature: Adjust the frost protection trigger temperature. Floor temperature limit: If you choose both sensors, floor temp limit must be set to protect floor. Temperature tolerance: The value is 1°C. The thermostat will start to heat when the actual temperature is 1°C lower than set temperature and stop heating when the actual temperature is 1°C higher than set temperature. Sensor selection: Floor sensor must be used when the thermostat is used with electric underfloor heating or is not installed in the same room as the heated floor. Schedule: Select a weekly timer schedule. There are two options: 7 days or 5+1+1. Adaptive function: After several days of installation and use, Adaptive function ensures that the required temperature has already been reached when the next event begins. Open window: This function will shut off automatically for 15 minutes if it detects a sudden drop in temperature.
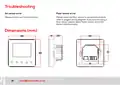
- Page 16: Troubleshooting Air sensor error. Floor sensor error. Please contact our technical team. Please check the floor sensor is connected correctly. Refer to page 6 wiring diagram. If you are not using a floor sensor, please select Room sensor only from sensor selection menu. Dimensions (mm)

industrie technik TF Frost Protection Thermostat Instruction Manual

hansgrohe 24240XXX Shower Column Including Thermostat Instruction Manual

GENERAL LIFE 300S Smart Thermostat User Manual

HIHOME Smart Radiator Thermostat User Manual

EBECO EB-Therm 500 Floor Heating Thermostat Instruction Manual

SmartDHOME 01335-1864-00 Zone Thermostat for 2-Pipe Fan Coil with 0-10 VDC Fan Regulator and Valve Management User Manual

Honeywell T4098A Deluxe Electric Heat Thermostat Instruction Manual

Day and Night TSTATIIEWF-01 Gray Smart Thermostat Owner’s Manual

OJ ELECTRONICS UTN5 OJ Microline Non Programmable Thermostat User Manual

FantiniCosmi CH143E 230V Flush Mounting Weekly Programmable Thermostat User Manual