SIEMENS RS485 Flush Mounted Room Thermostat User Manual


●
●
Mount the room thermostat on a recessed square conduit box with 60 mm fixing centers.
Mounting
Do not mount on a wall in niches or bookshelves, behind curtains, above or near heat
sources, or exposed to direct solar radiation.
●
●
Mount about 1.5 m above the floor.
Mount the room thermostat in a clean, dry indoor place without direct airflow from a
heating / cooling device, and not exposed to dripping or splash water.
●
In case of limited space in the conduit box, use mounting bracket ARG70.3 to increase
the headroom by 10 mm.
WARNING
Device damage
Carefully read all wiring diagrams prior to installation to avoid damage to the device caused
by incorrect wiring of high or low voltages.
●
See Mounting Instructions A6V12060783 enclosed with the thermostat.
Comply with local regulations to wire, protect and earth the thermostat.
Wiring
●
●
The device has no internal fuse for supply lines to fan and actuators. To avoid risk of
fire and injury due to short-circuits, the AC 230 V mains supply line must have a circuit
breaker with a rated current of no more than 10 A.
●
Properly size the cables to the thermostat, fan and valve actuators for AC 230 V
mains voltage.
●
●
Use only valve actuators rated for AC 230 V.
Adapt the wiring cross section for power supply (L, N), and 230 V outputs (Yx-N) to
the preceding overload protection elements (max 10 A) under all circumstances. Comply
with local regulations under all circumstances.
●
●
Cables of SELV inputs S1 (X2)-M / B1 (X1)-M: use cables with min 230 V insulation,
as the conduit box carries AC 230 V mains voltage.
Inputs S1 (X2)-M / B1 (X1)-M: several switches (e.g. summer/winter switch) may be
connected in parallel. Consider overall maximum contact sensing current for switch
rating.
●
Selectable relay function: Follow the instructions in Basic documentation A6V12114068
to connect external equipment to the relay outputs.
●
●
●
Isolate the cables of Modbus communication input A+, B- and REF for 230 V.
Disconnect thermostat from power supply before removing from the mounting plate.
The device does not support hot-plug.
Operating mode
In Protection mode, press any button to activate the screen, then press the mode button to
change to another operating mode.
Commissioning
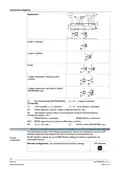
The room thermostat is delivered with a fixed set of applications.
Applications
Select and activate the relevant application during commissioning using one of the following
tools:
●
●
Local DIP switch and HMI
Modbus commissioning tools
Set the DIP switches before snapping the front panel onto the mounting plate, if you want to
select an application via DIP switches.
All DIP switches need to be set to “OFF” ("remote configuration"), if you want to select an
application via commissioning tools.
8
Siemens
A6V12005486_en--_d
2022-11-14
Smart Infrastructure
| General | Details |
|---|---|
| Name | SIEMENS RS485 Flush Mounted Room Thermostat User Manual |
| Make | SIEMENS |
| Language | English |
| Filetype | PDF (Download) |
| File size | 1.07 MB |


SIEMENS RDZ100ZB Zigbee Room Thermostat Owner’s Manual

SIEMENS RDG400 Room Thermostat Instruction Manual

SIEMENS M3182 Room Thermostat Instruction Manual

SIEMENS RDS120-B Smart Thermostat Instructions

SIEMENS Powers Controls TH 192-3 Series Day Night Vent Room Thermostat Instruction Manual

SIEMENS RDY2000BN BACnet Commercial Thermostat User Manual

SIEMENS RDH100RF/SET Room Thermostat Instruction Manual

SIEMENS RDH100RF/SET Wireless Room Thermostat with LCD User Guide

SIEMENS RDG260KN Room Thermostat Instruction Manual

SIEMENS RDF660MB Flush Mount Room Thermostat Instruction Manual


LUX PSP511A Smart Temp Electronic Thermostat Instruction Manual

Honeywell Non-Programmable Digital Thermostat User Guide

bryant SYSTXBBECC01-C Evolution Connex Control Thermostat Owner’s Manual

EPH CONTROLS CRT2 Room Thermostat Instruction Manual

Beca BHT-009 AI KnobThermostat User Guide

Satel ART-210 Wireless Radiator Thermostat Instruction Manual

AVATTO WT598 1T1 Smart Thermostat

EPH CONTROLS CMF Room Frost Thermostat Instruction Manual

COMPUTHERM Q5RF Multi Zone Wireless Digital Room Thermostat Instruction Manual

COMAP L151002001 Smart Home Thermostat User Manual