Roth Touchline PL Wireless Room Thermostat Installation Guide


Roth Touchline® PL
Installation
Roth Touchline® PL rumtermostat
Roth Touchline® PL termostat
Roth Touchline® PL termostat, digital
Roth Touchline® PL langaton termostaatti
Roth Touchline® PL wireless room thermostat
Living full of energy
1/4

| General | Details |
|---|---|
| Name | Roth Touchline PL Wireless Room Thermostat Installation Guide |
| Make | Roth |
| Language | English |
| Filetype | PDF (Download) |
| File size | 0.3 MB |


Roth Basicline 230T Programmable Clock Thermostat Instruction Manual

Roth Basicline H 230V Room Thermostat Instructions

Roth Minishunt Room Thermostat Installation Guide

Roth Touchline SL Standard Room Thermostat Installation Guide

Roth Minishunt Plus Wireless Room Thermostat Installation Guide

Roth VVS-nr. 466397.058 Softline Standard Room Thermostat Instruction Manual

Roth SL Car Air Conditioner Thermostat Instructions

Roth Minishunt Plus Thermostat and Capillary Sensor Installation Guide
Roth Basicline Wired Thermostat Installation Guide

Roth Touchline SL Plus Room Thermostat Instruction Manual

Roth Touchline PL Wireless Room Thermostat Installation Guide Overview
Summary of Contents
- Page 1: Roth Touchline® PL Installation Roth Touchline® PL room thermostat Roth Touchline® PL thermostat Roth Touchline® PL digital thermostat Roth Touchline® PL wireless room thermostat Living full of energy
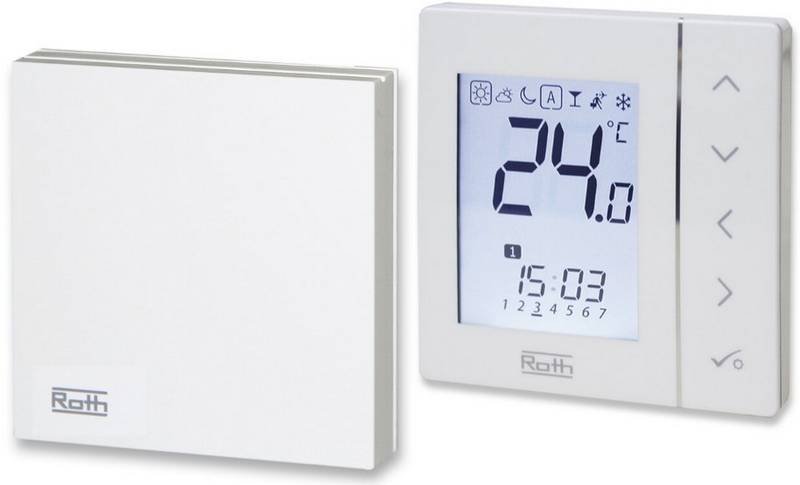
- Page 2: Roth Touchline® PL thermostat, display Roth Touchline® PL digital thermostat Roth Touchline® PL wireless room thermostat Remove screw and slide backplate off. Insert batteries (included), be aware of +/- polarity. Mount backplate on the wall (screws not included) and thermostat slides onto back plate.
- Page 3: Touchline® PL Controller 8 Ch Tilmeld en rumtermostat til en kanal på kontrolenheden. Alle el-forbindelser til pumpe, termomotorer og evt. relæ skal udføres inden der sættes 230V til kontrolenheden. Tryk ikke på rumtermostatens frontknapper når du trykker kortvarigt på tilmeldingsknappen på rumtermostatens bagside. Termostaten er nu tilmeldt zonen. På displayet kan du aæse aktuel rumtemperatur og ønsket temperatur, samt batteristand og signalstyrke. Gentag tilmeldingen for de øvrige rumtermostater på andre kanaler, indtil alle rumtermostater tilmeldt. Hvis du får tilmeldt rumtermostaten til en forkert kanal behøver du ikke slette den. Du melder blot rumtermostaten til den rigtige kanal, og den forkerte tilmelding slettes automatisk.
- Page 4: Operation of thermostat. In order to enter MENU, press and hold + and – button. Use +/- to navigate between MENU settings. In normal display, the current room temperature is shown. In sleep mode, the current temperature is displayed. To set/change temperature press +/- button. After setting the new temperature, Con will be shown. If the new temperature should be continuous, don’t touch the – button. The thermostat can display the battery level. When Bat is selected, the display blinks for 3 seconds and shows the level. Enables you to view the sensor calibration value. After selecting Cal, the screen flashes for 3 seconds and the value is displayed. You can lock the buttons on the thermostat. After selecting Loc, the screen flashes for 3 seconds. Enables you to restore factory settings on the sensor. After selecting Def, the screen flashes for 3 seconds. To exit the menu manually, select Ret and the display will blink for 3 seconds. After selecting Ret, you return to view of the current temperature.

sauermann TST Electronic Thermostat User Guide

seitron Wi-Time Wall Wi-Fi Programmable Thermostat Instruction Manual

GLOBAL WIFI Digital Heating Thermostat User Manual

Lachin TDS72 Series WiFi Thermostat User Guide

Somgoms TP528 WiFi Heating Room Thermostat User Guide

heatmiser neoStat-Pro Smart Thermostat Instruction Manual

BEOK TDS75 Touch Screen Thermostat User Manual

STELPRO ST252NPFF Non-Programmable Electronic Thermostat for Fan Heaters Owner’s Manual

GENERAL LIFE FC220 Digital Fan Coil Thermostat User Manual

Honeywell Y460A2003 Creative Series Thermostat Installation Guide