PNi CT36PRO Smart Thermostat Instruction Manual


PNI CT36 PRO

| General | Details |
|---|---|
| Name | PNi CT36PRO Smart Thermostat Instruction Manual |
| Make | PNI |
| Language | English |
| Filetype | PDF (Download) |
| File size | 1.12 MB |


PNI-CT40 Smart Wireless Thermostat User Manual

PNI CT25PW WIFI Smart Thermostat User Manual

PNi ACRF8508 Wireless Programmable Room Thermostat Instruction Manual

PNi CT36PRO Smart Thermostat Instruction Manual Overview
Summary of Contents
- Page 1: Page 1
- Page 2: The document contains a table of contents with sections in various languages, including English, Bulgarian, German, Spanish, French, Hungarian, Italian, Dutch, Polish, and Romanian. Each language section is followed by a page number indicating where the content can be found.
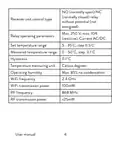
- Page 3: NO (normally open)/NC (normally closed) relay without potential (not energized). Receiver unit control type with max. 250 V, max. 10A (resistive). Current AC/DC operating parameters range from 5 - 35 °C, step 0.5 °C. Set temperature range is 0 - 50 °C, step 0.1 °C. Hysteresis is 0.1°C. Operating humidity max. 85% no condensation. WiFi frequency is 2.4 GHz. WiFi transmission power is 100mW. RF frequency is 868 MHz. RF transmission power is <25mW.
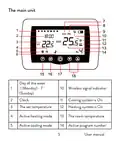
- Page 4: The main unit Wireless signal indicator Clock Cooling system is on Heating system is on The set temperature Active heating mode Active cooling mode The room temperature Active program number
- Page 5: Eco mode active Manual mode active Programmed mode active Thermostat On/Off Up and Down arrow for setting temperature and parameters Battery indicator Pairing button Power indicator User manual
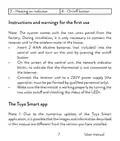
- Page 6: Heating on indicator On/off button Instructions and warnings for the first use The system comes with the two units paired from the factory. During installation, it is only necessary to connect the receiver unit to the wireless router in the house. Insert 2 AAA alkaline batteries (not included) into the central unit and turn on the unit by pressing the on/off button. On the screen of the central unit, the network indicator blinks, to indicate that the thermostat is not connected to the Internet. Connect the receiver unit to a 230V power supply (the operation must be performed by qualified personnel only). Make sure the thermostat is working properly by turning the two units on/off and checking the status of the LEDs. Due to the numerous updates of the Tuya Smart application, it is possible that the images and information described in this manual are different from the version you have installed.
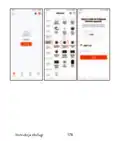
- Page 7: For a quick configuration, make sure that the phone and the thermostat are as close as possible to each other (1-3 m). Connect the mobile phone to a 2.4 GHz wireless network and activate the GPS location on your phone. Make sure that you have connected the phone to the wireless network on the 2.4 GHz frequency. Download the Tuya Smart application from the App Store or Google Play. Open the Tuya Smart application and press the + button or “Add device” to add the thermostat to the application. Select the “Small Home Appliances” - “Thermostat (Wi-Fi)” option. Select the WiFi network and add the network password. Long press the pairing button on the receiver unit until the “Heating on” LED blinks quickly.
- Page 8: In the application, press “Next” and confirm that the LED indicator on the product blinks quickly. The application will start scanning nearby devices. After your thermostat has been identified, press “Done” to complete the procedure. The LED on the receiver will stop blinking. At this moment, the wireless internet connection is successful. If the LED continues to blink slowly, the connection failed, repeat the procedure.
- Page 9: Functions available in the application include displaying the set temperature and the measured temperature. The heating/cooling status is indicated by specific icons. Operation mode selection includes Manual, Eco, and Programmed modes.
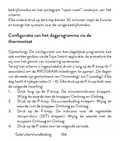
- Page 10: Advanced settings: For the two operation modes, heat and cold, the following settings are available: daily program setting (maximum 4 periods), child protection (keypad lock), anti-freeze protection, open window protection, temperature calibration, setting dead zone (hysteresis), temperature report.
- Page 11: Temperature control from the thermostat Press the Up and Down keys on the central unit to set the desired temperature. Heating mode: - If the set temperature is higher than the room temperature, the central unit will send a command to the receiver unit in a maximum of 90 seconds. The Heating on LED on the receiver unit will light up and a click will be heard indicating the activation of the internal relay. The heating system icon appears on the screen of the central unit. - If the set temperature is lower than the room temperature, the central unit will send a command to the receiver unit in a maximum of 90 seconds. The Heating on LED on the receiver unit will go out and a click will be heard indicating the activation of the internal relay. The icon disappears from the screen. Cooling mode: - If the set temperature is lower than the room temperature, the central unit will send a command to the receiver unit in a maximum of 90 seconds. The Heating on LED on the receiver unit will light up.
- Page 12: The click will be heard indicating the activation of the internal relay. The icon appears on the screen of the central unit. If the set temperature is higher than the temperature in the room, the central unit will send a command to the receiver unit in a maximum of 90 seconds. The “Heating on” LED on the receiver unit will go out and a click will be heard indicating the activation of the internal relay. Temperature control from the Tuya Smart application involves opening the application and selecting the thermostat. From the settings menu, select the cooling or heating mode. In the thermostat control interface, press the “-” and “+” buttons to set the desired temperature. The application sends the command via the Internet to the receiver unit, which confirms by turning on/off the “Heating on” LED. This activation is also indicated audibly with a click. The temperature displayed on the screen of the central unit will be updated shortly.
- Page 13: If the temperature on the screen of the central unit does not update within a maximum of 2 minutes, check the status of the thermostat in the application. The two units come paired from the factory; perform the pairing procedure only if absolutely necessary. If the thermostat appears offline in the application, the signal icon is missing, and the “Heating on” LED on the receiver unit is off, perform the pairing procedure. Long press the pairing button on the receiver unit until the “Heating on” LED flashes rapidly. Turn off the screen of the central unit by pressing the on/off button. When the screen is off, press and hold the M button on the central unit until a 4-digit code appears. Immediately press the up arrow button to pair with the receiver unit. The “Heating on” LED blinks rarely and then goes out.
- Page 14: The icon blinks for a few seconds, confirming that the pairing is complete. Test the functionality by changing the set temperature and watch the triggering of the relay in the receiver unit. Turn off the receiver unit by briefly pressing the on/off button. With the receiver off, press and hold the pairing and on/off buttons until the two LEDs light up at once. The Power LED stays lit, and the Heating on LED flashes rarely. The icon disappears from the screen of the central unit. First pair the two units and then add the thermostat to the Tuya Smart application. In case of RF signal loss between the receiver unit and the central unit, the icon will disappear from the screen.
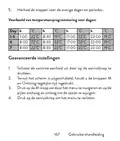
- Page 15: If the receiver unit is disconnected from the wireless, the “Heating on” LED will blink rarely. Change the batteries of the central unit if necessary. Bring the units closer to each other and the receiver unit to the WiFi router and check the status of the devices again. If the operation does not return to normal and the “Heating on” LED continues to blink rarely, delete and perform the pairing procedures again. Set the time and the day of the week. With the screen on, long press the M button for 5-6 seconds. Only the time remains displayed on the screen, and the minute indicator flashes. Press the Up and Down keys until you reach the desired value. Press the M key to confirm. The hour indicator blinks.
- Page 16: With the screen off, press and hold the M and Up buttons simultaneously. Press the M button to navigate through the menu and the Up and Down arrows to change the options. Press the on/off button to exit the menu. Menu description includes options for internal sensor temperature calibration. The default setting for internal sensor temperature calibration is 0°C. Setting the maximum set temperature limit ranges from 5°C to 35°C. Setting the minimum set temperature limit also ranges from 5°C to 35°C. Frost protection temperature is adjustable between 5°C and 15°C. Hysteresis can be set from 0.1°C to 6°C. The key lock function can be activated by long pressing the M key for 5 seconds.
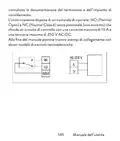
- Page 17: Open window detection - OWD OWD - Temperature drop (during detection) OWD - Time Delay (return to previous setting/program) Long press the on/off button for 5 seconds until the thermostat restarts. Return to factory settings Software version 5055-02 Receiver unit connection diagram Warning: Connecting the receiver unit to a 230 V power supply User manual
- Page 18: Installation and connection to a heating plant should be performed only by qualified personnel. Consult the documentation of the thermostat and the heating plant before installation. The receiver unit features a relay-type command, NO (Normal Open) and NC (Normal Closed) without potential. It closes a control circuit with a maximum current of 10 A and a maximum voltage of 250 V AC/DC. Examples of connection with certain models of thermal power plants are provided at the end of the manual.
- Page 19: Специални предупреждения Термостатът трябва да бъде свързан към мрежа от 230 V и към отоплително оборудване, инсталирането трябва да се извършва само от квалифициран персонал. Препоръчваме първоначалната конфигурация на термостата да се извършва само от квалифициран персонал. За дистанционно управление на термостата от мобилния телефон е необходимо да свържете термостата към 2,4 GHz безжична мрежа. Термостатът не поддържа 5GHz мрежи. Термостатът е съвместим с всички котли, оборудвани с вход за термостати с безпотенциално NO реле. Технически спецификации 2 алкални батерии AAA 1.5V Централно захранване
- Page 20: Захранване на приемника Тип управление на приемника Параметри на работа на релето Макс. 250 V, макс. 10A (резистивен), ток AC/DC Задайте температурен диапазон 5 - 35 °C, стъпка 0.5 °C Измерен температурен диапазон 0 - 50 °C, стъпка 0.1 °C Hysteresis Устройство за измерване на температура градуси по Целзий Работна влажност Макс. 85% без конденз WiFi честота 2.4 GHz
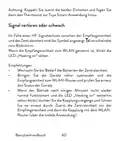
- Page 21: RF свързаност между двете устройства 868 MHz RF мощност на излъчване Основната единица Ден от седмицата Индикатор за безжичен сигнал Ръководство
- Page 22: Охладителната система е включена. Отоплителната система е включена. Активен режим на отопление. Активен режим на охлаждане. Номер на активна програма. Програмиран избор на режим. Активен еко режим. Активен ръчен режим. Програмираният режим е активен. Индикатор за батерията.
- Page 23: Приемното устройство Бутон за сдвояване Индикатор за мощност Индикатор за включено Бутон за включване/изключване Инструкции за употреба и предупреждения за първа Системата се доставя с двата модула, сдвоени от фабриката. По време на инсталацията е необходимо само да свържете приемника към безжичния рутер в къщата. Поставете 2 AAA алкални батерии (не са включени) в централното устройство и включете устройството.
- Page 24: като натиснете бутона за включване/изключване. На екрана на централното устройство мрежовият индикатор мига, за да покаже, че термостатът не е свързан към интернет. Свържете приемника към 230V захранване (операцията трябва да се извършва само от квалифициран персонал). Уверете се, че термостатът работи правилно, като включите/изключите двата модула и проверите състоянието на светодиодите. Приложението Tuya Smart. Поради многобройните актуализации на приложението Tuya Smart е възможно изображенията и информацията, описани в това ръководство, да са различни от версията, която сте инсталирали. За бърза конфигурация се уверете, че телефонът и термостатът са възможно най-близо един до друг (1-3 м). Свържете мобилния телефон към 2,4 GHz безжична мрежа. Активирайте GPS местоположението на вашия телефон. Уверете се, че сте свързали телефона.
- Page 25: Приложението ще започне да сканира близките устройства. След като вашият термостат бъде идентифициран, натиснете „Done“, за да завършите процедурата. Светодиодът на приемника ще спре да мига. В този момент безжичната интернет връзка е успешна. Ако светодиодът продължава да мига бавно, връзката е неуспешна, повторете процедурата.
- Page 26: Функции, налични в приложението Следните функции са налични в приложението Tuya Smart: Показване на зададената температура и измерената температура. Състояние на отопление/охлаждане: иконата се появява, когато отоплителната система е включена и иконата когато охладителната система е включена.
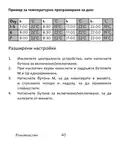
- Page 27: Избор на режим на работа: ръчен, еко и програмиран. Разширени настройки. За двата режима на работа, heat и cold, са налични следните настройки: настройка на дневна програма (максимум 4 периода). Защита от деца (заключване на клавиатурата). Защита против замръзване. Защита при отворен прозорец. Калибриране на температурата. Dead zone (hysteresis) настройка. Температурен отчет.
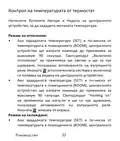
- Page 28: Контрол на температурата от термостат Натиснете бутоните Нагоре и Надолу на централното устройство, за да зададете желаната температура. Режим на отопление: Ако зададената температура (SET) е по-висока от температурата в помещението (ROOM), централното устройство ще изпрати команда до приемника за максимум 90 секунди. Светодиодът „Включено отопление“ на приемника ще светне и ще се чуе щракване, показващо активирането на вътрешното реле. Ако зададената температура (SET) е по-ниска от температурата в помещението (ROOM), централното устройство ще изпрати команда до приемника за максимум 90 секунди. Светодиодът “Heating on” на приемника ще изгасне и ще се чуе щракване, показващо активирането на вътрешното реле. Режим на охлаждане: Ако зададената температура (SET) е по-ниска от температурата в помещението (ROOM), централното устройство ще изпрати команда до приемника.
- Page 29: Устройството ще изпрати команда до приемника за максимум 90 секунди. Светодиодът Включено отопление на приемника ще светне и ще се чуе щракване, показващо активирането на вътрешното реле. Иконата (охладителната система е включена) се появява на екрана на централното устройство. Ако зададената температура (SET) е по-висока от температурата в помещението (ROOM), централното устройство ще изпрати команда до приемника за максимум 90 секунди. Светодиодът Heating on на приемника ще изгасне и ще се чуе щракване, показващо активирането на вътрешното реле. Иконата изчезва от екрана. Контрол на температурата от приложението Tuya Smart. Отворете приложението Tuya Smart и в списъка с устройства, добавени към приложението, щракнете върху термостата. От менюто с настройки изберете режим охлаждане (Cold) или отопление (Heat). В контролния интерфейс на термостата натиснете бутоните „-“ и „+“, за да зададете желаната температура.
- Page 30: Температура. Приложението изпраща командата по интернет до приемника, което потвърджава чрез включване/изключване на светодиода „Отопление включено“ и звуково щракване. Температурата (SET), показана на екрана на централното устройство, ще се актуализира. Ако температурата на екрана не се актуализира в рамките на максимум 2 минути, проверете състоянието на термостата в приложението. Двете устройства идват фабрично сдвоени. Изпълнете процедурата за сдвояване само ако е абсолютно необходимо. Ако термостатът се появи Офлайн в приложението, иконата за сигнал липсва от екрана. Светодиодът „Включено отопление“ на приемника е изключен.
- Page 31: Сдвояване на устройства. Натиснете продължително бутона за сдвояване на приемника. Изключете екрана на централното устройство. Натиснете и задръжте бутона M на централното устройство. Появява се 4-цифрен код. Натиснете бутона със стрелка нагоре, за да се сдвоите с приемника. Светодиодът Heating on мига рядко и след това изгасва. Иконата мига за няколко секунди, потвърдете сдвояването. Тествайте функционалността, като промените зададената температура. Наблюдавайте задействането на релето в приемника.
- Page 32: Изтриване на сдвояването Изключете приемника, като натиснете за кратко бутона за включване/изключване. При изключен приемник натиснете и задръжте едновременно бутоните за сдвояване и включване/изключване, докато двата светодиода светнат едновременно. Светодиодът „Захранване“ остава да свети, светодиодът „Heating on“ мига рядко. Иконата устройство изчезва от екрана на централното. Предупреждение: първо сдвоете двете устройства и след това добавете термостата към приложението Tuya Smart. В случай на загуба на радиочестотен сигнал между приемника и централното устройство, иконата ще изчезне от екрана. Ако приемникът е изключен от безжичната връзка, светодиодът „Heating on“ ще мига рядко.
- Page 33: Препоръки: Сменете батериите на централното устройство, ако е необходимо. Доближете модулите един до друг и приемника към WiFi рутера и проверете отново състоянието на устройствата. Ако след няколко минути работата не се върне към нормалното и светодиодът „Heating on“ продължава да мига рядко, изтрийте и извършете отново процедурите по сдвояване. Задайте часа и деня от седмицата. При включен екран натиснете дълго бутона M за 5-6 секунди. На екрана остава само часът, а индикаторът за минути мига. Натиснете бутоните нагоре и надолу, докато достигнете желаната стойност. Натиснете клавиша M, за да потвърдите. Индикаторът за час мига. Натиснете бутоните нагоре и надолу, докато достигнете желаната стойност.
- Page 34: Меню описание Стойности Вътрешно калибриране на -8 °C ~ 8 °C (стъпка 0.1 °C) Температурата на сензора Задаване на максимална зададена 5 °C ~ 35 °C Температурна граница Задаване на минималната зададена 5 °C ~ 15 °C Температура на защита от замръзване Хистерезис (мъртва зона) 0.1 °C ~ 6 °C (стъпка 0.1 °C) Ръководство
- Page 35: On: Function for locking keys by pressing the M key for 5 seconds to unlock the keys. OWD - Open window detection. OWD - Opening time ranges from 2 to 30 minutes. OWD - Temperature drop during opening is set at 2°C. OWD - Delay time ranges from 10 to 60 minutes. OWD - Delay time is set at 30 minutes. Manual.
- Page 36: Натиснете бутона за включване/изключване за 5 секунди, докато термостатът се рестартира. Върнете се към фабричните настройки. Софтуерна версия. Схема на свързване на приемника. Предупреждение: Свързването на приемника към електрическа мрежа 230 V и към отоплителна централа се извършва само от квалифициран персонал.
- Page 37: справка с документацията на термостата и отоплителната централа. Приемникът има команда от релеен тип, NO (Нормално отворен) (незахранван), който затваря управляваща верига. NC (Нормално затворен) без потенциал с максимален ток от 10 A и максимално напрежение от 250 V AC / DC. Можете да намерите примери за свързване с определени модели топлоелектрически централи в ръководството.
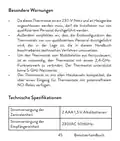
- Page 38: Besondere Warnungen Die Installation des Thermostats muss von qualifiziertem Personal durchgeführt werden. Die Erstkonfiguration des Thermostats sollte ebenfalls von qualifiziertem Personal vorgenommen werden. Um den Thermostat vom Mobiltelefon aus fernzusteuern, ist eine Verbindung mit einem 2,4-GHz-Funknetzwerk erforderlich. Der Thermostat unterstützt keine 5-GHz-Netzwerke. Der Thermostat ist mit Heizkesseln kompatibel, die über einen Eingang für Thermostate mit potenzialfreiem NO-Relais verfügen. Technische Spezifikationen Stromversorgung der Zentraleinheit: 2 AAA 1,5 V Alkalibatterien, 230VAC 50/60Hz.
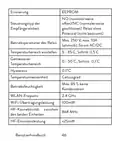
- Page 39: EEPROM Steuerungstyp der Empfängereinheit Relais ohne Potenzial (nicht bestromt) Max. 250 V, max. 10A (ohmsch), Strom AC/DC Betriebsparameter des Relais Temperaturbereich einstellen 5 - 35 °C, Schritt 0.5 °C Gemessener Temperaturbereich 0 - 50 °C, Schritt 0.1 °C Hysteresis 0.1°C Temperaturmesseinheit Celsiusgrad Betriebsfeuchtigkeit Max. 85 % keine Kondensation
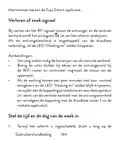
- Page 40: Die Haupteinheit Das Kühlsystem ist eingeschaltet Die eingestellte Temperatur Das Heizsystem ist eingeschaltet Aktiver Heizmodus Aktiver Kühlmodus Die Raumtemperatur Programmnummer Benutzerhandbuch
- Page 41: Auswahl des Eco- manuellen oder programmierten Modus Eco-Modus aktiv Auswahl des Heiz- und Kühlmodus Manueller Modus aktiv Programmierter Thermostat ein/aus Modus aktiv Pfeil nach oben und unten zum Einstellen Batterieanzeige von Temperatur und Parametern Benutzerhandbuch
- Page 42: Kopplungstaste Anzeige „Heating eingeschaltet“ Betriebsanzeige Ein-/Aus-Taste Hinweise und Warnhinweise für den ersten Gebrauch Das System wird mit werkseitig gekoppelten beiden Einheiten geliefert. Bei der Installation muss lediglich die Empfangseinheit mit dem WLAN-Router im Haus verbunden werden. Legen Sie 2 AAA-Alkalibatterien in die Zentraleinheit ein und schalten Sie die Einheit durch Drücken der Ein-/Aus-Taste ein. Auf dem Bildschirm der Zentraleinheit blinkt die Netzwerkanzeige, um anzuzeigen, dass der Thermostat nicht mit dem Internet verbunden ist. Schließen Sie die Empfangseinheit an eine 230-V-Stromversorgung an.
- Page 43: Die Tuya Smart-App Hinweis 1: Aufgrund der zahlreichen Updates der Tuya Smart-Anwendung ist es möglich, dass die in diesem Handbuch beschriebenen Bilder und Informationen von der von Ihnen installierten Version abweichen. Hinweis 2: Stellen Sie für eine schnelle Konfiguration sicher, dass sich Telefon und Thermostat so nah wie möglich beieinander befinden (1–3 m). Verbinden Sie das Mobiltelefon mit einem 2,4-GHz-WLAN-Netzwerk und aktivieren Sie den GPS-Standort auf Ihrem Telefon. Warnung: Stellen Sie sicher, dass Sie das Telefon über die 2,4-GHz-Frequenz mit dem drahtlosen Netzwerk verbunden haben. Der PNI-Thermostat unterstützt das 5-GHz-Funknetzwerk nicht. Laden Sie die Tuya Smart-Anwendung aus dem App Store oder Google Play herunter oder scannen Sie den untenstehenden QR-Code.
- Page 44: Wenn die LED weiterhin langsam blinkt, ist die Verbindung fehlgeschlagen. Wiederholen Sie den Vorgang.
- Page 45: In der Anwendung verfügbare Funktionen Die folgenden Funktionen stehen in der Tuya Smart-Anwendung zur Verfügung: Anzeige der eingestellten Temperatur und der gemessenen Temperatur. Heiz-/Kühlstatus: das Symbol Heating ist eingeschaltet und das Symbol erscheint, wenn die Heizfunktion aktiv ist.
- Page 46: Auswahl des Betriebsmodus: Manuell, Eco und programmiert. Erweiterte Einstellungen für die beiden Betriebsarten Wärme und Kälte stehen zur Verfügung. Tagesprogrammeinstellung mit maximal 4 Perioden. Kindersicherung (Tastatursperre). Frostschutz. Fenster-Offen-Schutz. Temperaturkalibrierung. Einstellung der Totzone (Hysterese). Temperaturbericht. Benutzerhandbuch.
- Page 47: Die LED „Heating on“ an der Empfängereinheit leuchtet auf und ein Klicken ertönt, um die Aktivierung des internen Relais anzuzeigen. Das Symbol (Heizung ist eingeschaltet) erscheint auf dem Bildschirm der Zentraleinheit. Wenn die eingestellte Temperatur (SET) niedriger ist als die Temperatur im Raum (ROOM), sendet die Zentraleinheit innerhalb von maximal 90 Sekunden einen Befehl an die Empfängereinheit. Die LED „Heating on“ an der Empfängereinheit erlischt und ein Klicken ertönt, was die Aktivierung des internen Relais anzeigt. Das Symbol verschwindet vom Bildschirm. Kühlmodus: Wenn die eingestellte Temperatur (SET) niedriger ist als die Temperatur im Raum (ROOM), sendet die Zentraleinheit innerhalb von maximal 90 Sekunden einen Befehl an die Empfängereinheit. Die LED „Heating on“ an der Empfängereinheit leuchtet auf und ein Klicken ertönt, um die Aktivierung des internen Relais anzuzeigen. Das Symbol (Das Kühlsystem ist eingeschaltet) erscheint auf dem Bildschirm der Zentraleinheit. Wenn die eingestellte Temperatur (SET) höher ist als die Temperatur im Raum (ROOM), sendet die Zentraleinheit.
- Page 48: Temperaturregelung über die Tuya Smart-Anwendung. Öffnen Sie die Tuya Smart-Anwendung und klicken Sie in der Liste der zur Anwendung hinzugefügten Geräte auf den Thermostat. Wählen Sie im Einstellungsmenü den Kühlmodus oder den Heizmodus. Drücken Sie in der Thermostat-Steuerschnittstelle die Tasten „-“ und „+“, um die gewünschte Temperatur einzustellen. In maximal 90 Sekunden sendet die Anwendung den Befehl über das Internet an die Empfängereinheit. Die LED „Heating on“ erlischt und ein Klicken ertönt, was die Aktivierung des internen Relais anzeigt. Das Symbol verschwindet vom Bildschirm. In kurzer Zeit wird auch die auf dem Bildschirm der Zentraleinheit angezeigte Temperatur aktualisiert.
- Page 49: Hinweis: Wenn die Temperatur auf dem Bildschirm der Zentraleinheit nicht innerhalb von maximal 2 Minuten aktualisiert wird, überprüfen Sie in der Anwendung erneut den Status des Thermostats und die eingestellte Temperatur. Koppeln der beiden Einheiten Warnung: Die beiden Einheiten werden ab Werk gepaart geliefert. Führen Sie diesen Vorgang nur durch, wenn dies unbedingt erforderlich ist. Wenn der Thermostat in der Anwendung als offline angezeigt wird, wird das Signalsymbol angezeigt, das auf dem Bildschirm fehlt. Die LED „Heating on“ an der Empfängereinheit ist aus und die Einheiten kommunizieren nicht miteinander. Führen Sie den Kopplungsvorgang durch: Drücken Sie lange auf die Pairing-Taste an der Empfängereinheit, bis die LED „Heating on“ schnell blinkt. Schalten Sie den Bildschirm der Zentraleinheit aus, indem Sie die Ein-/Aus-Taste drücken. Halten Sie bei ausgeschaltetem Bildschirm die M-Taste an.
- Page 50: Drücken Sie die Aufwärtspfeiltaste, um die Verbindung mit der Empfängereinheit herzustellen. Die LED „Heating on“ blinkt selten und erlischt dann. Das Symbol blinkt einige Sekunden lang und bleibt dann auf dem Bildschirm, um zu bestätigen, dass die Kopplung abgeschlossen ist. Testen Sie die Funktionalität, indem Sie die eingestellte Temperatur (SET) ändern und beobachten Sie die Auslösung des Relais in der Empfängereinheit. Schalten Sie die Empfangseinheit aus, indem Sie kurz die Ein-/Aus-Taste drücken. Halten Sie bei ausgeschaltetem Empfänger gleichzeitig die Pairing- und die Ein-/Aus-Taste gedrückt, bis die beiden LEDs gleichzeitig aufleuchten. Die „Power“-LED leuchtet dauerhaft und die „Heating on“-LED blinkt selten. Das Symbol verschwindet vom Bildschirm der Zentraleinheit.
- Page 51: Achtung: Koppeln Sie zuerst die beiden Einheiten und fügen Sie dann den Thermostat zur Tuya Smart-Anwendung hinzu. Im Falle eines HF-Signalverlusts zwischen der Empfängereinheit und der Zentraleinheit wird das Symbol angezeigt und verschwindet vom Bildschirm. Wenn die Empfängereinheit vom WLAN getrennt ist, blinkt die LED „Heating on“ selten. Wechseln Sie bei Bedarf die Batterien der Zentraleinheit. Bringen Sie die Geräte näher zueinander und die Empfangseinheit zum WLAN-Router und prüfen Sie erneut den Status der Geräte. Wenn der Betrieb nach einigen Minuten nicht wieder normal funktioniert und die LED „Heating on“ weiterhin selten blinkt, löschen Sie die Kopplungsvorgänge und führen Sie sie erneut durch. Zuerst die Zentraleinheit mit der Empfängereinheit und dann die Kopplung mit dem WLAN-Router (über die mobile Anwendung).
- Page 52: Stellen Sie die Uhrzeit und den Wochentag ein. Drücken Sie bei eingeschaltetem Bildschirm 5–6 Sekunden lang die M-Taste. Auf dem Bildschirm wird nur noch die Uhrzeit angezeigt und die Minutenanzeige blinkt. Drücken Sie die Auf- und Ab-Tasten, bis Sie den gewünschten Wert erreicht haben. Drücken Sie zur Bestätigung die M-Taste. Die Stundenanzeige blinkt. Die dem Wochentag entsprechende Anzeige, 1 (Montag) – 7 (Sonntag), blinkt. Wenn die Funktion zur Erkennung offener Fenster von der Anwendung aktiviert wird, stoppt das System die Heizung automatisch. Ein plötzlicher Temperaturabfall wird registriert (standardmäßig 2 °C in 15 Minuten). Das Symbol „Fenster“ wird angezeigt.
- Page 53: Menu Beschreibung Interne Sensortemperatur kalibrierung Einstellen der maximal eingestellten Temperaturgrenze Einstellen der minimal eingestellten Temperaturgrenze Frostschutz temperatur Hysteresis (Deadzone) Tastensperrfunktion um die Tasten zu entsperren Benutzerhandbuch
- Page 54: Erkennung geöffneter Fenster - OWD Erkennungszeit 2 ~ 30 Minuten Temperaturabfall (während der Erkennung) 2,3,4 °C Zeitverzögerung (Zurück zur vorherigen Einstellung/Programm) 10 ~ 60 Minuten Halten Sie die Ein-/Aus-Taste 5 Sekunden lang gedrückt, bis der Thermostat neu startet. Zurück zu den Werkseinstellungen
- Page 55: Softwareversion 5055-02 Anschlussplan der Empfängereinheit Achtung: Der Anschluss der Empfangseinheit an eine 230-V-Stromversorgung und an eine Heizanlage darf nur durch Fachpersonal und nur nach Einsichtnahme in die Dokumentation des Thermostats und der Heizanlage erfolgen. Die Empfängereinheit verfügt über einen relaisartigen Befehl, NO (Normal Open) und NC (Normal Closed) ohne Potenzial, der einen Steuerstromkreis mit einem maximalen Strom von 10 A und einer maximalen Spannung von 250 V AC/DC schließt. Beispiele für den Anschluss an bestimmte Modelle von Wärmekraftwerken finden Sie am Ende des Handbuchs.
- Page 56: Advertencias especiales Dado que este termostato debe conectarse a una red de 230V y a equipos de calefacción, la instalación sólo debe ser realizada por personal cualificado. Recomendamos que la configuración inicial del termostato sea realizada únicamente por personal cualificado capaz de implementar los procedimientos técnicos detallados en este manual. Para controlar el termostato de forma remota desde el teléfono móvil es necesario conectar el termostato a una red inalámbrica de 2,4 GHz. El termostato no admite redes de 5 GHz. El termostato es compatible con todas las calderas equipadas con una entrada para termostatos con relé NO libre de potencial. Especificaciones técnicas Alimentación de la unidad central: 2 pilas alcalinas AAA de 1,5 V.
- Page 57: Fuente de alimentación de la unidad receptora 230VAC 50/60Hz Tipo de control de la unidad receptora Máx. 250 V, máx. 10A funcionamiento del relé (resistivo), corriente CA/CC Establecer rango de temperatura 5 - 35 °C, paso 0.5 °C Rango de temperatura medido 0 - 50 °C, paso 0.1 °C Hysteresis 0.1°C Unidad de medida de temperatura Grados Celsius Humedad de funcionamiento Máx. 85% sin condensación Frecuencia WiFi 2.4 GHz Potencia de transmisión WiFi 100mW
- Page 58: Conectividad RF entre las dos unidades. Potencia de emisión de RF. La unidad principal. Día de la semana 1 (lunes) - 7 (domingo). Wireless signal indicator. Cooling system is On. Hora.
- Page 59: La temperatura establecida. El sistema de calefacción está encendido. Modo de calefacción activo. La temperatura ambiente. Modo de enfriamiento activo. Número de programa activo. Selección de modo Eco, Manual, Programado. Modo ecológico activo. Selección de modo de calefacción, refrigeración. Termostato encendido/apagado.
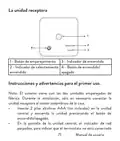
- Page 60: La unidad receptora Botón de emparejamiento Indicador de encendido Indicador de calentamiento Botón de encendido/apagado Instrucciones y advertencias para el primer uso. El sistema viene con las dos unidades emparejadas de fábrica. Durante la instalación, sólo es necesario conectar la unidad receptora al router inalámbrico de la casa. Inserte 2 pilas alcalinas AAA (no incluidas) en la unidad central y encienda la unidad presionando el botón de encendido/apagado. El indicador de red parpadea, para indicar que el termostato no está conectado.
- Page 61: Conecte la unidad receptora a una fuente de alimentación de 230 V. Asegúrese de que el termostato esté funcionando correctamente. La aplicación Tuya Smart puede tener imágenes y información diferentes a la versión instalada. Para una configuración rápida, mantenga el teléfono y el termostato cerca (1-3 m). Conecte el teléfono móvil a una red inalámbrica de 2,4 GHz. Active la ubicación GPS en su teléfono. Asegúrese de haber conectado el teléfono a la red inalámbrica en la frecuencia de 2,4 GHz. El termostato PNI no admite la frecuencia de 5 GHz. Descargue la aplicación Tuya Smart desde App Store.
- Page 62: Page 62
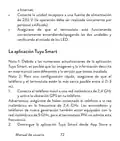
- Page 63: Funciones disponibles en la aplicación Las siguientes funciones están disponibles en la aplicación Tuya Muestra la temperatura establecida y la temperatura medida. Estado de calefacción/refrigeración: el icono aparece cuando el sistema de calefacción está encendido y el icono cuando el sistema de enfriamiento está encendido. Selección del modo de funcionamiento: Manual, Eco.
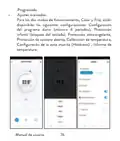
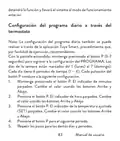
- Page 64: Ajustes avanzados: Para los dos modos de funcionamiento, Calor y Frío, están disponibles las siguientes configuraciones: Configuración del programa diario (máximo 4 períodos), Protección infantil (bloqueo del teclado), Protección anticongelante, Protección de ventana abierta, Calibración de temperatura, Configuración de la zona muerta (Histéresis), Informe de temperatura.
- Page 65: Control de temperatura desde el termostato. Pulse las teclas Arriba y Abajo de la unidad central para configurar la temperatura deseada. Modo calefacción: Si la temperatura configurada (SET) es superior a la temperatura de la habitación (ROOM), la unidad central enviará una orden a la unidad receptora en un máximo de 90 segundos. Se encenderá el LED “Heating on” de la unidad receptora y se escuchará un clic indicando la activación del relé interno. El icono (el sistema de calefacción está encendido) aparece en la pantalla de la unidad central. Si la temperatura configurada (SET) es inferior a la temperatura de la habitación (ROOM), la unidad central enviará una orden a la unidad receptora en un máximo de 90 segundos. El LED “Heating on” de la unidad receptora se apagará y se escuchará un clic que indica la activación del relé interno. Modo de enfriamiento: Si la temperatura configurada (SET) es inferior a la temperatura de la habitación (ROOM), la unidad central enviará una orden a la unidad receptora en un máximo de 90 segundos. Se encenderá el LED “Heating on” de la unidad.
- Page 66: El relé interno se activa con un clic. El icono indica que el sistema de refrigeración está encendido. La unidad central enviará una orden a la unidad receptora en un máximo de 90 segundos. El LED “Heating on” se apagará al activar el relé interno. Control de temperatura desde la aplicación Tuya Smart. Seleccione el modo refrigeración o calefacción en la aplicación. Configure la temperatura deseada usando los botones “-” y “+”. La aplicación envía la orden a la unidad receptora vía Internet. La unidad receptora confirma la acción con un clic y el LED correspondiente. La temperatura configurada se actualizará en poco tiempo.
- Page 67: La temperatura en la pantalla de la unidad central no se actualiza en un máximo de 2 minutos. Consulte nuevamente en la aplicación el estado del termostato y la temperatura configurada. Las dos unidades vienen emparejadas de fábrica. Realice el procedimiento de emparejamiento solo si es absolutamente necesario. Si el termostato aparece Sin conexión en la aplicación, el icono de señal no aparece en la pantalla. El LED “Heating on” en la unidad receptora está apagado y las unidades no se comunican entre sí. Mantenga presionado el botón de emparejamiento en la unidad receptora hasta que el LED “Heating on” parpadee rápidamente. Apague la pantalla de la unidad central pulsando el botón de encendido/apagado. Mantenga pulsado el botón M de la unidad central hasta que aparezca un código de 4.
- Page 68: Presione el botón de flecha hacia arriba para emparejarlo con la unidad receptora. El LED “Heating on” parpadea raramente y luego se apaga. El icono parpadea durante unos segundos, después permanece en la pantalla, confirmando que el emparejamiento se ha completado. Pruebe la funcionalidad cambiando la temperatura establecida (SET) y observe el disparo del relé en la unidad receptora. Apague la unidad receptora presionando brevemente el botón de encendido/apagado. Con el receptor apagado, mantenga presionados los botones de emparejamiento y encendido/apagado al mismo tiempo. El LED de “Encendido” permanece encendido y el LED de “Heating on” parpadea raramente. El icono desaparece de la pantalla de la unidad central. Primero empareje las dos unidades y luego agregue el termostato a la aplicación Tuya Smart. Manual de usuario.
- Page 69: Señal perdida o débil En caso de pérdida de señal RF entre la unidad receptora y la unidad central, el icono desaparecerá de la pantalla. Si la unidad receptora está desconectada de la conexión inalámbrica, el LED “Heating on” parpadeará raramente. Recomendaciones: Cambie las baterías de la unidad central si es necesario. Acerque las unidades entre sí y la unidad receptora al enrutador WiFi y verifique nuevamente el estado de los dispositivos. Si después de unos minutos el funcionamiento no vuelve a la normalidad y el LED “Heating on” continúa parpadeando raramente, borre y realice nuevamente los procedimientos de emparejamiento. Establecer la hora y el día de la semana. Con la pantalla encendida, mantenga presionado el botón M durante 5 a 6 segundos.
- Page 70: Presione las teclas Arriba y Abajo hasta alcanzar el valor deseado. El indicador de hora parpadea. Presione las teclas Arriba y Abajo hasta alcanzar el valor deseado. El indicador correspondiente al día de la semana, 1 (lunes) - 7 (domingo) parpadeará. La pantalla vuelve al modo de visualización normal. Cuando la aplicación activa la función de detección de ventana abierta, el sistema detendrá automáticamente la calefacción. El icono de “ventana abierta” aparece en la pantalla y la temperatura establecida pasa a ser 5°C. Esta función es útil al abrir una ventana sin detener la calefacción. El termostato volverá al modo de funcionamiento anterior después de 30 minutos. Cualquier otra pulsación de botón dentro de los 30 minutos.
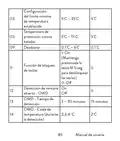
- Page 71: Configuración del límite mínimo de temperatura establecido Temperatura de protección contra heladas Deadzone Función de bloqueo de teclas Detección de ventana abierta - OWD OWD - Tiempo de detección OWD - Caída de temperatura (durante la detección) Temperatura mínima y máxima especificadas Valores de temperatura en grados Celsius Instrucciones para desbloquear las teclas
- Page 72: Retardo de tiempo (volver a la configuración/programa anterior) Mantenga presionado el botón de volver a la configuración de fábrica encendido/apagado durante 5 segundos hasta que el termostato se reinicie. Versión del software 5055-02 Diagrama de conexión de la unidad receptora Advertencia: La conexión de la unidad receptora a una fuente de alimentación de 230 V y a una instalación de calefacción la realiza únicamente personal cualificado. Manual de usuario
- Page 73: La unidad receptora cuenta con un comando tipo relé, NO (Normal Abierto) y NC (Normal Cerrado) sin potencial. Cierra un circuito de control con una corriente máxima de 10 A y un voltaje máximo de 250 V AC/DC. Podrás encontrar ejemplos de conexión con determinados modelos de centrales térmicas al final del manual.
- Page 74: Avertissements spéciaux Ce thermostat doit être connecté à un réseau 230V et à des équipements de chauffage, l’installation ne doit être effectuée que par du personnel qualifié. La configuration initiale du thermostat doit être effectuée uniquement par du personnel qualifié capable de mettre en œuvre les procédures techniques détaillées dans ce manuel. Pour contrôler le thermostat à distance depuis le téléphone mobile, il est nécessaire de le connecter à un réseau sans fil 2,4 GHz. Le thermostat ne prend pas en charge les réseaux 5 GHz. Le thermostat est compatible avec toutes les chaudières équipées d’une entrée pour thermostats avec relais NO sans potentiel. Spécifications techniques Alimentation de l'unité centrale : 2 piles alcalines AAA 1,5 V et 230VAC 50/60Hz.
- Page 75: Mémoire EEPROM Type de commande du récepteur Paramètres de fonctionnement du relais Max. 250 V, maximum 10A (résistif), courant AC/DC Régler la plage de température 5 - 35 °C, pas 0.5 °C Plage de température mesurée 0 - 50 °C, pas 0.1 °C Hysteresis Unité de mesure de la température Degrés Celsius Humidité d'exploitation Max. 85% sans condensation
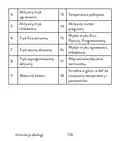
- Page 76: Puissance d'émission RF <25mW L’unité principale Indicateur de signal sans fil Le système de refroidissement est activé Le système de chauffage est allumé La température réglée Jour de la semaine 1 (lundi) - 7 (dimanche) Heure Manuel utilisateur
- Page 77: Mode chauffage actif La température ambiante Mode refroidissement actif Numéro de programme actif Sélection du mode Eco Mode éco actif Mode manuel actif Marche/Arrêt du thermostat Mode programmé actif Flèche haut et bas pour régler la température et les paramètres
- Page 78: L’unité de réception Bouton d'appairage Indicateur Heating on Indicateur d'alimentation Bouton marche/arrêt Instructions et avertissements pour la première utilisation Le système est livré avec les deux unités jumelées en usine. Lors de l’installation, il suffit de connecter le récepteur au routeur sans fil de la maison. Insérez 2 piles alcalines AAA (non incluses) dans l’unité centrale et allumez l’appareil en appuyant sur le bouton marche/arrêt. Sur l’écran de l’unité centrale, l’indicateur réseau clignote.
- Page 79: Pour indiquer que le thermostat n’est pas connecté à Internet. Connectez le récepteur (l’opération doit être effectuée uniquement par du personnel qualifié). Assurez-vous que le thermostat fonctionne correctement en allumant/éteignant les deux unités et en vérifiant l’état des LED. L’application Tuya Smart. Remarque 1: En raison des nombreuses mises à jour de l’application Tuya Smart, il est possible que les images et informations décrites dans ce manuel soient différentes de la version que vous avez installée. Remarque 2: Pour une configuration rapide, assurez-vous que le téléphone et le thermostat sont aussi proches que possible l’un de l’autre (1 à 3 m). Connectez le téléphone mobile à un réseau sans fil 2,4 GHz et activez la localisation GPS sur votre téléphone. Attention: Assurez-vous d’avoir connecté le téléphone au réseau sans fil sur la fréquence 2,4 GHz. Les routeurs et téléphones nouvelle génération sont également équipés du réseau sans fil 5 GHz, mais le thermostat PNI ne prend pas en charge cette fréquence.
- Page 80: La connexion Internet sans fil est réussie. Si la LED continue de clignoter lentement, la connexion a échoué, répétez la procédure.
- Page 81: Fonctions disponibles dans l’application. Les fonctions suivantes sont disponibles dans l’application Tuya. Affiche la température réglée et la température mesurée. Etat chauffage/refroidissement: l’icône apparaît lorsque le système de chauffage est allumé et l’icône lorsque le système de refroidissement est allumé. Manuel utilisateur.
- Page 82: Sélection du mode de fonctionnement: Manuel, Eco et Programmé. Réglages avancés disponibles pour les modes de fonctionnement Chaud et Froid. Réglage du programme journalier (maximum 4 périodes). Protection enfants (Verrouillage du clavier). Protection antigel. Protection fenêtre ouverte. Calibrage de la température. Réglage de la zone morte (Hystérésis). Rapport de température. Manuel utilisateur.
- Page 83: Contrôle de la température depuis le thermostat. Appuyez sur les touches Haut et Bas de l’unité centrale pour régler la température souhaitée. Mode chauffage: Si la température réglée (SET) est supérieure à la température de la pièce (ROOM), l’unité centrale enverra une commande à l’unité réceptrice dans un délai maximum de 90 secondes. La LED « Heating on » sur le boîtier récepteur s’allumera et un clic se fera entendre indiquant l’activation du relais interne. L’icône chauffage apparaît sur l’écran de l’unité centrale. Mode refroidissement: Si la température réglée (SET) est inférieure à la température de la pièce (ROOM), l’unité centrale enverra une commande à l’unité réceptrice dans un délai maximum de 90 secondes. La LED « Heating on » du boîtier récepteur s’éteindra et un clic se fera entendre indiquant l’activation du relais interne. L’icône disparaît de l’écran.
- Page 84: L'icône du système de refroidissement apparaît sur l'écran de l'unité centrale. Si la température réglée est supérieure à la température de la pièce, l'unité centrale enverra une commande à l'unité réceptrice dans un délai maximum de 90 secondes. La LED « Heating on » du boîtier récepteur s'éteindra et un clic se fera entendre indiquant l'activation du relais interne. Contrôle de la température depuis l'application Tuya Smart. Ouvrez l'application Tuya Smart et cliquez sur le thermostat dans la liste des appareils ajoutés. Dans le menu des paramètres, sélectionnez le mode refroidissement ou chauffage. Dans l'interface de contrôle du thermostat, appuyez sur les boutons « - » et « + » pour régler la température souhaitée. En 90 secondes maximum, l'application envoie la commande via Internet à l'unité de réception. L'unité de réception confirme en allumant/éteignant la LED « Heating on » et par un clic. La température affichée sur l'écran de l'unité est mise à jour.
- Page 85: La centrale sera mise à jour. Si la température sur l’écran de l’unité centrale ne se met pas à jour dans un délai maximum de 2 minutes, vérifiez à nouveau dans l’application l’état du thermostat. Les deux unités sont couplées en usine. Effectuez la procédure d’appairage uniquement si cela est absolument nécessaire. Si le thermostat apparaît hors ligne dans l’application, l’icône de signal est absent de l’écran. Appuyez longuement sur le bouton d’appairage du boîtier récepteur jusqu’à ce que la LED « Heating on » clignote rapidement. Éteignez l’écran de l’unité centrale en appuyant sur le bouton marche/arrêt. Maintenez enfoncé le bouton M de l’unité centrale jusqu’à ce qu’un code à 4 chiffres apparaisse à l’écran.
- Page 86: Appairage avec le récepteur Appuyez immédiatement sur la touche fléchée vers le haut pour effectuer le couplage avec le récepteur. La LED « Heating on » clignote rarement puis s’éteint. L’icône clignote pendant quelques secondes, après quoi il reste affiché à l’écran, confirmant que l’appairage est terminé. Testez la fonctionnalité en modifiant la température de consigne (SET) et observez le déclenchement du relais dans le boîtier récepteur. Supprimer le jumelage Éteignez le récepteur en appuyant brièvement sur le bouton marche/arrêt. Le récepteur étant éteint, maintenez enfoncés simultanément les boutons d’appairage et marche/arrêt jusqu’à ce que les deux LED s’allument en même temps. La LED « Power » reste allumée et la LED « Heating on » clignote rarement. L’icône disparaît de l’écran de l’unité centrale. Attention : associez d’abord les deux unités puis ajoutez le thermostat à l’application Tuya Smart.
- Page 87: Signal perdu ou faible En cas de perte du signal RF entre le boîtier récepteur et l’unité centrale, l’icône disparaîtra de l’écran. Si le récepteur est déconnecté du réseau sans fil, la LED « Heating on » clignotera rarement. Recommandations: Changez les piles de l’unité centrale si nécessaire. Rapprochez les appareils les uns des autres et le récepteur du routeur WiFi. Si le fonctionnement ne revient pas à la normale, supprimez et effectuez à nouveau les procédures d’appairage. Régler l’heure et le jour de la semaine. Avec l’écran allumé, appuyez longuement sur le bouton M pendant 5 à 6 secondes.
- Page 88: Appuyez sur les touches Haut et Bas jusqu’à atteindre la valeur souhaitée. Appuyez sur la touche M pour confirmer. L’indicateur des heures clignote. L’indicateur correspondant au jour de la semaine, 1 (lundi) - 7 (dimanche) clignotera. L’écran revient au mode d’affichage normal. Lorsque la fonction de détection de fenêtre ouverte est activée, le système arrêtera automatiquement le chauffage si une baisse brutale de température est enregistrée. L’icône « fenêtre ouverte » apparaît sur l’écran et la température réglée devient 5°C. Cette fonction est utile pour ouvrir une fenêtre sans arrêter le chauffage. Le thermostat reviendra au mode de fonctionnement précédent après 30 minutes. L’icône « fenêtre ouverte » disparaîtra de l’écran. Toute autre pression sur un bouton dans les 30 minutes arrêtera la fonction.
- Page 89: Réglage de la limite maximale de température réglée Réglage de la limite minimale de température de consigne Température de protection contre le gel Hysteresis (Deadzone) Fonction de verrouillage des touches Détection de fenêtre ouverte - OWD
- Page 90: OWD - Temps de détection OWD - Chute de température OWD - Temporisation (retour au réglage/programme précédent) Appuyez longuement sur le bouton Revenir aux paramètres d'usine Marche/arrêt pendant 5 secondes jusqu’à ce que le thermostat redémarre. Manuel utilisateur
- Page 91: Une version de logiciel 5055-02 Schéma de connexion du récepteur Attention: Le raccordement du boîtier récepteur à une alimentation 230 V et à une installation de chauffage est effectué uniquement par du personnel qualifié et uniquement après consultation de la documentation du thermostat et de l’installation de chauffage. L’unité de réception dispose d’une commande de type relais, NO (Normal Ouvert) et NC (Normal Fermé) sans potentiel (non alimenté) qui ferme un circuit de commande avec un courant maximum de 10 A et une tension maximale de 250 V AC/DC. Vous trouverez des exemples de raccordement avec certains modèles de centrales thermiques en fin de manuel. Manuel utilisateur
- Page 92: Különleges figyelmeztetések Mivel ezt a fűtőberendezéshez kell csatlakoztatni, szakképzett személyzet végezheti. A termosztát kezdeti beállítását csak szakképzett személyzet végezze el. A termosztát mobiltelefonról történő távoli vezérléséhez a termosztátot egy 2,4 GHz-es vezeték nélküli hálózathoz kell csatlakoztatni. A termosztát nem támogatja az 5 GHz-es hálózatokat. A termosztátot 230 V-os hálózathoz kell csatlakoztatni, és a telepítést csak szakképzett személyzet végezheti. A termosztát minden olyan kazánnal kompatibilis, amely termosztát bemenettel rendelkezik potenciálmentes NO relével. Műszaki adatok Központi egység tápegység Vevőegység tápellátása
- Page 93: NO (normál nyitott)/NC (normál zárt) relé potenciál nélkül. Vevőegység vezérlési típusa. Relé működési paraméterei: max. 250 V, max. 10A (ellenállás), áram AC/DC. Állítsa be a hőmérsékleti tartományt: 5 - 35 °C, lépés 0.5 °C. Mért hőmérséklet tartomány: 0 - 50 °C, lépés 0.1 °C. Hysteresis: 0.1°C. Hőmérséklet mérő egység: Celsius fok. Max. 85% nincs páralecsapódás. Működési páratartalom. WiFi frekvencia: 2.4 GHz, 100mW.
- Page 94: A fő egység A hét napja Vezeték nélküli jel jelző A hűtőrendszer be van kapcsolva A beállított hőmérséklet A fűtési rendszer be van kapcsolva Aktív fűtési mód A szoba hőmérséklete Használati utasítás
- Page 95: Aktív hűtési mód Eco mód aktív Programozott mód kiválasztása Fűtés, hűtés üzemmód kiválasztása Manuális mód aktív Termosztát be/ki Akkumulátor jelző Hőmérséklet és a paraméterek beállításához Használati utasítás
- Page 96: Párosítás gomb Heating on jelző Tápellátás visszajelző Be/ki gomb Utasítások és figyelmeztetések az első használathoz A rendszer a gyárilag párosított két egységgel érkezik. Helyezzen be 2 db AAA alkáli elemet a központi egységbe. A központi egység képernyőjén a hálózat jelzőfénye villog. Csatlakoztassa a vevőegységet 230 V-os tápegységhez. Győződjön meg arról, hogy a termosztát megfelelően működik-e.
- Page 97: Csatlakoztassa a mobiltelefont egy 2,4 GHz-es vezeték nélküli hálózathoz, és aktiválja a GPS-helymeghatározást a telefonon. Győződjön meg arról, hogy a telefont a 2,4 GHz-es vezeték nélküli hálózathoz csatlakoztatta. A PNI termosztát nem támogatja az 5 GHz-es frekvenciát. Töltse le a Tuya Smart alkalmazást az App Store vagy a Google Play áruházból. Nyissa meg a Tuya Smart alkalmazást, és nyomja meg a + gombot vagy az „Add device” gombot a termosztát alkalmazáshoz való hozzáadásához. Válassza ki a „Small Home Appliances” - „Termosztát (Wi-Fi)” opciót. Válassza ki a WiFi hálózatot, és adja meg a hálózati jelszót.
- Page 98: Nyomja meg hosszan a párosítás gombot a vevőegységen, amíg a „Heating on” LED gyorsan villogni nem kezd. Az alkalmazásban nyomja meg a „Next” gombot, és ellenőrizze, hogy villog-e a terméken lévő LED-jelző gyorsan. Az alkalmazás megkezdi a közeli eszközök vizsgálatát. A termosztát azonosítása után nyomja meg a „Done” gombot az eljárás befejezéséhez. A vevő LED-je abbahagyja a villogást. Jelenleg a vezeték nélküli internetkapcsolat sikeres. Ha a LED továbbra is lassan villog, és a csatlakozás nem sikerült, ismételje meg az eljárást.
- Page 99: Az alkalmazásban elérhető funkciók A következő funkciók érhetők el a Tuya Smart alkalmazásban: A beállított hőmérséklet és a mért hőmérséklet megjelenítése. Fűtés/hűtés állapota: a ikon megjelenik, ha a fűtési rendszer be van kapcsolva, és a ikon amikor a hűtőrendszer be van kapcsolva.
- Page 100: Üzemmód kiválasztása: Kézi, Eco és Programozott. A két üzemmódhoz, a meleghez és a hideghez, a következő beállítások érhetők el: Napi programbeállítás (maximum 4 periódus), Gyermekvédelem (Billentyűzetzár), Fagyvédelem, Nyitott ablakvédelem, Hőmérséklet kalibrálása, Holt zóna beállítása (hiszterézis), Hőmérséklet jelentés. Használati utasítás.
- Page 101: Hőmérséklet szabályozás a termosztátról Nyomja meg a fel és le gombokat a központi egységen a kívánt hőmérséklet beállításához. Fűtési mód: Ha a beállított hőmérséklet (SET) magasabb, mint a szoba (ROOM) hőmérséklete, központi egység legfeljebb 90 másodpercen belül parancsot küld a vevőegységnek. A vevőegységen kigyullad a „Heating on” LED, és egy kattanás hallható, ami a belső relé aktiválását jelzi. Ha a beállított hőmérséklet (SET) alacsonyabb, mint a szoba (ROOM) hőmérséklete, a központi egység legfeljebb 90 másodpercen belül parancsot küld a vevőegységnek. A „Heating on” LED a vevőegységen kialszik, és egy kattanás hallható, jelezve a belső relé aktiválását. Hűtési mód: Ha a beállított hőmérséklet (SET) alacsonyabb, mint a szoba (ROOM) hőmérséklete, a központi egység legfeljebb 90 másodpercen belül parancsot küld a vevőegységnek.
- Page 102: Hőmérséklet szabályozás a Tuya Smart alkalmazásból Nyissa meg a Tuya Smart alkalmazást, és az alkalmazáshoz hozzáadott eszközök listájában kattintson a termosztátra. A beállítások menüben válassza ki a hűtés (Hideg) vagy fűtés (Fűtés) üzemmódot. A termosztát vezérlőfelületén nyomja meg a „-” és „+” gombot a kívánt hőmérséklet beállításához. Az alkalmazás legfeljebb 90 másodpercen belül elküldi a parancsot az interneten keresztül a vevőegységnek. A „Fűtés be” LED ki-/bekapcsolásával és hallhatóan egy kattintással nyugtázza, ami a belső relé aktiválását jelenti. Rövid időn belül a központi egység képernyőjén megjelenő hőmérséklet (SET) is frissül. Kattanás hallható, ami a belső relé aktiválását jelzi. Az ikon (a hűtőrendszer be van kapcsolva) megjelenik a központi egység képernyőjén. Ha a beállított hőmérséklet (SET) magasabb, mint a szoba (ROOM) hőmérséklete, a központi egység legfeljebb 90 másodpercen belül parancsot küld a vevőegységnek.
- Page 103: Ha a központi egység képernyőjén a hőmérséklet nem frissül legfeljebb percen belül, ellenőrizze újra az alkalmazásban a termosztát állapotát és a beállított hőmérsékletet. A két egység gyárilag párosítva érkezik. Ezt az eljárást csak akkor végezze el, ha feltétlenül szükséges. Ha a termosztát Offline állapotban jelenik meg az alkalmazásban, a jel ikon hiányzik a képernyőről, a „Heating on” LED a vevőegységen nem világít, és az egységek nem kommunikálnak egymással, hajtsa végre az alábbi párosítási eljárást. Nyomja meg hosszan a párosítás gombot a vevőegységen, amíg a „Heating on” LED gyorsan villogni nem kezd. Kapcsolja ki a központi egység képernyőjét a be/ki gomb megnyomásával. Ha a képernyő ki van kapcsolva, nyomja meg és tartsa lenyomva, amíg a számjegyű kód meg nem jelenik a képernyőn. Azonnal nyomja meg a felfelé mutató nyíl gombot a vevőegységgel való párosításhoz.
- Page 104: Heating on LED ritkán villog, majd kialszik. Az ikon néhány másodpercig villog, majd a képernyőn marad, megerősítve, hogy a párosítás befejeződött. Tesztelje működőképességet beállított hőmérséklet a (SET) megváltoztatásával, és figyelje a relé kioldását a vevőegységben. Kapcsolja ki a vevőegységet a be-/kikapcsoló gomb rövid megnyomásával. A két LED kialszik. A vevő kikapcsolt állapotában nyomja meg és tartsa lenyomva egyszerre a párosítás és a be-/kikapcsoló gombot. A „Power” LED égve marad, a „Heating on” LED pedig ritkán villog. Az ikon eltűnik a központi egység képernyőjéről. Figyelmeztetés: először párosítsa a két egységet, majd adja hozzá a termosztátot a Tuya Smart alkalmazáshoz. RF jelvesztés esetén a vevőegység és a központi egység között.
- Page 105: Ajánlások: Szükség esetén cserélje ki a központi egység elemeit. Vigye közelebb az egységeket egymáshoz és a vevőegységet a WiFi útválasztóhoz. Ha a működés nem tér vissza a normál kerékvágásba, törölje le és hajtsa végre újra a párosítási eljárást. Állítsa be az időt és a hét napját. Bekapcsolt képernyő mellett tartsa lenyomva az M gombot 5-6 másodpercig. Nyomja le a Fel és Le gombokat, amíg el nem éri a kívánt értéket. Nyomja meg az M gombot a megerősítéshez. Az órajelző villog. Nyomja le a Fel és Le gombokat, amíg el nem éri a kívánt értéket. Nyomja meg az M gombot a megerősítéshez.
- Page 106: Villogni fog a hét napjának megfelelő 1 (hétfő) - 7 (vasárnap) jelző. Nyomja le a Fel és Le gombokat, amíg el nem éri a kívánt értéket. Nyomja meg az M gombot a megerősítéshez. Ha az alkalmazás aktiválja a nyitott ablak érzékelési funkciót, a rendszer automatikusan leállítja a fűtést. A képernyőn megjelenik a „nyílt ablak” ikon, és a beállított hőmérséklet (SET) 5°C lesz. Ez a funkció akkor hasznos, ha ablakot nyit a fűtés leállítása nélkül. A termosztát 30 perc elteltével visszatér az előző üzemmódba. Bármilyen más gombnyomás 30 percen belül leállítja a funkciót. A napi program konfigurálása a Tuya Smart alkalmazáson keresztül is elvégezhető. Az eljárást a könnyebb végrehajtás érdekében javasoljuk.
- Page 107: Kapcsolja ki a központi egységet a be-/kikapcsoló gomb megnyomásával. Kikapcsolt képernyő mellett nyomja meg és tartsa lenyomva egyszerre az M és a Fel gombot. Nyomja meg az M gombot a menüben való navigáláshoz. A fel és le nyilak megnyomásával módosíthatja az opciókat. Nyomja meg a be/ki gombot a menüből való kilépéshez. Belső érzékelő lehetőségek. Hőmérséklet kalibrálása 0 °C (lépés 0.1 °C). A maximális beállított hőmérsékleti határ beállítása. A minimális beállított hőmérsékleti határ beállítása. Fagyvédelmi hőmérséklet.
- Page 108: Hysteresis (Deadzone) 0.1 °C ~ 6 °C On (To unlock the keys, hold the M button for 5 seconds) Open window detection - OWD OWD – Detection time 2 ~ 30 minutes OWD - Temperature decrease (during detection) OWD - Time delay (return to previous setting/program) User manual
- Page 109: Long press the on/off button for 5 seconds until the thermostat restarts. Return to factory settings. Software version 5055-02. Warning: The connection of the receiver unit to a 230 V power supply and heating device should only be performed by qualified personnel after reviewing the thermostat and heating device documentation. The receiver unit has a relay type NO (normally open) and NC (normally closed) command output, without potential, which closes the control circuit with a maximum current of 10 A and a maximum voltage of 250 V AC/DC. Examples of connections with various models of heating plants can be found at the end of the manual. User instructions.
- Page 110: Page 110
- Page 111: Avvertenze speciali Poiché questo termostato deve essere collegato ad una rete 230V e ad apparecchi di riscaldamento, l’installazione deve essere eseguita solo da personale qualificato. Raccomandiamo che la configurazione iniziale del termostato venga eseguita solo da personale qualificato in grado di implementare le procedure tecniche dettagliate in questo manuale. Per controllare il termostato a distanza dal cellulare è necessario connettere il termostato ad una rete wireless a 2,4 GHz. Il termostato non supporta le reti a 5 GHz. Il termostato è compatibile con tutte le caldaie dotate di ingresso per termostati con relè NO a potenziale zero. Specifice tecniche Alimentazione dell'unità centrale: 2 batterie alcaline AAA da 1,5 V. Alimentazione dell'unità ricevente: 230VAC 50/60Hz. EEPROM: Memoria 129.
- Page 112: Relè NO (normalmente aperto)/NC (normalmente chiuso) senza potenziale (non eccitato). Tipo di controllo dell'unità ricevente. Massimo 250 V, massimo 10 A (resistivo), corrente CA/CC. Parametri di funzionamento del relè. Impostare l'intervallo di temperatura 5 - 35 °C, passo 0.5 °C. Intervallo di temperatura misurata 0 - 50 °C, passo 0.1 °C. Unità di misurazione della temperatura gradi Celsius. Massimo 85% senza condensa umidità operativa. Frequenza Wi-Fi 2.4 GHz. Potenza di trasmissione WiFi 100mW.
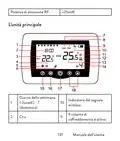
- Page 113: Potenza di emissione RF <25mW L’unità principale Giorno della settimana 1 (lunedì) - 7 (domenica) Indicatore del segnale wireless Il sistema di raffreddamento è attivo Manuale dell’utente
- Page 114: La temperatura impostata. Il sistema di riscaldamento è acceso. Modalità di riscaldamento attiva. La temperatura della stanza. Modalità di raffreddamento attivo. Numero del programma attivo. Modalità ecologica attiva. Selezione modalità Eco, Manuale, Programmata. Modalità manuale attiva. Termostato acceso/spento.
- Page 115: L’unità ricevente Pulsante di abbinamento Indicatore di Heating on Indicatore di alimentazione Tasto di accensione/spegnimento Istruzioni e avvertenze per il primo utilizzo Il sistema viene fornito con le due unità accoppiate in fabbrica. Durante l’installazione è solo necessario collegare l’unità ricevente al router wireless della casa. Inserire 2 batterie alcaline AAA (non incluse) nell’unità centrale. Accendere l’unità premendo il pulsante di accensione/spegnimento.
- Page 116: Collegare l’unità ricevente ad una alimentazione a 230V. Assicurati che il termostato funzioni correttamente accendendo/spegnendo le due unità e controllando lo stato dei LED. A causa dei numerosi aggiornamenti dell’applicazione Tuya Smart, le immagini e le informazioni descritte in questo manuale potrebbero essere diverse dalla versione installata. Per una configurazione rapida, assicurati che il telefono e il termostato siano il più vicini possibile tra loro (1-3 m). Collega il telefono cellulare a una rete wireless a 2,4 GHz e attiva la posizione GPS sul telefono. Assicurati di aver collegato il telefono alla rete wireless sulla frequenza 2,4 GHz. Scarica l’applicazione Tuya Smart dall’App Store o da Google Play.
- Page 117: Manuale dell’utente
- Page 118: Funzioni disponibili nell’applicazione Nell’applicazione Tuya Smart sono disponibili le seguenti funzioni: Visualizza la temperatura impostata e la temperatura misurata. Stato riscaldamento/raffrescamento: l’icona appare quando è attivo il sistema di riscaldamento e l’icona quando è attivo il sistema di raffrescamento.
- Page 119: Selezione modalità di funzionamento: Manuale, Eco Impostazioni avanzate: Per le due modalità di funzionamento, Caldo e Freddo, sono disponibili le seguenti impostazioni: Impostazione programma giornaliero (massimo 4 periodi) Protezione bambini (Blocco tastiera) Protezione antigelo Protezione finestra aperta Calibrazione temperatura Impostazione Zona morta (Isteresi) Rapporto sulla temperatura
- Page 120: Controllo della temperatura dal termostato Premere i tasti Su e Giù dell’unità centrale per impostare la temperatura desiderata. Modalità riscaldamento: Se la temperatura impostata (SET) è superiore alla temperatura dell’ambiente (ROOM), la centrale invierà un comando all’unità ricevente in un tempo massimo di 90 secondi. Il LED “Heating on” sull’unità ricevente si accenderà e si sentirà un clic che indica l’attivazione del relè interno. Se la temperatura impostata (SET) è inferiore alla temperatura ambiente (ROOM), la centrale invierà un comando all’unità ricevente in un tempo massimo di 90 secondi. Il LED “Heating on” sull’unità ricevente si spegnerà e si sentirà un clic che indica l’attivazione del relè interno. Modalità di raffreddamento: Se la temperatura impostata (SET) è inferiore alla temperatura ambiente (ROOM), la centrale invierà un comando all’unità ricevente in un tempo massimo di 90 secondi.
- Page 121: Accensione del sistema di raffreddamento. L'icona indica che il sistema di raffreddamento è acceso. Il comando viene inviato all'unità ricevente in un massimo di 90 secondi. Il LED Heating on si spegnerà e si sentirà un clic. Controllo della temperatura dall'applicazione Tuya Smart. Selezionare la modalità di raffreddamento o riscaldamento. Impostare la temperatura desiderata utilizzando i pulsanti. L'applicazione invia il comando via Internet all'unità ricevente. Il LED Heating on conferma l'attivazione del relè interno. La temperatura visualizzata sullo schermo verrà aggiornata.
- Page 122: Schermo della centrale. Nota: se la temperatura sullo schermo dell’unità centrale non si aggiorna entro un massimo di 2 minuti, verificare nuovamente nell’applicazione lo stato del termostato e la temperatura impostata. Associazione delle due unità. Avvertenza: le due unità vengono accoppiate dalla fabbrica. Eseguire questa procedura solo se assolutamente necessario. Se il termostato appare Offline nell’applicazione, l’icona del segnale manca dallo schermo. Il LED “Heating on” sull’unità ricevente è spento e le unità non comunicano tra loro. Eseguire la procedura di abbinamento seguente. Premere a lungo il pulsante di associazione sull’unità ricevente finché il LED “Heating on” non lampeggia rapidamente. Spegnere lo schermo dell’unità centrale premendo il pulsante di accensione/spegnimento. A schermo spento, tenere premuto il pulsante M dell’unità centrale finché sullo schermo non viene visualizzato un codice di 4 cifre.
- Page 123: Premere immediatamente il pulsante freccia su per associare l’unità ricevente. Il LED “Heating on” lampeggia raramente e poi si spegne. L’icona lampeggia per alcuni secondi, dopodiché rimane sullo schermo confermando che l’associazione è completata. Testare la funzionalità modificando la temperatura impostata (SET) e osservare l’attivazione del relè nell’unità ricevente. Spegnere l’unità ricevente premendo brevemente il pulsante di accensione/spegnimento. Con il ricevitore spento, tieni premuti contemporaneamente i pulsanti di associazione e accensione/spegnimento finché i due LED non si accendono contemporaneamente. Il LED “Alimentazione” rimane acceso e il LED “Heating on” lampeggia raramente. L’icona scompare dallo schermo dell’unità centrale. Attenzione: associare prima le due unità e poi aggiungere il termostato all’applicazione Tuya Smart.
- Page 124: Segnale perso o debole In caso di perdita del segnale RF tra l’unità ricevente e l’unità centrale, l’icona scomparirà dallo schermo. Se l’unità ricevente è disconnessa dalla rete wireless, il LED “Heating on” lampeggerà raramente. Se necessario, sostituire le batterie dell’unità centrale. Avvicinare le unità tra loro e l’unità ricevente al router WiFi e verificare nuovamente lo stato dei dispositivi. Se dopo qualche minuto il funzionamento non ritorna normale ed il LED “Heating on” continua a lampeggiare raramente, eliminare ed eseguire nuovamente le procedure di associazione. Imposta l’ora e il giorno della settimana. Con lo schermo acceso, premi a lungo il pulsante M per 5-6 secondi. Sullo schermo rimane visualizzata solo l’ora e l’indicatore dei minuti lampeggia. Premere i tasti Su e Giù fino a raggiungere il valore.
- Page 125: L'indicatore dell'ora lampeggia. Premere i tasti Su e Giù fino a raggiungere il valore desiderato. L'indicatore corrispondente al giorno della settimana, 1 (lunedì) - 7 (domenica) lampeggerà. Lo schermo ritorna alla modalità di visualizzazione normale. Quando la funzione di rilevamento finestra aperta è attivata, il sistema interromperà automaticamente il riscaldamento se viene registrato un improvviso calo della temperatura. Sullo schermo appare l'icona “finestra aperta” e la temperatura impostata diventa 5°C. Questa funzione è utile quando si apre una finestra senza arrestare il riscaldamento. Il termostato tornerà alla modalità operativa precedente dopo 30 minuti. L'icona della “finestra aperta” scomparirà dallo schermo. Qualsiasi altra pressione del pulsante entro 30 minuti interromperà la funzione. Riportando il sistema alla modalità manuale.
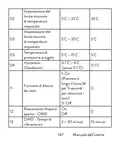
- Page 126: Impostazione del limite massimo di temperatura impostato Impostazione del limite minimo di temperatura impostato Temperatura di protezione antigelo Hysteresis (Deadzone) Funzione di blocco dei tasti Rilevamento finestra aperta - OWD OWD - Tempo di rilevamento 0.1 °C ~ 6 °C (passo 0.1 °C) Premere a lungo il tasto M per 5 secondi per sbloccare i tasti Tempo di rilevamento 2 ~ 30 minuti
- Page 127: OWD - Calo di temperatura Rilevamento a 2,3,4 °C Ritardo (ritorno all'impostazione/programma) 10 ~ 60 minuti Premere a lungo il pulsante di accensione/spegnimento per 5 secondi fino al riavvio del termostato. Ritorna alle impostazioni di fabbrica Versione software 5055-02 Schema di collegamento dell’unità ricevente Collegamento dell’unità ricevente ad una alimentazione di 230 V deve essere effettuato solo da personale qualificato. Manuale dell’utente
- Page 128: Consultare la documentazione del termostato e dell'impianto di riscaldamento. L'unità ricevente dispone di un comando di tipo relè, NO (Normal Open) e NC (Normal Closed) senza potenziale. Chiude un circuito di controllo con una corrente massima di 10 A e una tensione massima di 250 V AC/DC. Alla fine del manuale potrete trovare esempi di collegamento con alcuni modelli di centrali termoelettriche.
- Page 129: Speciale waarschuwingen Aangezien deze thermostaat moet worden aangesloten op een 230V-netwerk en op verwarmingsapparatuur, mag de installatie alleen worden uitgevoerd door gekwalificeerd personeel. We raden ook aan dat de initiële configuratie van de thermostaat alleen wordt uitgevoerd door gekwalificeerd personeel dat in staat is de technische procedures uit deze handleiding te implementeren. Om de thermostaat op afstand te bedienen vanaf de mobiele telefoon, is het noodzakelijk om de thermostaat te verbinden met een 2,4 GHz draadloos netwerk. De thermostaat ondersteunt geen 5GHz-netwerken. De thermostaat is compatibel met alle ketels voorzien van een ingang voor thermostaten met een potentiaalvrij NO-relais. Technische specificaties 2 AAA-alkalinebatterijen van 1,5 V Voeding centrale eenheid
- Page 130: Voeding ontvangereenheid Geheugen Besturingstype ontvangereenheid Bedrijfsparameters van het relais Temperatuurbereik instellen 5 - 35 °C, step 0.5 °C Gemeten temperatuurbereik 0 - 50 °C, step 0.1 °C Hysteresis 0.1°C Temperatuur meeteenheid Luchtvochtigheid regelen
- Page 131: De hoofdeenheid Draadloze signaalindicator Koelsysteem is ingeschakeld Verwarmingssysteem is ingeschakeld De ingestelde temperatuur Dag van de week Klok Gebruikershandleiding
- Page 132: Actieve verwarmingsmodus Kamertemperatuur Actieve koelmodus Geprogrammeerde modusselectie Eco-modus actief Handmatige modus actief Verwarming, selectie koelmodus Geprogrammeerde modus actief Thermostaat aan/uit Batterij indicator
- Page 133: De ontvangsteenheid Koppelingsknop Indicator Heating on Stroomindicator Aan/uit-knop Instructies en waarschuwingen voor het eerste gebruik Het systeem wordt geleverd met twee eenheden die in de fabriek zijn gekoppeld. Tijdens de installatie is het alleen nodig om de ontvangerunit aan te sluiten op de draadloze router in huis. Plaats 2 AAA-alkalinebatterijen in de centrale eenheid en schakel de eenheid in door op de aan/uitknop te drukken.
- Page 134: Op het scherm van de centrale eenheid knippert de netwerkindicator om aan te geven dat de thermostaat niet met internet is verbonden. Sluit de ontvanger aan op een voeding van 230 V. Zorg ervoor dat de thermostaat goed werkt door de twee units aan/uit te zetten en de status van de LED’s te controleren. Door de vele updates van de Tuya Smart applicatie is het mogelijk dat de afbeeldingen en informatie in deze handleiding afwijken van de versie die u heeft geïnstalleerd. Zorg ervoor dat de telefoon en de thermostaat zo dicht mogelijk bij elkaar zijn (1-3 m) voor een snelle configuratie. Verbind de mobiele telefoon met een 2,4 GHz draadloos netwerk en activeer de GPS-locatie op uw telefoon. Zorg ervoor dat u de telefoon hebt verbonden met het draadloze netwerk op de 2,4 GHz-frequentie. Nieuwe generatie routers en telefoons zijn ook uitgerust met het 5 GHz draadloze netwerk, maar de PNI-thermostaat ondersteunt deze frequentie niet.
- Page 135: De LED blijft langzaam knipperen, is de verbinding mislukt. Herhaal dan de procedure.
- Page 136: Functies beschikbaar in de applicatie De volgende functies zijn beschikbaar in de Tuya Smart-applicatie: Weergave van de ingestelde temperatuur en de gemeten temperatuur. Verwarmings-/koelingsstatus: het pictogram verschijnt als het verwarmingssysteem is ingeschakeld en het pictogram als het koelsysteem is ingeschakeld.
- Page 137: Keuze van de bedrijfsmodi: Handmatig, Eco en Geprogrammeerd. Geavanceerde instellingen. Voor de twee bedrijfsmodi, Verwarmen en Koud, zijn de volgende instellingen beschikbaar: Dagprogramma-instelling (maximaal 4 periodes). Kinderbeveiliging (Toetsenslot). Antivriesbeveiliging. Open raambeveiliging. Temperatuurkalibratie. Instelling dode zone (Hysteresis). Temperatuurrapport. Gebruikershandleiding.
- Page 138: Temperatuurregeling vanaf de thermostaat Druk op de toetsen Omhoog en Omlaag op de centrale eenheid om de gewenste temperatuur in te stellen. Verwarmingsmodus: Als de ingestelde temperatuur (SET) hoger is dan de temperatuur in de kamer (ROOM), stuurt de centrale binnen maximaal 90 seconden een commando naar de ontvangstunit. De led “Heating on” op de ontvanger gaat branden en er klinkt een klik die aangeeft dat het interne relais is geactiveerd. Het icoon (het verwarmingssysteem is ingeschakeld) verschijnt op het scherm van de centrale eenheid. Als de ingestelde temperatuur (SET) lager is dan de temperatuur in de kamer (ROOM), stuurt de centrale binnen maximaal 90 seconden een commando naar de ontvangstunit. De LED “Heating on” op de ontvanger gaat uit en er klinkt een klik die aangeeft dat het interne relais is geactiveerd. Het icoon verdwijnt van het scherm.
- Page 139: Ontvangstunit. De LED “Heating on” op de ontvanger gaat branden en er klinkt een klik die aangeeft dat het interne relais is geactiveerd. Het icoon (het koelsysteem is ingeschakeld) verschijnt op het scherm van de centrale eenheid. Als de ingestelde temperatuur (SET) hoger is dan de temperatuur in de kamer (ROOM), stuurt de centrale binnen maximaal 90 seconden een commando naar de ontvangstunit. Temperatuurregeling vanuit de Tuya Smart-applicatie. Open de Tuya Smart-applicatie en klik in de lijst met apparaten die aan de applicatie zijn toegevoegd op de thermostaat. Selecteer in het instellingenmenu de modus voor koelen (Koud) of verwarmen (Verwarmen). Druk in de thermostaatbedieningsinterface op de knoppen “-” en “+” om de gewenste temperatuur in te stellen. In maximaal 90 seconden verzendt de applicatie het commando via internet naar de ontvanger.
- Page 140: Hoorbaar met een klik, wat de activering van het interne relais betekent. Binnen korte tijd zal ook de temperatuur (SET) die op het scherm van de centrale eenheid wordt weergegeven, worden bijgewerkt. Als de temperatuur op het scherm van de centrale eenheid niet binnen maximaal 2 minuten wordt bijgewerkt, controleer dan in de applicatie opnieuw de status van de thermostaat en de ingestelde temperatuur. De twee eenheden worden in de fabriek gekoppeld geleverd. Voer deze procedure alleen uit als dit absoluut noodzakelijk is. Als de thermostaat Offline verschijnt in de applicatie, voer de onderstaande koppelingsprocedure uit. Druk lang op de koppelingsknop op de ontvanger totdat de LED “Heating on” snel knippert. Schakel het scherm van de centrale eenheid uit door op de aan/uitknop te drukken.
- Page 141: Het scherm is uitgeschakeld, houdt u de M-knop op de centrale eenheid ingedrukt totdat er een 4-cijferige code op het scherm verschijnt. Druk onmiddellijk op de pijl omhoog om te koppelen met de ontvanger. De LED “Heating on” knippert zelden en gaat dan uit. Het icoon knippert een paar seconden, waarna het op het scherm blijft staan, ter bevestiging dat de koppeling voltooid is. Test de functionaliteit door de ingestelde temperatuur (SET) te wijzigen en kijk hoe het relais in de ontvanger wordt geactiveerd. Schakel de ontvangereenheid uit door kort op de aan/uitknop te drukken. Terwijl de ontvanger uitgeschakeld is, houdt u de koppelings- en aan/uit-knop tegelijkertijd ingedrukt totdat de twee LED’s tegelijk oplichten. De “Power” LED blijft branden en de “Heating on” LED knippert zelden. Het icoon verdwijnt van het scherm van de centrale eenheid. Koppel eerst de twee units en voeg vervolgens de gebruikershandleiding toe.
- Page 142: Thermostaat toevoegen aan de Tuya Smart-applicatie. Bij verlies van het RF-signaal tussen de ontvanger en de centrale eenheid verdwijnt het pictogram van het scherm. Als de ontvangereenheid is losgekoppeld van de draadloze verbinding, knippert de LED “Heating on” zelden. Vervang indien nodig de batterijen van de centrale eenheid. Breng de units dichter bij elkaar en de ontvangerunit bij de WiFi-router. Als de werking niet naar normaal terugkeert, verwijder dan de koppelingsprocedures en voer deze opnieuw uit. Stel de tijd en de dag van de week in.
- Page 143: Druk op de M-knop gedurende 5-6 seconden. Alleen de tijd blijft op het scherm weergegeven en de minutenindicator knippert. Druk op de toetsen Omhoog en Omlaag totdat u de gewenste waarde bereikt. Druk op de M-toets om te bevestigen. De uurindicator knippert. Druk op de toetsen Omhoog en Omlaag totdat u de gewenste waarde bereikt. De indicator die overeenkomt met de dag van de week, 1 (maandag) - 7 (zondag), gaat knipperen. Het scherm keert terug naar de normale weergavemodus. Wanneer de open raam detectiefunctie door de applicatie wordt geactiveerd, stopt het systeem automatisch de verwarming. Het pictogram “open raam” verschijnt op het scherm en de ingestelde temperatuur (SET) wordt 5°C. Deze functie is handig bij het openen van een raam zonder de verwarming uit te zetten. De thermostaat keert na 30 minuten terug naar de vorige instellingen.
- Page 144: Menu beschrijving Kalibratie van de interne sensortemperatuur -8 °C ~ 8 °C (stap 0.1 °C) Instellen van de maximaal ingestelde temperatuurlimiet 5 °C ~ 35 °C Instellen van de minimaal ingestelde temperatuur limiet 5 °C ~ 35 °C Vorstbeschermings temperatuur 5 °C ~ 15 °C Hysteresis 0.1 °C ~ 6 °C (stap 0.1 °C) Toetsen vergrendelings functie Houd de M-toets 5 seconden lang ingedrukt om de toetsen te ontgrendelen
- Page 145: Detectie open raam OWD - Detectietijd 2 ~ 30 minuten 15 minuten OWD - Temperatuurdaling (tijdens detectie) OWD - Tijdvertraging (terug naar vorige instelling/programma) 10 ~ 60 minuten 30 minuten Houd de aan/uitknop 5 keer terug naar de fabrieksinstellingen Software versie 5055-02 Gebruikershandleiding
- Page 146: Aansluitschema ontvangereenheid Waarschuwing: Het aansluiten van de ontvanger op een 230 V-voeding en op een verwarmingsinstallatie mag alleen worden uitgevoerd door gekwalificeerd personeel en alleen na raadpleging van de documentatie van de thermostaat en de verwarmingsinstallatie. De ontvangereenheid beschikt over een relais-type commando, NO (Normal Open) en NC (Normal Closed) zonder potentiaal dat een stuurcircuit sluit met een maximale stroom van 10 A en een maximale spanning van 250 V AC/DC. Aan het einde van de handleiding vindt u voorbeelden van verbindingen met bepaalde modellen thermische energiecentrales.
- Page 147: Specjalne ostrzeżenia Montaż termostatu musi być wykonany wyłącznie przez wykwalifikowany personel. Wstępną konfigurację termostatu powinien przeprowadzić wykwalifikowany personel. Aby sterować termostatem zdalnie, konieczne jest połączenie z siecią bezprzewodową 2,4 GHz. Termostat nie obsługuje sieci 5 GHz. Termostat współpracuje ze wszystkimi kotłami wyposażonymi w wejście na termostaty z bezpotencjałowym przekaźnikiem NO. Specyfikacja techniczna obejmuje 2 baterie alkaliczne AAA 1,5 V. Zasilanie jednostki centralnej wynosi 230VAC 50/60Hz. Zasilanie odbiornika to EEPROM.
- Page 148: Przekaźnik NO (normalnie otwarty)/NC (normalnie zamknięty) bez potencjału (niezasilany) Typ sterowania jednostką odbiorczą Maks. 250 V, maks. 10A (rezystancyjny), prąd AC/DC Parametry pracy przekaźnika Ustawić zakres temperatur 5 - 35°C, krok 0,5°C Zmierzony zakres temperatur 0 - 50°C, krok 0,1°C Hysteresis 0.1°C Jednostka pomiaru temperatury Stopni Celsjusza Wilgotność pracy Maks. 85% bez kondensacji Częstotliwość Wi-Fi 2.4 GHz
- Page 149: Jednostka główna Dzień tygodnia Wskaźnik sygnału bezprzewodowego Układ chłodzenia jest włączony Ustawiona temperatura System ogrzewania jest włączony Instrukcja obsługi
- Page 150: Aktywny tryb ogrzewania Temperatura pokojowa Aktywny tryb chłodzenia Wybór trybu Eco Tryb Eco aktywny Wybór trybu ogrzewania, chłodzenia Tryb ręczny aktywny Tryb zaprogramowany aktywny Włączenie/wyłączenie termostatu Strzałka w górę i w dół do ustawiania temperatury i parametrów
- Page 151: Jednostka odbiorcza Przycisk parowania Wskaźnik zasilania Wskaźnik włączenia ogrzewania Przycisk włączania/wyłączania Instrukcje i ostrzeżenia dotyczące pierwszego użycia System jest dostarczany z dwoma jednostkami sparowanymi fabrycznie. Podczas instalacji wystarczy podłączyć odbiornik do routera bezprzewodowego w domu. Włóż 2 baterie alkaliczne AAA (brak w zestawie) do jednostki centralnej. Na ekranie jednostki centralnej miga wskaźnik sieci, sygnalizując, że termostat nie jest podłączony do Internetu.
- Page 152: Podłącz odbiornik do źródła zasilania 230V. Upewnij się, że termostat działa prawidłowo, włączając/wyłączając oba urządzenia i sprawdzając stan diod LED. Aplikacja Tuya Smart. Ze względu na liczne aktualizacje aplikacji Tuya Smart możliwe jest, że obrazy i informacje opisane w tej instrukcji będą się różnić od wersji, którą zainstalowałeś. Aby dokonać szybkiej konfiguracji, upewnij się, że telefon i termostat znajdują się jak najbliżej siebie (1-3 m). Podłącz telefon komórkowy do sieci bezprzewodowej 2,4 GHz i aktywuj lokalizację GPS w telefonie. Upewnij się, że telefon jest podłączony do sieci bezprzewodowej na częstotliwości 2,4 GHz. Pobierz aplikację Tuya Smart z App Store lub Google Play lub zeskanuj poniższy kod QR.
- Page 153: Page 153
- Page 154: Funkcje dostępne w aplikacji W aplikacji Tuya Smart dostępne są następujące funkcje: Wyświetla ustawioną i zmierzoną temperaturę. Stan ogrzewania/chłodzenia: ikona pojawia się, gdy system ogrzewania jest włączony, a ikona, gdy system chłodzenia jest włączony. Wybór trybu pracy: Ręczny, Eco i Programowany.
- Page 155: Zaawansowane ustawienia: Dla dwóch trybów pracy, ogrzewania i chłodzenia, dostępne są następujące ustawienia: ustawienie programu dziennego, zabezpieczenie przed dziećmi (blokada klawiatury), zabezpieczenie przed zamarzaniem, zabezpieczenie otwartego okna, kalibracja temperatury, ustawienie martwej strefy (histereza), raport temperaturowy. Instrukcja obsługi
- Page 156: Regulacja temperatury z termostatu Naciśnij klawisze „w górę” i „w dół” na jednostce centralnej, aby ustawić żądaną temperaturę. Tryb ogrzewania: Jeżeli ustawiona temperatura (SET) jest wyższa od temperatury pomieszczeniu (ROOM), jednostka centralna wyśle polecenie do jednostki odbiorczej w ciągu maksymalnie 90 sekund. Dioda LED „Heating on” na odbiorniku zaświeci się i usłyszysz kliknięcie wskazujące aktywację wewnętrznego przekaźnika. Ikona system ogrzewania jest włączony pojawia się na ekranie jednostki centralnej. Jeżeli ustawiona temperatura (SET) jest niższa od temperatury w pomieszczeniu (ROOM), jednostka centralna wyśle polecenie do jednostki odbiorczej w ciągu maksymalnie 90 sekund. Dioda LED „Heating on” na odbiorniku zgaśnie i rozlegnie się kliknięcie wskazujące na aktywację wewnętrznego przekaźnika. Ikona znika z ekranu. Tryb chłodzenia: Jeżeli ustawiona temperatura (SET) jest niższa od temperatury pomieszczeniu (ROOM), jednostka centralna.
- Page 157: centralna wyśle polecenie do jednostki odbiorczej w ciągu maksymalnie 90 sekund. Dioda LED „Heating on” na odbiorniku zaświeci się i usłyszysz kliknięcie wskazujące aktywację wewnętrznego przekaźnika. Ikona chłodzenia pojawia się na ekranie jednostki centralnej. Jeżeli ustawiona temperatura jest wyższa od temperatury w pomieszczeniu, jednostka centralna wyśle polecenie do jednostki odbiorczej w ciągu maksymalnie 90 sekund. Dioda LED „Heating on” na odbiorniku zgaśnie i rozlegnie się kliknięcie wskazujące na aktywację wewnętrznego przekaźnika. Sterowanie temperaturą z aplikacji Tuya Smart. Otwórz aplikację Tuya Smart i na liście urządzeń dodanych do aplikacji kliknij termostat. Z menu ustawień wybierz tryb chłodzenia lub ogrzewania. W interfejsie sterowania termostatem naciśnij przyciski „-” i „+”, aby ustawić żądaną temperaturę. Aplikacja wysyła polecenie przez Internet do odbiornika, który potwierdza włączeniem.
- Page 158: Wyłączeniem diody „Heating on” oraz dźwiękiem kliknięcia, co oznacza aktywację wewnętrznego przekaźnika. W krótkim czasie zaktualizowana zostanie także temperatura (SET) wyświetlana na ekranie jednostki centralnej. Uwaga: Jeżeli temperatura na ekranie centralki nie zaktualizuje się w ciągu maksymalnie 2 minut, sprawdź ponownie w aplikacji stan termostatu (Online lub Offline) i ustawioną temperaturę. Ostrzeżenie: Obydwa urządzenia są fabrycznie sparowane. Wykonaj tę procedurę tylko wtedy, gdy jest to absolutnie konieczne. Jeśli w aplikacji termostat pojawi się w trybie Offline, pojawi się ikona sygnału. Dioda LED „Heating on” na odbiorniku jest wyłączona, a urządzenia nie komunikują się ze sobą. Naciśnij i przytrzymaj przycisk parowania na odbiorniku, aż dioda LED „Heating on” zacznie szybko migać. Wyłącz ekran jednostki centralnej naciskając przycisk włączania/wyłączania. Gdy ekran jest wyłączony, naciśnij i przytrzymaj przycisk M.
- Page 159: Na jednostce centralnej pojawi się 4-cyfrowy kod. Natychmiast naciśnij przycisk strzałki w górę, aby sparować z odbiornikiem. Dioda LED „Heating on” miga rzadko, a następnie gaśnie. Ikona na ekranie potwierdza zakończenie parowania. Przetestuj funkcjonalność, zmieniając ustawioną temperaturę (SET). Usuń parowanie, wyłączając odbiornik. Naciśnij i przytrzymaj przyciski parowania i włączania/wyłączania. Dioda LED „Zasilanie” pozostaje zapalona, a dioda „Heating on” miga rzadko. Ikona znika z ekranu jednostki centralnej. Najpierw sparuj obydwa urządzenia, a następnie dodaj termostat do aplikacji Tuya Smart.
- Page 160: Utracony lub słaby sygnał W przypadku utraty sygnału RF pomiędzy odbiornikiem a jednostką centralną, ikona zniknie z ekranu. Jeśli odbiornik zostanie odłączony od sieci bezprzewodowej, dioda LED „Heating on” będzie rzadko migać. Zalecenia: W razie potrzeby wymień baterie jednostki centralnej. Zbliż jednostki do siebie, a odbiornik do routera WiFi i ponownie sprawdź stan urządzeń. Jeśli w ciągu kilku minut praca nie powróci do normy, usuń i wykonaj ponownie procedurę parowania. Ustaw godzinę i dzień tygodnia. Przy włączonym ekranie naciśnij i przytrzymaj przycisk M przez 5-6 sekund. Na ekranie pozostaje tylko czas, a wskaźnik minut miga. Naciskaj klawisze „w górę” i „w dół”, aż osiągniesz żądaną.
- Page 161: Wskaźnik godziny miga. Naciskaj klawisze „w górę” i „w dół”, aż osiągniesz żądaną wartość. Wskaźnik odpowiadający dniu tygodnia, 1 (poniedziałek) - 7 (niedziela) będzie migać. Ekran powraca do normalnego trybu wyświetlania. Po włączeniu przez aplikację funkcji wykrywania otwartego okna, system automatycznie zatrzyma ogrzewanie w przypadku zarejestrowania nagłego spadku temperatury. Na ekranie pojawia się ikona „otwartego okna”, a ustawiona temperatura wynosi 5°C. Funkcja ta jest przydatna podczas otwierania okna bez zatrzymywania ogrzewania. Termostat powróci do poprzedniego trybu pracy po 30 minutach. Ikona „otwartego okna” zniknie z ekranu po 30 minutach. Każde inne naciśnięcie przycisku w ciągu 30 minut zatrzyma tę funkcję. Instrukcja obsługi.
- Page 162: Ustawianie maksymalnego limitu temperatury 5°C ~ 35°C Ustawianie minimalnego limitu temperatury 5°C ~ 35°C Temperatura ochrony przed zamarzaniem 5°C Hysteresis (Deadzone) 0.1°C ~ 6°C Funkcja blokady klawiszy Wykrywanie otwartego okna - OWD On/Off
- Page 163: OWD – Czas detekcji: 2 ~ 30 minuty OWD – spadek temperatury (podczas detekcji): 2,3,4 °C OWD – Opóźnienie czasowe (powrót do poprzedniego ustawienia/programu): 10 ~ 60 minuty Naciśnij i przytrzymaj przycisk włączania/wyłączania przez 5 sekund, aż termostat uruchomi się ponownie. Wersja oprogramowania: 5055-02 Instrukcja obsługi
- Page 164: Schemat podłączenia odbiornika Uwaga: Podłączenia odbiornika do sieci elektrycznej 230 V oraz do instalacji grzewczej dokonuje wyłącznie osoba wykwalifikowana. Odbiornik posiada polecenie typu przekaźnikowego, NO (Normalnie Otwarte) i NC (Normalnie Zamknięte) bez potencjału. Maksymalny prąd wynosi 10 A, a maksymalne napięcie to 250 V AC/DC. Przykłady połączeń z określonymi modelami elektrowni cieplnych znajdziesz na końcu instrukcji.
- Page 165: Atentionari speciale Instalarea trebuie efectuata doar de personal calificat. Configurarea initiala a termostatului recomandam sa fie efectuata doar de personal calificat. Pentru controlul termostatului de la distanta de pe telefonul mobil, este necesara conectarea termostatului la o retea wireless de 2.4 GHz. Termostatul nu suporta retele de 5GHz. Termostatul este compatibil cu toate centralele termice prevazute cu intrare pentru termostate cu releu NO fara potential. Specificații tehnice Alimentare unitate centrala: 230VAC 50/60Hz. Alimentare unitate receptor: 2 baterii alcaline AAA 1.5V. Memorie: EEPROM.
- Page 166: Releu NO (normal deschis) Tip comanda unitate receptor NC (normal inchis) fara potential (neenergizat) Parametri de functionare releu Max. 250 V, max. 10A (rezistiv), Curent AC/DC Interval temperatura setata 5 - 35 °C cu pas de 0.5 °C Interval temperatura masurata 0 - 50 °C cu pas de 0.1 °C Unitate de masura temperatura Grade Celsius Umiditate acceptata Max. 85% fara condens Frecventa WiFi 2.4 GHz Putere de emisie WiFi 100mW Conectivitate RF intre unitati 868 MHz
- Page 167: Prezentare unitate centrala Indicator semnal wireless Ora curenta Indicator racire pornita Indicator incalzire pornita Temperatura setata Mod incalzire activ Mod racire activ Temperatura din camera Numar program activ
- Page 168: Selectare mod Eco Mod Eco activ Selectare mod Incalzire Mod Manual activ Mod Programat activ Pornire/Oprire termostat Sageata Sus si Jos pentru setare temperatura si parametri Indicator baterie Prezentare unitate receptor Buton imperechere
- Page 169: Instructiuni si atentionari la prima utilizare Sistemul vine cu cele doua unitati imperecheate din fabrica. La instalare, mai este necesara doar conectarea unitatii receptor cu router-ul wireless din casa. Introduceti 2 baterii AAA alcaline (nu sunt incluse) in unitatea centrala si porniti unitatea apasand butonul de pornire/oprire. Pe ecranul unitatii centrale, indicatorul de retea clipeste, pentru a indica ca termostatul nu este conectat la internet. Conectati unitatea receptor la o sursa de alimentare 230V (operatiunea trebuie efectuata doar de personal calificat). Asigurati-va ca termostatul functioneaza corect, pornind/oprinzand cele doua unitati si verificand starea LED-urilor. Control din aplicatia Tuya Smart Datorita numeroaselor update-uri ale aplicatiei Tuya Smart este posibil ca imaginile si informatiile descrise in acest manual sa fie diferite de versiunea pe care ati instalat-o. Pentru o configurare rapida, asigurati-va ca telefonul si termostatul se afla cat mai aproape unul de altul (1-3 m). Conectati telefonul mobil la reteaua wireless 2.4 GHz din.
- Page 170: Dupa ce termostatul dvs. a fost identificat, apasati pe “Done“ pentru a finaliza procedura. LED-ul de pe receptor nu va mai clipi. In acest moment conectarea la internet prin wireless este reusita. Daca LED-ul continua sa clipeasca lent, conexiunea nu a reusit, reluati procedura. Manual de utilizare
- Page 171: Functii disponibile in aplicatie In aplicatia Tuya Smart sunt disponibile urmatoarele functii: Afisare temperatura setata si temperatura masurata. Afisare stare incalzire/racire: apare pictograma sistemului de incalzire si pictograma sistemului de racire. Selectare mod de lucru: Manual, Eco si Programat.
- Page 172: Setari avansate: Pentru cele doua moduri de lucru, Heat (Incalzire) si Cold (Racire) sunt disponibile urmatoarele setari: Setare program zilnic (maxim 4 perioade), Protectie copii (Blocare taste), Protectie anti-inghet, Protectie geam deschis, Calibrare temperatura, Setare Dead Zone (Hysteresis), Afisare raport temperatura. Manual de utilizare
- Page 173: Controlul temperaturii din termostat Apasati tastele Sus si Jos de pe unitatea centrala pentru a seta temperatura dorita. Mod incalzire: Daca temperatura setata (SET) este mai mare decat temperatura din camera (ROOM), unitatea centrala va trimite in maxim 90 de secunde o comanda catre unitatea receptor. LED-ul “Heating on” de pe unitatea receptor se va aprinde si se va auzi un click care indica actionarea releului din interior. Pe ecranul unitatii centrale apare pictograma (incalzire pornita). Daca temperatura setata (SET) este mai mica decat temperatura din camera (ROOM), unitatea centrala va trimite in maxim 90 de secunde o comanda catre unitatea receptor. LED-ul “Heating on” de pe unitatea receptor se va stinge si se va auzi un click care indica actionarea releului din interior.
- Page 174: Receptorul LED Heating on se va aprinde și se va auzi un click care indică acționarea releului din interior. Pe ecranul unității centrale apare pictograma de racire pornita. Dacă temperatura setată este mai mare decât temperatura din cameră, unitatea centrală va trimite o comandă către unitatea receptor. LED-ul Heating on de pe unitatea receptor se va stinge și se va auzi un click care indică acționarea releului din interior. Pictograma dispare de pe ecran. Pentru controlul temperaturii din aplicația Tuya Smart, deschideți aplicația și selectați termostatul din lista de dispozitive. Din meniul de setări, selectați modul racire sau incalzire. În interfața de control a termostatului, utilizați butoanele pentru a seta temperatura dorită. Aplicația trimite comanda prin internet către unitatea receptor, care confirmă prin aprinderea/stingerea LED-ului Heating on. Se va actualiza și temperatura afișată pe ecran.
- Page 175: Ecranul unității centrale. Dacă temperatura pe ecranul unității centrale nu se actualizează într-un interval de maxim 2 minute, verificați din nou în aplicație statusul termostatului (Online sau Offline) și temperatura setată. Atentionare: Cele două unități vin împerecheate din fabrică. Executați această procedură doar dacă este absolut necesar. Dacă termostatul apare Offline în aplicație, pictograma de semnal lipsește de pe ecran, LED-ul “Heating on“ de pe unitatea receptor este stins și unitățile nu comunică între ele, executați procedura de împerechere. Apăsați lung butonul de împerechere de pe unitatea receptor până când LED-ul “Heating on“ clipeste rapid. Stingeți ecranul unității centrale apăsând butonul de pornire/oprire. Când ecranul este stins, apăsați lung butonul M de pe unitatea centrală până când pe ecran apare un cod format din 4 cifre. Imediat, apăsați butonul săgeată sus pentru a efectua.
- Page 176: LED-ul Heating on clipeste rar apoi se stinge. Pictograma clipeste cateva secunde dupa care ramane pe ecran confirmand ca imperecherea este finalizata. Testati functionalitatea modificand temperatura setata (SET) si urmariti declansarea releului din unitatea receptor. Opriti unitatea receptor apasand scurt butonul de pornire/oprire. Cele doua LED-uri se vor stinge. Cu receptorul oprit, tineti apasate simultan butoanele de imperechere si de pornire/oprire pana cand cele doua LED-uri se aprind amandoua odata. LED-ul Power ramane aprins, iar LED-ul Heating on clipeste rar. Pictograma dispare de pe ecranul unitatii centrale. Atentionare: Imperecheati mai intai cele doua unitati si mai apoi adaugati termostatul in aplicatia Tuya Smart. In cazul pierderii semnalului RF dintre unitatea receptor si unitatea. Manual de utilizare.
- Page 177: In cazul deconectarii unitatii receptor de la wireless, LED-ul “Heating on“ va clipi rar. Recomandari: Schimbati bateriile unitatii centrale daca este necesar. Apropiati unitatile una de alta si unitatea receptor de router-ul WiFi si verificati din nou starea dispozitivelor. Daca in cateva minute functionarea nu revine la normal iar LED-ul “Heating on“ continua sa clipeasca rar, stergeti si executati din nou procedurile de imperechere. Setare ora si ziua saptamanii. Cu ecranul aprins, apasati lung butonul M timp de 5-6 secunde. Pe ecran ramane afisata doar ora, iar indicatorul minutelor clipeste. Apasati tastele Sus si Jos pana ajungeti la valoarea dorita. Apasati tasta M pentru a confirma. Indicatorul orei la clipi. Apasati tastele Sus si Jos pana ajungeti la valoarea dorita.
- Page 178: Indicatorul corespunzător zilei săptămânii va clipi. Apăsați tastele Sus și Jos până ajungeți la valoarea dorită. Apăsați tasta M pentru a confirma. Funcția detectie geam deschis oprește automat încălzirea dacă se înregistrează o scădere bruscă a temperaturii. Pictograma “geam deschis” apare pe ecran, iar temperatura setată devine 5°C. Această funcție este utilă atunci când se deschide o fereastră fără să se oprească încălzirea. Termostatul va reveni la modul de funcționare anterior după 30 de minute. Orice altă apăsare de buton în perioada de 30 de minute va opri funcția. Configurarea programului zilnic poate fi făcută și prin aplicația Tuya Smart.
- Page 179: Cu ecranul stins, apasati lung si simultan butoanele M si Sus. Apasati butonul M pentru a naviga prin meniu si sagetile Sus si Jos pentru a modifica valorile. Apasati butonul de pornire/oprire pentru a iesi din meniu. Calibrare temperatura senzor intern -8 °C ~ 8 °C (pas 0.1 °C). Setare limita maxima temperatura setata. Setare limita minima temperatura setata. Temperatura protectie inghet 5 °C ~ 35 °C. Hysteresis (Deadzone) 0.1 °C ~ 6 °C (pas 0.1 °C). Functie blocare taste. Manual de utilizare.
- Page 180: Functie detectie geam deschis - OWD Oprit Pornit detectie temperatura (in timpul de detectie) Intarziere (revenire la setare/program anterior) Apasati lung butonul de pornire/oprire timp de 5 secunde Revenire la setarile din fabrica Versiune Software 5055-02
- Page 181: Diagrama conexiuni unitate receptor Atentionare: conectarea unitatii receptor la o sursa de alimentare de 230 V si la o centrala termica se executa doar de catre personal calificat si doar dupa consultarea documentatiei termostatului si a centralei termice. Unitatea receptor are o comanda de tip releu, NO (Normal Deschis) si NC (Normal Inchis) fara potential (neenergizat) ce executa inchiderea unui circuit de comanda cu un curent maxim de 10 A si o tensiune maxima de 250 V AC / DC. Regasiti exemple de conectare cu anumite modele de centrale termice la sfarsitul manualului.
- Page 182: Exemple de conectare a termostatului PNI CT36 la diferite modele de centrale termice. Atentionare: Conectarea unității receptor la o sursă de alimentare de 230 V și la o centrală termică se execută doar de către personal calificat și doar după consultarea documentației termostatului și a centralei termice. Ariston CLAS EVO SYSTEM.
- Page 183: Page 183
- Page 184: Motan Max Optimus

Danfoss KPU 19 Thermostat Installation Guide

EPH CONTROLS CP4 Programmable RF Thermostat User Manual

GENERAL LIFE HT330S Digital Room Thermostat User Manual

Schneider Electric 2290B Programmable Room Thermostat Instruction Manual

ENSTO ECO16BT-J Floor Heating Thermostat User Guide

GENERALLIFE MITRA 230S RF Wireless Room Thermostat User Manual

FRICO TAP16R Electronic Thermostat User Guide

EUROLAMP HY06BW Digital Heating Smart Thermostat User Manual

OJ ELECTRONICS UTN5 Non Programmable Touch Thermostat Instruction Manual

Danfoss 014G0013 Z Wave Radiator Thermostat Installation Guide