
Home > NEOMITIS > NEOMITIS PRG7 RF 7 Day Two Channel Programmer with RF Room Thermostat Instruction Manual
NEOMITIS PRG7 RF 7 Day Two Channel Programmer with RF Room Thermostat Instruction Manual

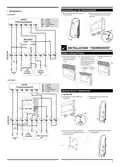


5- Secure the thermostat by screwing the
3- Programmer and Thermostat RF icon will be solid when pairing is complete and
locking screws under the thermostat.
normal display is returned.
x2
Note: the programmer is usually located near your
boiler. If you want to check the signal strength,
press and release the RF test buꢀon on the ther-
mostat. RF icon blinks for 10 seconds then signal
strength appears. 10 is the best signal strength.
• On the table stand
1- Insert the 2 pins inside the wallplate
2- Fold the stand and lock it into the
and slide on the stand .
wallplate.
INSTALLER SETTINGS
ADVANCED INSTALLER SETTING
2
• Access
Move the 2 mode
sliders to off posi-
ꢁon.
Move the programming slider to
posiꢁon.
1
x2
30°
37°
2 ꢁlts possibiliꢁes
Press and hold
display.
and then press and hold both down unꢁl spanner is in
Recommended locaꢀons for your thermostat.
To ensure that your thermostat provides accurate readings and controls effecꢁvely, it
must be installed approximately 1.5 m above floor level on
an inside wall, away from direct sunshine and any other sources of heat or cold such as
radiators, cold draughts, etc.
6 advanced seꢁngs can be modified.
Press
unꢁl correct opꢁon is in display then use or to select your choice.
Seꢁng number
Descripꢀon
1
2
3
4
5
6
Select gravity/pumped mode
Set 12 or 24 hours clock
Acꢁvaꢁon of auto Summer/Winter change over
Set the number of ON/OFF periods
Select your system between Z1/Z2 or CH/HW
Acꢁvaꢁon of backlight
• Gravity/Pumped mode (1)
NB: In order to ensure proper operaꢁon of the product, ensure that the thermostat is
not posiꢁoned near to an area which could be affected by
interference from another source. E.g.: a wireless transmiꢀer or receiver, TV, PC, etc.
The pre-set system is Pumped.
1- Press or to change to Gravity (2).
2- Then save by moving the programming
slider or save and go to next seꢂng by
Important: The thermostat measures the temperature of the place where
it is installed. It does not take into account the temperature differences that may exist
between different locaꢁons in the house if the temperature is not uniform.
1 = Pumped
2 = Gravity
pressing
.
PAIRING PROCEDURE
The programmer and the thermostat are not bonded together at the factory.
To bond the programmer and the thermostat together, proceed as below:
1- Move the 2 mode sliders on both
sides of the programmer to the OFF
posiꢁon and then move the program
slider to the RUN posiꢁon. Once this
is done, press and hold the RF test
buꢀon unꢁl Pair is shown in the dis-
play (approx. 5 seconds). The pairing
icon will be flashing.
2- Within 1 minute, press and hold the
RF Test buꢀon on the thermostat
unꢁl PAir is shown in the display
(approx. 5 seconds). The pairing Icon
will be flashing.
• Set 12/24 hours clock (2)
The pre-set value is 12 hours clock.
1- Press or to change to "24h".
2- Then save by moving the programming
slider or save and go to next seꢂng by
pressing
.
5 sec
5 sec
3

| General | Details |
|---|---|
| Name | NEOMITIS PRG7 RF 7 Day Two Channel Programmer with RF Room Thermostat Instruction Manual |
| Make | NEOMITIS |
| Language | English |
| Filetype | PDF (Download) |
| File size | 2.63 MB |
 (1 votes, average: 5.00 out of 5)
 Loading...

NEOMITIS RTE7OTA Wired Digital 7 Day Programmable Smart Room Thermostat Instruction Manual

Neomitis RTMA Mechanical Room Thermostat Instruction Manual

NEOMITIS RTE7D, RTE7BD Wired Digital 7 Day Programmable Room Thermostat Instruction Manual

NEOMITIS Rtaneoa Wired Analog Room Thermostat Instruction Manual

NEOMITIS RTE7SD Mains Powered Digital 7 Day Programmable Room Thermostat Instruction Manual

NEOMITIS RTE0RFA Wireless Digital Room Thermostat and Receiver Instruction Manual

NEOMITIS RTE0B Wired Digital Room Thermostat Installation Guide

NEOMITIS RTUa Mechanical Room Thermostat Instruction Manual


vtech Installing E-Smart W960 Thermostat User Manual

King K901-B Wifi Programmable Thermostat Instruction Manual

EpheyFIF WITH3 Wireless Gas Boiler Thermostat User Guide

GENERAL LIFE HT220 Smart Room Thermostat User Manual

Vaillant VRC 700 Programmable Weather Compensating Thermostat Owner’s Manual

Danfoss TPOne-M Electronic Programmable Room Thermostat User Guide

Tense STC-1000 Thermostat User Guide

GENERAL LIFE FH100 Underfloor Heating Thermostat User Manual

APATOR TH 480 Bi Metallic Thermostat Instruction Manual

king K702E-2 SimplStat Electronic Thermostat Instruction Manual