
MOES BRT-100 Radiator TRV Thermostat Instruction Manual
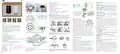


Smart Life,Smart Feture
2. Mode selection
APPLICATION
DIMENSION
Set Temp. Range: 5~45 °C
Press to switch between manual, programming, vacation
modes.
BRT-100 Radiator Thermostat(TRV)
User Guide
Display temp. Range: 0~70°C
Ambient Temp.: 0 ~ 45 °C
Manual mode - In this mode, the device executes manual
temperature setting. When the set temperature is lower than
the"minimum temperature", the valve is closed (forced closed);
Programming mode -In this mode, the device executes a preset
week programming temperature time and temperature;
Holiday mode - In this mode, for example, the vacation mode
is set for 10 days and the temperature is set to 15 degrees
Celsius. After 10 days, the device will automatically switch to
programming mode;
Temporary manual mode - In this mode,
this time, the device executes the manually set temperature and
returns to the weekly programming mode in the next time period.
3. Set the temperature
Press "+"/"-" key to adjust the temperature
4. Set the clock
Ambient Humidity: 5 ~ 95 % RH (Non Condensing)
Storage Temp.: -5~ 45 °C
Timing Error: < 1%
Protection Class: IP 20
Buttons: Capacitive Touch Buttons
Part 1
Before installing
To avoid damages to the product during installation,please
read the manual carefully before installing TRV .
Follow the instructions in
the figure below to install
the mounting plate on the
valve. Pay attention to the
red label in the picture.
icon will flash. At
INSTALLATION
52.0
48.5
Step 1: Select the adapter.TRV is usually connected with
M30*1.5mm valve. If you have different valves, please
determine your valve type according to the picture below,
and choose the correct adapter from the package. If you do
not find the valve that matches your use in the picture below,
please buy it carefully.
Unit: mm
Zigbee Type
For other languages,please scan the following QR code
Fig. 1
Press and hold for 3 seconds, the screen will display "h" and
numbers, indicating that the hour is being set, set the hour by
press "+" / "-" keys; press again, the screen will display "m",
indicating that the minute is being set, press "+" /"-" keys to set
the minutes; press again, the screen will display "number",
indicating that the day of the week is being set, and the day of
the week can be set by "+" /"-" ;press again, the screen will
flash "number, h, m", indicating that the number of days in the
vacation mode is set, which can be set by the "+" and "-" keys;
5. Lock your Radiator
Step 4: Install battery
Follow the picture below to install the
battery in the correct direction. After
the battery is installed correctly, the
thermostat will be turned on. At this
71.5
85.0
Deutsch
Español
Français
Italiano
time, click the
(only once),
Welcome
the thermostat will display and flash
"F1", when the "F1" stops flashing,
the thermostat motor It will all
Thank you for your purchase. MOES always made
high-quality products with our high-end technology,
high-quality craftsmanship, safe and reliable materials.
The new radiator thermostat will bring you a more
comfortable smart life .
Press the +" and"-" keys together for 3 seconds to lock or
unlock the keys.
shrink to facilitate the connection of
the thermostat and the mounting plate.
6. Low voltage reminder
Please read this installation/ programming manual for
installing and operating. Please also make sure someone
qualified to install the radiator .
M30*1.5
53.0
Step 5: Connect the thermostat and the mounting board
When "F1" stops flashing, find the "mark point" of the
thermostat, shown Fig. 1.Turn clockwise to complete the
connection between the thermostat and the mounting plate.
When the voltage is lower than 1.8V, the screen will display .
7. Boost heating
Press and hold "+" for 3 seconds, the device will enter the
C
o
m
p
l
y
w
i
t
h
a
l
l
l
o
c
a
l
r
e
g
u
l
a
t
i
o
n
s
.
HOME SCREEN QUICK REFERENCE
boost heating mode, and the
will flash.The countdown
Step 2: Install the adapter.Install the adapter on your valve
as the picture below. If you don’t need an adapter, please
ignore this step.
After clicking the
(only once), the thermostat will display
will be displayed in the APP.
FEATURES
Week
"F2". When “F2 ”disappears, while the screen remains on,
turn the thermostat clockwise to adjust the screen to your
liking direction.
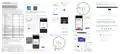
8. Adjusting/Setting the Programmable Schedules
1. LED display, no window, wider perspective
2. Colorful display
Method one;
Manually set a week of programming settings, specific operations
are as follows:
3
.
G
r
a
c
e
f
u
l
a
r
c
w
a
i
s
t
s
h
a
p
e
Low temp.
Valve open
Error warning
Battery reminder
Zigbee
protection
4. Rubber stretch paint, feel like baby skin
5. Night Halo colors your home
Installation finished.
Holiday mode
Minute
Method Two;
Hour
6. Low power consumption,battery can last 1 year for normal
use and standby for 2 years.
Use APP for one week of programming settings, please refer to
the second page "Programming your Radiator"
Manual editing:
Key lock
OPERATION
Room temp.
RA
RAV
Comap
7. Low battery tip
Energy saving mode
Open window
1. Power: After installing the battery, it will automatically turn
on. It can't be turned off till the battery is removed.
When the TRV is turned on, it will enter the self-check
program, and all icons will be displayed firstly.
Set temp.
8. Diagram of temperature curve added in APP
9. Vary colors are available like white, Black, gray etc.
temp.display
Press and hold
for 3 seconds. When you see the flashing
Programming
mode
Manual mode
numbers on the screen, press 4 times to skip the clock
setting. When the screen displays "①②③④⑤" (means Monday to
Friday), flashing numbers and "h", you can set the hour with "+"
In the box you will find
Press
, the screen flashes "F1", indicating that the
Special note: The Zigbee version of
the temperature control valve should
be used with a Zigbee gateway com-
patible with "Tuya iot'".
The package does not include the
battery and gateway.
Raditor Thermostat
User Guide
1pc
1pc
1pc
1pc
1pc
1pc
1set
1pc
and "-"; press
again, flashing numbers and "m", you can use
temperature control valve is shrinking; when "F1" stops
Up
Down
" +" "-" Set the minutes; press again, the screen displays
"Set", and the temperature can be set by "+" "-". This completes
the setting of the programmed temperature for one week in the
flashing, press
again,
menu
RA Adapter
The screen displays "F2",Indicates that the temperature
control valve is measuring.; when the screen displays the
RAVL
T+A Herz
TECHNICAL DATA
RAV Adapter
RAVL Adapter
Comap Adapter
T+A Herz Adapter
Herz Adapter
Power Supply: 3 V,2xAA Batteries, Packaging not have battery. morning from Monday to Friday.
room temperature, it indicates that the temperature control
Step 3: Install the thermostat mounting plate.Remove the
Maximum stroke: 4.5mm By analogy, refer to the one-week programming temperature
valve has completed the stroke measurement, and you can
mounting plate of the thermostat (Part 1 in the picture below)
counterclockwise.
Accuracy: ± 0.5°C default table to complete one-week programming settings.
start using the temperature control valve normally.


| General | Details |
|---|---|
| Name | MOES BRT-100 Radiator TRV Thermostat Instruction Manual |
| Make | MOES |
| Language | English |
| Filetype | PDF (Download) |
| File size | 1.07 MB |
 (1 votes, average: 5.00 out of 5)
 Loading...

Moes WTP-BY-EU BHT-12 Smart Thermostat Instruction Manual

MOES BHT-12 Smart Thermostat Instruction Manual

Moes 002 Series Wifi Thermostat User Guide

Moes ZigBee 002 Series Thermostat User Manual

Moes M30 x 1.5 Smart Radiator Thermostat User Manual

Moes BHT-3000 Series Thermostat User Guide

Moes BHT-006 Series Thermostat User Manual

MOES BRT-100 Radiator Thermostat User Guide

Moes WIFI 002 Series Wi-Fi Thermostat Instruction Manual

Moes WHT-PJ01 Smart WiFi Thermostat User Manual

Moes BRT-100 Instruction Manual: Specifications
| Setpoint range | 5~45 °C |
| Display range | 0~70°C |
| Operating temperature | 0 ~ 45 °C |
| Storage temperature | -5~ 45 °C |
| Humidity | 5 ~ 95 % RH (Non Condensing) |
| IP rating | IP 20 |
Moes BRT-100 compared with other radiator thermostats
| Specification | Moes BRT-100 | Schneider Electric CCTFR6100Z3 Wiser | Wiser CCTFR6100 |
|---|---|---|---|
| Setpoint range | 5~45 °C | 5 °C to 30 °C | 5 °C - 30 °C |
| Storage temperature | -5~ 45 °C | -20 °C to 65 °C | -20 °C to 65 °C |
| IP rating | IP 20 | IP 30 | IP 30 |
Other Moes BRT-100 manuals
More Moes thermostat manuals

SUNSKY BAC-2005 Smart Thermostat User Manual

Primevolve NFJ2002E Space Heater with Thermostat Instruction Manual

olympia electronics BS-850-KIT Wireless Programmable WiFi Electronic Chrono Thermostat User Manual

BEOK CONTROLS TR9B Capacitive Touch LCD Smart Thermostat Owner’s Manual

AURATON Libra Room Thermostat User Manual

AXOR 17716090 CARLTON Highflow Thermostat Instruction Manual

qunda QD-HVAC15 WIFI Touch-Screen Programmable Thermostat Instruction Manual

BEOK TGT79 Touch Screen Thermostat User Manual

GLOBAL Digital Heating Thermostat User Manual

Schluter DITRA-HEAT-E-RS1 Smart Thermostat Instruction Manual