Home > GE Appliances > GE APPLIANCES RAK190V Energy Management Thermostat Owner’s Manual
×
- 1. Installation Instructions (Specifications → Wiring → Installer Menu → Using The Thermostat → Troubleshooting → Resetting)
- 2. Specifications (Electrical Rating → Setpoint Range → Operating Ambient → Occupancy Sensor Range → Humidity Range/accuracy → Shipping Temperature → Thermostat Applications)
- 3. Installation Instructions (Package Contents/tools Required → To Remove Existing Thermostat)
- 4. Installation Instructions (To Install Thermostat → Important → Note → Notice)
- 5. Installation Instructions (Wiring → Installer Menu → Precautions)
- 6. Installation Instructions (Way Communication Wiring → Note: 2-way Communication Provides Variable Speed Models With Temperature & Humidity Data To Optimize Performance. → For Make Up Air Models: To Deliver Make-up Air Only When A Room Is Occupied, Be Sure To Enable Make-up Air Occupancy Control On The Unit (mode B2). → Note: Colors Mentioned On Diagram Match Leads On Zoneline 2-way Connector Below.)
- 7. Installation Instructions (Way Communication Wiring → Note: 2-way Communication Provides Variable Speed Models With Temperature & Humidity Data To Optimize Performance. → For Make Up Air Models: To Deliver Make-up Air Only When A Room Is Occupied, Be Sure To Enable Mode 'e' In The Auxiliary Controls Of The Air Conditioner. → Note: Colors Mentioned On Diagram Match Leads On Zoneline 2-way Connector Below.)
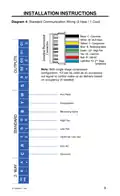
- 8. Installation Instructions (Standard Communication Wiring (3 Heat / 2 Cool) → Factory Default)
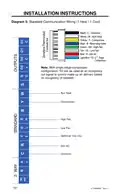
- 9. Installation Instructions (Standard Communication Wiring (2 Heat / 1 Cool) → Note: With Single Stage Compressor Configuration, Y2 Can Be Used As An Occupancy Out Signal To Control Make-up Air Delivery Based On Occupancy (if Needed))
- 10. Installation Instructions (Standard Communication Wiring (1 Heat / 1 Cool) → Aux Heat → Compressor → High Fan → Low Fan → V Ac)
- 11. Installation Instructions (Installer Menu → Indicator)
- 12. Installation Instructions (Installer Menu → Menu Item → Fan Mode → Heat Pump → Reversing Valve Type → Auto Changeover)
- 13. Installation Instructions (Installer Menu → Menu Item → Occupancy Energy Savings → Occupancy Response Time → Occupancy Cool Setback Temperature → Occupancy Heat Setback Temperature)
- 14. Installation Instructions (Installer Menu → Occupancy Status Timer → Scheduled Energy Savings Start Time → Scheduled Energy Savings Stop Time → Device 1 → Device 2 → Defaults Reset)
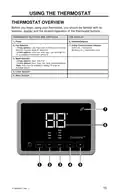
- 15. Using The Thermostat (Thermostat Overview → Thermostat Buttons And Switches → The Display)
- 16. Troubleshooting (Problem → Solution → No Display → System Fan Does Not Come On Properly → All Thermostat Buttons Are Inoperative → Thermostat Turns On And Off Too Frequently → Resetting The Thermostat Or Thermostat Settings)
- 17. Limited Warranty (What Ge Appliances Will Not Cover: → Exclusion Of Implied Warranties → Warrantor: Ge Appliances, A Haier Company)
- 18. Fcc Statement (Note)
- 19. Instructions Dinstallation (Spécifications → Installation Du Thermostat → Câblage → Menu De Linstallateur → Utilisation Du Thermostat → Dépannage)
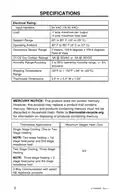
- 20. Spécifications (Paramètres Électriques → Plage De Réglage → Température Ambiante De Fonctionnement → Portée Du Capteur Doccupation → Plage Dhumidité/précision → Dimensions Du Thermostat → Applications Du Thermostat)
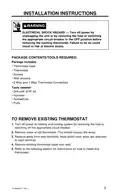
- 21. Installation Du Thermostat (Contenu De Lemballage → Outils Requis → Pour Retirer Le Thermostat Existant)
- 22. Installation Du Thermostat (Important → Remarque → Câblage → Notice)
- 23. Installation Du Thermostat (Câblage → Communication Bidirectionnelle → Communication Standard (unidirectionnelle) → Précautions)
- 24. Installation Du Thermostat (Diagramme 1 : Câblage De Communication À 2 Voies → Remarque : La Communication Bidirectionnelle → Pour Les Modèles À Air D'appoint :)
- 25. Installation Du Thermostat (Diagramme 2: Câblage De Communication Bidirectionnelle (5 Broches / 5 Fils) Utilisé Avec Les Modèles Az9v Uniquement.)
- 26. Installation Du Thermostat (Diagramme 3 : Câblage De Communication Standard → Chauffage Auxiliaire → Compresseur → Vanne Dinversion → Ventilateur Haut → Ventilateur Bas)
- 27. Installation Du Thermostat (Diagramme 4 : Câblage De Communication Standard → Chauffage Auxiliaire → Compresseur → Vanne Dinversion → Ventilateur Haut → Ventilateur Bas)
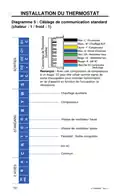
- 28. Installation Du Thermostat (Diagramme 5 : Câblage De Communication Standard → Aux Heat → Chauffage Auxiliaire → Compresseur → Vitesse De Ventilateur Haute → Vitesse De Ventilateur Basse → Facultatif : Sortie Occupation)
- 29. Installation Du Thermostat (Menu De Linstallateur)
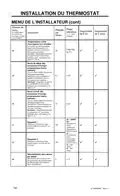
- 30. Installation Du Thermostat (Menu De Linstallateur (cont) → Réglage Par Défaut Menu → Description De 8 Fils De 2 Voies → Réglage Des Heures Actuelles (heure Militaire) → Mode Ventilateur → Thermopompe)
- 31. Installation Du Thermostat (Menu De Linstallateur (cont) → Réglage Par Défaut Menu → Zone Morte (f) → Temp. Refroidissement Min. (f) → Max Heating Temp (f) → Économies D'énergie Selon Loccupation)
- 32. Installation Du Thermostat (Menu De Linstallateur (cont) → Description De 8 Fils De 2 Voies → Temporisateur D'état D'occupation (en Minutes) → Heure De Début Des Économies D'énergie Programmées (heure Militaire) → Heure Darrêt Des Économies D'énergie Programmées (heure Militaire) → Réinitialisation Des Valeurs Par Défaut)
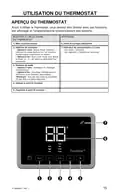
- 33. Utilisation Du Thermostat (Aperçu Du Thermostat → Boutons Et Sélecteurs Du Thermostat → Affichage)
- 34. Dépannage (Problème → Solution → Aucun Affichage → Le Système De Ventilation Ne Se Met Pas En Marche Correctement → Aucun Bouton Du Thermostat Ne Fonctionne → Le Thermostat Sallume Et Séteint Trop Fréquemment)
- 35.
- 36. Garantie Limitée Du Thermostat (Période De La Garantie → Ce Que Ge Appliances Ne Couvre Pas → Exclusion Des Garanties Implicites)
- 37. Déclaration De La Fcc (Remarque → Can Ices-003 (b) / Nmb-003 (b))
×
GE APPLIANCES RAK190V Energy Management Thermostat Owner’s Manual
INSTALLATION INSTRUCTIONS
INSTALLER MENU
To access the INSTALLER MENU, use the Power button to turn the
thermostat OFF. While OFF, press and hold the Mode and + button for 2
seconds until “Setup Mode” is shown on the display.
Once in the menu:
•
•
•
•
+ / – : change setting selection
Mode: advances to next menu item
Fan: returns to previous menu item
Power: saves changes and exits
Note: After two minutes of no key presses, Menu times out and returns to
Power Off black screen.
Indicator
confirms
you are
in setup
mode
Two Small
Digits =
Menu Item
Selection
Two Large
Digits =
Setting
Selection
31-5000842 Rev. 1
11
| General | Details |
|---|---|
| Name | GE APPLIANCES RAK190V Energy Management Thermostat Owner’s Manual |
| Make | GE Appliances |
| Language | English |
| Filetype | PDF (Download) |
| File size | 0.39 MB |

GE APPLIANCES RAK160W2 Wireless Thermostat User Manual

GE APPLIANCES RAK150VF2 Wall Thermostat Instruction Manual

GE APPLIANCES RAK190V 2 Way Energy Management Thermostat Instruction Manual

GE APPLIANCES RAK150VF2 Digital Wall Thermostat Instruction Manual

GE APPLIANCES THERMOSTAT Owner’s Manual


Honeywell T9 Smart Thermostat Installation Guide

EPH CONTROLS HRT Room Thermostat User Guide

Honeywell Home DT92E Wireless Room Thermostat User Manual
GENERAL 300S Wired Room Thermostat User Manual

Danfoss 015G3090 React Radiator Thermostat Installation Guide

TotalHome TTHWP Wireless Programmable Thermostat Installation Guide

nVent GM-TA Thermostat User Manual

TECH CONTROLLERS EU-R-12b Wireless Room Thermostat User Manual

Jung FTR231 Floor Thermostat Instruction Manual

TechPunt E1 Smart WiFi Radiator Thermostat User Guide
Table of Contents
- 1. Installation Instructions - Specifications →
- 2. Specifications - Electrical Rating →
- 3. Installation Instructions - Package Contents/tools Required →
- 4. Installation Instructions - To Install Thermostat →
- 5. Installation Instructions - Wiring →
- 6. Installation Instructions - Way Communication Wiring →
- 7. Installation Instructions - Way Communication Wiring →
- 8. Installation Instructions - Standard Communication Wiring (3... →
- 9. Installation Instructions - Standard Communication Wiring (2... →
- 10. Installation Instructions - Standard Communication Wiring (1... →
- 11. Installation Instructions - Installer Menu →
- 12. Installation Instructions - Installer Menu →
- 13. Installation Instructions - Installer Menu →
- 14. Installation Instructions - Installer Menu →
- 15. Using The Thermostat - Thermostat Overview →
- 16. Troubleshooting - Problem →
- 17. Limited Warranty - What Ge Appliances Will Not Cover: →
- 18. Fcc Statement - Note →
- 19. Instructions Dinstallation - Spécifications →
- 20. Spécifications - Paramètres Électriques →
- 21. Installation Du Thermostat - Contenu De Lemballage →
- 22. Installation Du Thermostat - Important →
- 23. Installation Du Thermostat - Câblage →
- 24. Installation Du Thermostat - Diagramme 1 : Câblage De Commun... →
- 25. Installation Du Thermostat - Diagramme 2: Câblage De Communi... →
- 26. Installation Du Thermostat - Diagramme 3 : Câblage De Commun... →
- 27. Installation Du Thermostat - Diagramme 4 : Câblage De Commun... →
- 28. Installation Du Thermostat - Diagramme 5 : Câblage De Commun... →
- 29. Installation Du Thermostat - Menu De Linstallateur →
- 30. Installation Du Thermostat - Menu De Linstallateur (cont) →
- 31. Installation Du Thermostat - Menu De Linstallateur (cont) →
- 32. Installation Du Thermostat - Menu De Linstallateur (cont) →
- 33. Utilisation Du Thermostat - Aperçu Du Thermostat →
- 34. Dépannage - Problème →
- 35. Page 35 →
- 36. Garantie Limitée Du Thermostat - Période De La Garantie →
- 37. Déclaration De La Fcc - Remarque →