Home > Emerson > EMERSON Programmable Touchscreen Thermostat Setup in E2 and Site Supervisor User Guide
EMERSON Programmable Touchscreen Thermostat Setup in E2 and Site Supervisor User Guide


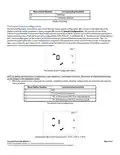


Thermostat Wiring and Connections
Once the baseplate is affixed on the wall, proceed with the wiring connections to the terminal block.
Thermostat Power
Thermostat Communication
R
24VAC Power Supply
B+
A-
RS-485 + Signal
24VAC Power Supply for
Y1, Y2
Rc
RS-485 - Signal
24VAC Power Supply
Common
Ground Reference for DC
signals
C
GND
Thermostat Power and Communication Matrix
2H / 2C System with 1
2H / 2C System with 2
Transformers
Heat Pump Systems
Transformer
24VAC Power
Supply
R
24VAC Power Supply
R
R
24VAC Power Supply
*Shorting
Jumper
*Shorting
Jumper
24VAC Power Supply
for Y1, Y2
24VAC Power
Supply for Y1, Y2
24VAC Power Supply
for Y1, Y2
Rc
Rc
C
Rc
C
24VAC Power Supply
Common
24VAC Power
Supply Common
24VAC Power Supply
Common
C
Cool Stage 1, relay
output
Cool Stage 1, relay
output
*Cool Stage 1, relay
output
Y1
Y2
W1
W2
G
Y1
Y2
Y1
Y2
O/B
G
Cool Stage 2, relay
output
Cool Stage 2, relay
output
*Cool Stage 2, relay
output
Heat Stage 1, relay
output
Heat Stage 1, relay
output
Reversing Valve, relay
output
W1
W2
G
Heat Stage 2, relay
output
Heat Stage 2, relay
output
Fan Control, relay
output
Fan Control, relay
output
Fan Control, relay
output
Wiring and Connections
*For systems with only one stage, the second stage terminals (Y2, W2) can be left floating open.
Setup and Configuration
On the first start-up of the thermostat, the default System Configuration is idle. This means that the first step to get the device
started is to configure the appropriate system configuration. The following menu will appear by default upon the first
startup:
Thermostat Display in Idle Configuration
To access the Configuration Menu press the technician
icon for 10 seconds. If the thermostat has been previously
configured, to access the configuration menu from the main display, a technician icon should be displayed on the right bottom
corner of the screen. The technician icon is not displayed automatically. To display the technician icon, touch on the
right-bottom corner of the screen, and then press the technician icon
for 10 seconds.
Document Part # 026-4850 Rev 1
Page 2 of 10
©2020 Emerson Retail Solutions, Inc. This document may be photocopied for personal use.
| General | Details |
|---|---|
| Name | EMERSON Programmable Touchscreen Thermostat Setup in E2 and Site Supervisor User Guide |
| Make | Emerson |
| Language | English |
| Filetype | PDF (Download) |
| File size | 0.23 MB |


EMERSON ST75W Sensi Touch Wi-Fi Smart Thermostat Installation Guide

EMERSON Thermostat Common Wire Kit SA11 Instruction Manual

EMERSON 1F75H-21PR Programmable Heat Pump Thermostat Instruction Manual

EMERSON 1F75C-11PR Programmable Thermostat Installation Guide

EMERSON 1D56-310 White-Rodgers Low Voltage Horizontal Mounting Thermostat Instruction Manual

EMERSON 1F76U-22WFB Series Sensi Lite Smart Thermostat Installation Guide

EMERSON 1F87U-42WF Sensi Smart Thermostat User Guide

EMERSON 1F83C-11NP Single Stage Thermostat Owner’s Manual

EMERSON 1F75P-21PR Display Thermostat Instruction Manual

EMERSON 1F75H-21NP Non Programmable Heat Pump Thermostat Instruction Manual


STEGO Type STO-STS 011 Mechanical Thermostat Instruction Manual

AIRQUEST TSTATIIEWF ION Gray Smart Thermostat Owner’s Manual

resideo T3 Programmable Thermostat Installation Guide

hansgrohe AXOR CARLTON Thermostat Mixer Instruction Manual

DEVI 530M Electronic Thermostat Installation Guide

Danfoss AN527449268065en-000101 Thermostat Instruction Manual

Ensto ECO16BT-IN-WW Floor Heating Thermostat User Guide

aube technologies TH104PLUS 5-2 Day Programmable Electric Thermostat Owner’s Manual

TechPunt E1 Smart WiFi Radiator Thermostat User Guide

micro-Air ASY-357-X02 EasyTouch 357 Touchscreen Thermostat User Manual