elko One Matter Thermostat Owner’s Manual

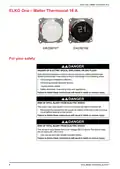


ELKO One – Matter Thermostat 16 A
Device User Guide
Information about features and functionality of the device.
11/2024

| General | Details |
|---|---|
| Name | elko One Matter Thermostat Owner’s Manual |
| Make | ELKO |
| Language | English |
| Filetype | PDF (Download) |
| File size | 0.83 MB |
 (1 votes, average: 5.00 out of 5)

ELKO EKO50107, EKO50108 Matter Thermostat Installation Guide

ELKO EKO07258 16A Smart ZB Thermostat User Guide

elko One Matter Thermostat Owner’s Manual Overview
Summary of Contents
- Page 1: Device user guide Information about features and functionality of the device.
- Page 2: Legal information The information provided in this document contains general descriptions, technical characteristics and/or recommendations related to products/solutions. This document is not intended as a substitute for a detailed study or operational and site-specific development or schematic plan. It is not to be used for determining suitability or reliability of the products/solutions for specific user applications. It is the duty of any such user to perform or have any professional expert perform the appropriate and comprehensive risk analysis, evaluation and testing of the products/solutions. The ELKO brand and any trademarks of ELKO AS and its subsidiaries referred to in this document are the property of ELKO AS or its subsidiaries. This document and its content are protected under applicable copyright laws and provided for informative use only. No part of this document may be reproduced or transmitted in any form or by any means without the prior written permission of ELKO. ELKO reserves the right to make changes or updates with respect to or in the content of this document at any time without notice. No responsibility or liability is assumed by ELKO and its subsidiaries for any errors or omissions in the informational content of this document.
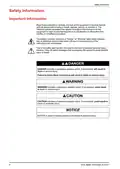
- Page 3: Safety information is crucial for the proper use of the device. Read these instructions carefully to become familiar with the device before installation or operation. Special messages may appear throughout the manual to warn of potential hazards. The safety alert symbol indicates potential personal injury hazards. Obey all safety messages that accompany the safety alert symbol. Danger indicates a hazardous situation that will result in death or serious injury if not avoided. Warning indicates a hazardous situation that could result in death or serious injury if not avoided. Caution indicates a hazardous situation that could result in minor or moderate injury if not avoided. Notice addresses practices not related to physical injury. Failure to follow instructions may result in serious consequences.
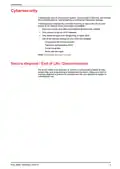
- Page 4: Cybersecurity aims to prevent your system, communication networks, and devices from possible attacks, data tampering, or confidential information leakage. Following these cybersecurity principles may help to reduce the risk of cyber threats to the network where your system is installed. Keep your phone up-to-date and install the latest security updates. Only connect to secure Wi-Fi networks. Only download apps from Google Play or Apple store. Use all the security settings on your smartphone/tablet, including long passcodes or pass phrases, two-factor authentication (2FA), facial recognition, and blocking unknown apps. If a device needs to be disposed of, perform a factory reset to delete all data. Make sure that it is securely disposed to prevent its redeployment into your operational system or unauthorized use.
- Page 5: For your safety Danger Hazard of electric shock, explosion, or arc flash Safe electrical installation must be carried out only by skilled professionals. Skilled professionals must prove profound knowledge in connecting to installation networks, connecting several electrical devices, laying electric cables, and safety standards. Failure to follow these instructions will result in death or serious injury. Risk of fatal injury from electric shock The output may carry electric current even when the load is switched off. Disconnect the device from the supply by means of the fuse in the incoming circuit before working on the device. The device is not a Safety Extra Low Voltage (SELV) device. Only use sensors with double insulated cables.
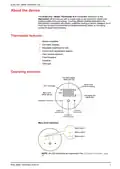
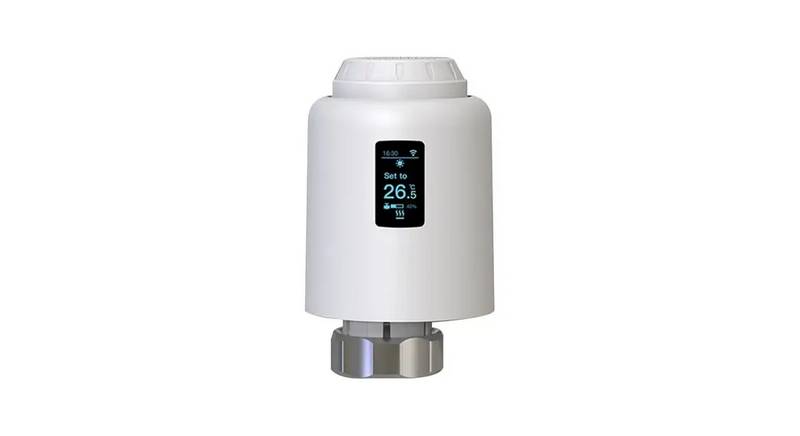
- Page 6: About the device The ELKO One – Matter Thermostat 16 A will provide you with a simple, easy to use product to control your heating system and save energy. The thermostat is compatible with electric underfloor heating or electric radiators, but it could also be used to control mains-powered motorized valves or circulating pumps for water-based heating. Thermostat features: • Matter-compatible • Dot-matrix displays • Adjustable brightness for LED • Control room temperature setpoint • Open window detection • Frost Protection • Schedule • Child lock • Wi-Fi LED (RGB) • Capacitive Touch Pad
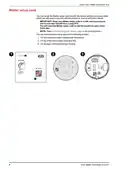
- Page 7: Matter setup code is located on both the device and the instruction sheet. Keep your Matter setup code in a safe and secure place. No one else should have a copy of the Matter setup code. You will need the Matter setup code to add the product to your smart home app. Refer to Commissioning with Matter for the pairing process. The Matter setup label can be found on the instruction sheet supplied with the product. The Matter setup label is also on top of the thermostat's protective film. The Matter setup label is located on the back of the thermostat logic module.
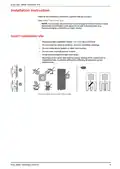
- Page 8: ELKO One – Matter Thermostat 16 A Installation instruction Refer to the installation instruction supplied with this product. It is strongly recommended to use a surge protection device in case thermostat is connected in the same circuit with inductive loads. Recommended installation height: 1 to 1.5 m above the floor. Do not install too close to windows, doors or ventilation openings. Do not install above heaters or other heat sources. Avoid direct sunlight and light from lamps. Mounting on the cavity wall requires proper sealing of the conduit box or installation tube.
- Page 9: ELKO Matter Thermostat 16 A Installer setting Thermostat can be configured in two installer levels according to room heating requirement. This process should only be used by authorized/professional installers. Installer Level 1 allows you to set the preset value depending on what the thermostat is directly controlling. Installer Level 2 enables you to configure additional thermostat parameters, enhancing the user's experience in temperature regulation. You can preset the thermostat on the first power-on or immediately after an ex-factory reset. Preset selection is a manual process and all preset uses a PI control algorithm which provides highly stable results. You can choose one preset configuration based on control type and setpoint range. Cycle time setting determines the length of each on/off cycle of the output relay. A longer cycle time may be more appropriate for slow heating surfaces, while a short cycle time is more suitable for faster heating surfaces.
- Page 10: Initial preset configuration When the thermostat enters preset mode, by default “P2” flashes on the matrix LEDs if there is no external sensor connected, or “P4” if there is any external sensor connected. Modifying the preset value To modify the preset from default value, wake-up the thermostat by pressing any touch button and then simultaneously press O and + for 5 s to access the installer settings menu. Note: If the preset is already configured and you want to change the value, reset it to the ex-factory settings before making any changes to the preset. Dot matrix display shows default preset. Wi-Fi LED turns purple. Then, use the + button on the thermostat to increase the preset value by 1 and the – button to decrease the preset value by 1. Note: To exit preset menu, simultaneously press O and + or thermostat will automatically exit if there is no interaction within 10 s.
- Page 11: One – Matter Thermostat 16 A Confirming the preset Select the preset that meets your needs using the +/- buttons, and then hold the O for > 1 s to confirm the selection. Once the preset is confirmed, the device proceeds to Installer Level 2. Installer Level 2 enables you to configure additional thermostat parameters, enhancing the user's experience in temperature regulation. Based on the preset value set in Installer Level 1, additional parameters can be configured. Once the preset is chosen, press O button for 1 s to confirm the preset. When you enter Installer Level 2, the Wi-Fi LED glows purple, and the left most menu level indicator glows white. Press + or – to navigate between the menu options.
- Page 12: One Matter Thermostat 16 A is designed to connect with an external floor sensor for room temperature regulation. The thermostat allows for the selection of different floor probe types to ensure accurate temperature display. To select the floor sensor type, access menu 51 by pressing the O touch button for more than 1 second. Use the + or – touch buttons to switch between available sensor types. Available sensor types include: - Not equipped with any probe - 2 kOhm - 10 kOhm - 12 kOhm - 15 kOhm - 33 kOhm - 47 kOhm Confirm the selected sensor type by pressing the O touch button for more than 1 second.
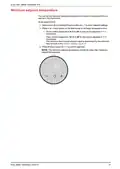
- Page 13: Minimum floor limit After setting floor probe type, you must set the minimum floor limit. It is the lower limit of the floor sensor. To set floor limit: Select menu 52 by pressing O touch button for > 1 s to enter the settings. Press + or – touch button on the device to set the minimum limit. Press the O touch button for > 1 s to confirm the selection. The temperature limit ranges from 10° C to 39° C. Each “+/–” tapping will increase or decrease the temperature by 1° C. When the minimum floor limit is set, it changes the minimum floor control setpoint that can be set in the user settings. Maximum floor limit After setting minimum floor limit, you must set the maximum floor limit. It is the upper limit of the floor sensor. To set maximum guard temperature: Select menu 53 by pressing O touch button for > 1 s to enter the settings. Press + or – touch button on the device to set the maximum limit. Press the O touch button for > 1 s to confirm the selection. The temperature limit ranges from 11° C to 40° C. When the maximum floor limit is set, it changes the maximum floor control setpoint that can be set in the user settings.
- Page 14: Control method Control method used in thermostats to achieve variable heating outputs for precise control of the average power delivered to the heating system. To set control method: Select menu 54 by pressing O touch button for > 1 s to enter the settings. Press + or – touch button on the thermostat to switch between the options. Control method 01 to 03 works on PWM (Pulse Width Modulation) which rapidly switches the power on and off to achieve variable output. Control method 04 and 05 works on PID (Proportional-Integral-Derivative) which uses feedback to continuously adjust the output based on the difference between the desired setpoint and the actual temperature. Press the O touch button for > 1 s to confirm the selection.
- Page 15: One – Matter thermostat 16 A This parameter setting in a thermostat is only available when the control method is set to option 04 or 05. You can set the minimum duration for which the thermostat's heating system must remain On or Off before it can switch the state. This feature helps to prevent rapid cycling of the system, which can improve energy efficiency and reduce wear and tear on the equipment. When enabled, switch over takes place every hour. To set 2-pt min: Select menu 55 by pressing O touch button for > 1 s to enter the settings. Press + or – touch button on the thermostat to switch between the option ranges from 1 to 10 represented in mins. Each “+/–” tapping will increase or decrease the value by 1. Press the O touch button for > 1 s to confirm the selection.
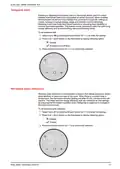
- Page 16: Temporal limit Enabling or disabling the temporal limit in a thermostat allows users to control whether time-based restrictions are applied to certain functions. When enabled, the thermostat will adhere to predefined time constraints for specific settings or modes, helping to manage energy usage and maintain comfort effectively. To set temporal limit: 1. Select menu 56 by pressing O touch button for > 1 s to enter the settings. 2. Press + or – touch button on the thermostat to display following option. 3. Press the O touch button for > 1 s to confirm the selection. Windows open detection Windows open detection in a thermostat is a feature that utilizes sensors to detect when windows or doors are open in the room. When there is a sudden drop in temperature, the thermostat will stop heating and after 20 min, normal control will resume. To set windows open detection: 1. Select menu 57 by pressing O touch button for > 1 s to enter the settings. 2. Press + or – touch button on the thermostat to display following option. 3. Press the O touch button for > 1 s to confirm the selection.
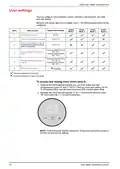
- Page 17: User settings You can configure LED brightness, sensor calibration, set point limit, and other end user settings. Based on the preset value set in Installer Level 1, the following parameters can be configured: Preset Mode 1, Preset Mode 2, Preset Mode 3, Preset Mode 4. Idle brightness, page 19. Room sensor calibration, page 20. Floor sensor calibration, page 20. Minimum setpoint temperature, page 21. Maximum setpoint temperature, page 22. Stand-by mode, page 23. To access user setting menu (menu level 3): Wake-up the thermostat by pressing any one touch button and then simultaneously press + and – for 5 s. If the thermostat remains inactive for 10 seconds during the process, it will time out and exit the settings.
- Page 18: Idle brightness can be configured for the thermostat when inactive. To set idle brightness, select menu 1 by pressing the O touch button for more than 1 second. Use the + or – touch buttons to switch between brightness levels. Brightness levels include: 00 (0% - no display), 01 (10%), 02 (25%), 03 (50%), 04 (75%), and 05 (100%). Press the O touch button for more than 1 second to confirm the selection.
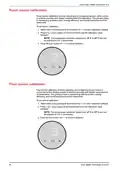
- Page 19: Room sensor calibration involves adjusting and configuring sensors within a room to achieve accurate and reliable measurement of temperature. This process helps in maintaining optimal comfort, energy efficiency, and overall performance of the thermostat. To set sensor calibration: Select menu 2 by pressing O touch button for > 1 to enter calibration settings. Press + or – touch button on the thermostat to set the calibration value. The temperature calibration ranges from -9° C to +9° C and can be adjusted in 0.5° C increments. Press O touch button for > 1 to confirm selection. Floor sensor calibration involves adjusting and configuring sensors which is connected to floor heating system to achieve accurate and reliable measurement of temperature. This process helps in maintaining optimal comfort, energy efficiency, and overall performance of the thermostat. To set sensor calibration: Select menu 3 by pressing O touch button for > 1 to enter calibration settings. Press + or – touch button on the thermostat to set the calibration value. The temperature calibration ranges from -9° C to +9° C and can be adjusted in 0.5° C increments. Press O touch button for > 1 to confirm selection.
- Page 20: Minimum setpoint temperature can be set in the thermostat. To set setpoint limit, select menu 4 by pressing O touch button for more than 1 second. Press + or – touch button on the thermostat to set lower temperature limit. Room control ranges from 4° C to 29° C and can be adjusted in 1° C increments. Floor control ranges from 10° C to 39° C and can be adjusted in 1° C increments. The minimum floor control setpoint value is determined by the minimum floor limit set in the installer settings. Press O touch button for more than 1 second to confirm selection. The minimum setpoint temperature should be lower than maximum setpoint temperature.
- Page 21: Maximum setpoint temperature can be set in the thermostat. To set setpoint limit, select menu 5 by pressing O touch button for more than 1 second. Room control ranges from 5° C to 30° C and can be adjusted in 1° C increments. Floor control ranges from 11° C to 40° C and can be adjusted in 1° C increments. The maximum floor control setpoint value is determined by the maximum floor limit set in the installer settings. Press O touch button for more than 1 second to confirm selection. The maximum setpoint temperature should be higher than the minimum setpoint temperature. Example: When the minimum setpoint limit is set to 12° C and the maximum setpoint limit is set to 28° C, the thermostat allows for a minimum room temperature setting of 12° C and a maximum room temperature setting of 28° C.
- Page 22: Stand-by mode When room heating is not needed, you can put the thermostat into stand-by mode. To set stand-by mode: Select menu 6 by pressing O touch button for > 1 to enter stand-by mode settings. Press + or – touch button on the thermostat to display and then press O touch button for > 1 to confirm selection. When thermostat display, press O touch button for > 1 to exit stand-by mode setting. When thermostat is set to stand-by mode: Occupied setpoints is not used. LED display is turned off. Wi-Fi network is turned off. If thermostat is in heating mode, frost protection will be enabled. To cancel existing stand-by mode, press any touch button for >5 s.
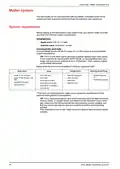
- Page 23: Matter thermostat 16 A The thermostat can be commissioned with any Matter compatible smart home system. Before setting up the thermostat, ensure that you meet the minimum system requirements. Apple users need iOS 16.1 or later. Android users need Android 8.1 or later. Connect the Matter device with a Wi-Fi router on 2.4 GHz bands. The 2.4 GHz band signal can travel a greater distance than other bands. Supported smart home platforms include Apple Home, Google Home, Samsung SmartThings, and Alexa. Review the specifications of the required smart platform hubs/speakers. Ensure that the smart home hub and your phone/app have the latest software updates for smoother commissioning.
- Page 24: Commissioning with Matter Make sure installer setting and user setting are configured before commissioning. Wake-up the thermostat by pressing any one touch button and then press and hold O button for 2 to 5 seconds to enter commissioning mode. The thermostat matrix display Jn and LED turns yellow to indicate commissioning mode is initiated. Open Matter supported smart home app and scan the Matter code provided with the thermostat. Wait for few seconds for the thermostat to get commissioned. You can check the progress in the app. Upon successful commissioning, app shows the connected message and turns solid yellow. If any error occurs during commissioning process, thermostat matrix display “Er” LED turns red. Press O touch button to exit and restart Matter Wi-Fi configuration.
- Page 25: ELKO One – Matter Thermostat 16 A Matter commissioning video reference Commonly used smart home commissioning videos for the following ecosystems: Amazon Alexa Apple Home Google Home Homey Pro How to set up the ELKO One Matter thermostat with Amazon Alexa How to set up the ELKO One Matter thermostat with the Apple Home Pod How to set up the ELKO One Matter thermostat with Google Home How to set up the ELKO One Matter thermostat with Homey Pro
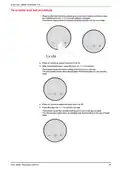
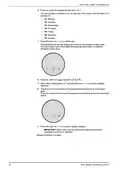
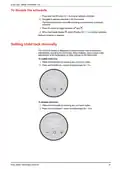
- Page 26: Setting the room temperature can be done manually by pressing the touch button on the thermostat. Press the “+” button to increase the temperature setpoint. Press the “–” button to decrease the temperature setpoint. Temperature can be adjusted in 0.5°C increments. Max. and min. temperature setpoint is based on the limit defined in the user setting. In P4, if a floor sensor is fitted, the device will be in room temperature with floor limits mode. If the room temperature equals or exceeds the setpoint, and the floor temperature is below the lower limit, a demand is created to heat the room. If the room temperature is lower than the setpoint and the floor temperature exceeds the upper limit, control output should be prevented. The demand LED flashes white at 1 Hz under specific conditions.
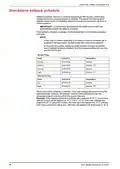
- Page 27: Standalone setback schedule allows the thermostat to operate based on a programmed schedule without external input. Connecting the thermostat to the Matter environment will automatically disable the setback schedule. In case of a fresh installation or power-cut with no schedule set, the thermostat will control to the setpoint. During a power outage with the setback schedule enabled, the thermostat maintains the set time and day for 8 hours. The setback schedule for Monday to Friday includes specific time slots for morning, daytime, evening, and night with corresponding temperature setpoints. For Saturday and Sunday, the setback schedule includes day and night temperature setpoints. If the user changes the setpoint while the setback schedule is enabled, the new value will take precedence until the end of the current time slot. After the current time slot ends, the setpoint will revert back to the scheduled value. An example illustrates how changing the setpoint affects the thermostat's operation during a scheduled event.
- Page 28: ELKO One – Matter Thermostat 16 A To enable and set schedule Wake-up the thermostat by pressing any one touch button and then press and hold O button for >= 5 s to enter setback schedule. Thermostat matrix blinks h indicates that thermostat is in set hour state. Press +/- button to adjust hour from 0 to 23. After selecting the hour, press O button for > 1 s to confirm. Thermostat saves the hours setting and move to set minutes. Thermostat matrix blinks m indicates that thermostat is in set minutes state. Press +/- button to adjust minutes from 0 to 59. Press O button for > 1 s to confirm minutes. Thermostat saves the minutes setting and move to set day of week. Thermostat matrix blinks d indicates that thermostat is in set day of week state.
- Page 29: ELKO Matter Thermostat 16 A You can specify a schedule to run on any day of the week, from Monday (1) to Sunday (7). Press O button for > 1 s to confirm day. The thermostat matrix blinks Sb indicating that thermostat is in setback schedule enable state. Press +/- button to toggle between settings. When thermostat display selection, press O button for > 1 s to confirm setback. The thermostat matrix blinks T indicating that thermostat is in set setpoint state. Press +/- button to set the required setpoint temperature during the scheduled period. Press O button for > 1 s to confirm setback setpoint. Make sure to set all parameters before enabling the schedule to avoid error detection. Setback schedule is enabled.
- Page 30: To disable the schedule, press and hold the O button for more than 5 seconds to enter setback schedule. Navigate to setback schedule in the thermostat. The thermostat matrix blinks Sb indicating the thermostat is in setback schedule. Press +/- button to toggle between options. When the thermostat display shows the desired option, press O button for more than 1 second to confirm selection. Setback schedule is disabled. The child lock feature is designed to prevent children from accessing or inadvertently operating the thermostat. To enable child lock, wake the thermostat by pressing any one touch button and hold O and – button simultaneously for more than 5 seconds. To disable child lock, wake the thermostat and hold O and – button simultaneously for more than 10 seconds.
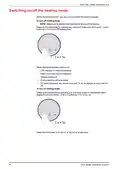
- Page 31: One Matter Thermostat 16 A Switching on/off the heating mode When thermostat is not in use, you can turn on/off the device manually. Make sure to disable child lock before turning off the device. Wake-up the thermostat by pressing any one touch button and then press the touch button for > 5 s to turn off heating mode. When thermostat heating mode is off, LED displays no room temperature. Frost protection will be enabled. On initial interaction, the device shows an “X” on the display to show that it is off. Wake-up the thermostat by pressing any one touch button to thermostat matrix display X. Press the button for > 5 s to turn on. When the thermostat is turned on, it returns to its last state.
- Page 32: ELKO Matter thermostat 16 A Matter Over The Air (OTA) allows users to receive firmware updates. To check for a firmware update, go to the device settings in your smart home app. Tap Update to install the latest firmware. The Matter thermostat will show a loading LED indication while the update is in progress. Once the update is complete, the thermostat will display the setpoint and the app shows the latest firmware version.
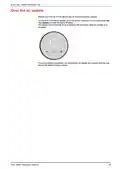
- Page 33: Resetting the device You can manually reset the thermostat to reset user data or perform a complete factory reset. Reset user data Wake up the thermostat by pressing any one touch button and then simultaneously press + and – for 5 seconds to enter user setting. Once you enter user setting, the Wi-Fi LED glows yellow, and both menu depth LED indicators glow white. Press + or – touch button for the thermostat to display 49 and then press O touch button for more than 1 second to confirm selection. Press + or – touch button to navigate between the following options: to process with reset or to cancel reset and go back to user setting. Press O touch button for more than 5 seconds to confirm selection. If the thermostat remains inactive for 10 seconds during the process, it will time out and exit the settings. Reset user data will reset Matter connection, restore setpoint and user settings to default, and maintain the installer configuration of the device.
- Page 34: Ex-factory reset Wake-up the thermostat by pressing any one touch button and then simultaneously press O and + for 5 seconds to enter installer setting. Once you enter installer setting, the Wi-Fi LED glows purple. Press + or – touch button for thermostat to display 99 and then press “O” touch button for more than 1 to confirm selection. Press + or – touch button to navigate between options. Ex-factory reset will reset Matter connection, restore setpoint and user settings to default, delete all schedules information, restore installer setting to default, and reboot as ex-factory state. The external housing should be kept clean. Wipe the surface with a damp cloth. Do not use any cleaning agent, especially alcohol. Failure to follow these instructions can result in equipment damage.
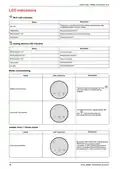
- Page 35: Matter thermostat 16 A has various LED indications for different statuses. The Wi-Fi LED indicates whether the thermostat is connected or disconnected from Wi-Fi. A yellow solid light means it is disconnected from Wi-Fi, while a white solid light indicates a successful connection. Heating demand is shown through specific LED signals, such as blinking white for limit sensor errors or window open detection. The thermostat displays different messages during Matter commissioning, including a yellow light for joining progress and a red light for failure to join the network. User interaction is required for preset selection, indicated by the matrix display showing specific codes based on sensor connections. The default display shows P2 for no external sensor and P4 for an external sensor connected.
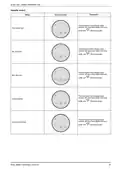
- Page 36: ELKO One – Matter Thermostat 16 A Installer level 2 Description Status User interaction The thermostat matrix display menu Floor probe type Min. floor limit Max. floor limit Control method 2-pt min On/Off time
- Page 37: ELKO Matter Thermostat 16 A The thermostat matrix display menu Temporal limit Windows open detection User settings Status User interaction Idle brightness Room sensor calibration Floor sensor calibration
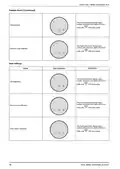
- Page 38: User settings (Continued) The thermostat matrix display menu Minimum setpoint temperature Maximum setpoint temperature Stand-by mode Resetting the device User interaction Reset User Data Ex-factory Reset
- Page 39: Temperature display shows limits from -9 °C to 99 °C. The display flashes “--” when the temperature is below -9 degrees. Flashing “--” may indicate a temperature reading error. The display flashes “++” when the temperature is above 99 degrees. The thermostat matrix indicates set hour, minute, and day of the week states. Setback schedule is part of the user interaction. Status indicators are displayed on the thermostat matrix. User interaction is facilitated through the thermostat matrix display. The thermostat matrix provides feedback on temperature limits. Description sections outline the functionality of the thermostat.
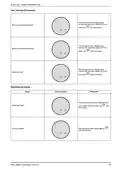
- Page 40: ELKO One – Matter Thermostat 16 A Setback schedule The thermostat matrix display indicating set setback scheduled state. Setback The thermostat matrix display indicating set setpoint temperature state. Setback setpoint temperature Other LED indication User interaction Child lock enabled Child lock disabled
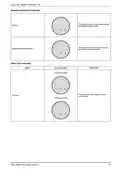
- Page 41: - The thermostat matrix display indicates that heating mode is off. - Heating mode is off. - Over the air (OTA) update is in progress.
- Page 42: Troubleshooting The thermostat heating mode is Off. The thermostat has gone offline. Unable to commission the thermostat with app. The thermostat is in child lock mode. Technical Data Nominal voltage: AC 230 V ~, 50 Hz. Maximum current rating: max. 16 A, 3680 W. Temperature accuracy: max. ±0.5 °C (across the range of 4 to 30 °C). Wi-Fi standard: IEEE 802.11 b/g/n 2.4 GHz. Protection Class: II.
- Page 43: Compliance Open source license information This product is provided with certain open source software components developed by third parties. The OSS is licensed in accordance with the OSS license terms set forth below. Apache-2.0 License SPDX identifier Apache License Version 2.0, January 2004 TERMS AND CONDITIONS FOR USE, REPRODUCTION, AND DISTRIBUTION
- Page 44: Compliance Definitions License shall mean the terms and conditions for use, reproduction, and distribution as defined by Sections 1 through 9 of this document. Licensor shall mean the copyright owner or entity authorized by the copyright owner that is granting the License. You (or Your) shall mean an individual or Legal Entity exercising permissions granted by this License. Source form shall mean the preferred form for making modifications, including but not limited to software source code, documentation source, and configuration files. Object form shall mean any form resulting from mechanical transformation or translation of a Source form. Work shall mean the work of authorship, whether in Source or Object form, made available under the License. Derivative Works shall mean any work, whether in Source or Object form, that is based on (or derived from) the Work. Contribution shall mean any work of authorship, including the original version of the Work and any modifications or additions to that Work. Contributor shall mean Licensor and any individual or Legal Entity on behalf of whom a Contribution has been received by Licensor. Grant of Copyright License. Subject to the terms and conditions of this License, each Contributor hereby grants to You a perpetual, worldwide, non-exclusive, no-charge, royalty-free, irrevocable copyright license to reproduce, prepare Derivative Works of, publicly display, publicly perform, sublicense, and distribute the Work and such Derivative Works in Source or Object form.
- Page 45: Compliance Grant of patent license: Each Contributor grants a perpetual, worldwide, non-exclusive, royalty-free patent license to make, use, and distribute the Work. Redistribution: You may reproduce and distribute copies of the Work or Derivative Works with certain conditions, including providing a copy of the License to recipients. Submission of contributions: Any Contribution submitted for inclusion in the Work is under the terms of this License unless stated otherwise. Trademarks: The License does not grant permission to use the trade names or trademarks of the Licensor, except for descriptive purposes. Disclaimer of warranty: The Work is provided AS IS without warranties or conditions of any kind, and you assume risks associated with its use.
- Page 46: Compliance Limitation of liability states that no Contributor is liable for damages arising from the use or inability to use the Work. Damages include direct, indirect, special, incidental, or consequential damages. Liability is limited unless required by applicable law or agreed to in writing. Accepting warranty or additional liability allows you to offer support or indemnity while redistributing the Work. You act on your own behalf and are solely responsible for any obligations you accept. You must indemnify and hold each Contributor harmless for any liability incurred due to your acceptance of additional liability. For more details, refer to the provided link.
- Page 47: Compliance MIT License Permission is granted to use, copy, modify, merge, publish, distribute, sublicense, and/or sell copies of the software. The software is provided as is, without warranty of any kind. The authors or copyright holders are not liable for any claim, damages, or other liability arising from the software. EU Declaration of Conformity ELKO declares that this product is in compliance with the essential requirements of the Radio Equipment Directive 2014/53/EU. Trademarks This guide references system and brand names that are trademarks of their respective owners. Amazon, Alexa, and related logos are trademarks of Amazon.com, Inc. or its affiliates. Apple and App Store are registered trademarks of Apple Inc. Google, Google Home, Google Play Store, and Android are trademarks of Google LLC. Wi-Fi is a registered trademark of Wi-Fi Alliance.

STELPRO STE302NP Single Programming Electronic Thermostat User Guide

BEOK CONTROLS TGT79 Touch Screen Thermostat Instruction Manual

vtech W960 E-Smart Wireless Thermostat User Manual

ENGO CONTROLS EASYBATB Wired Thermostat User Guide

Schluter DITRA-HEAT-E-RS1 Smart Thermostat Instruction Manual

Honeywell RTHL2510 Series Programmable Thermostat Owner’s Manual

Honeywell Home RLV3150 Electric Thermostat User Guide

honeywell RLV3150 Electronic Thermostat User Manual

Danfoss TPOne-RF Electronic Programmable Room Thermostat Installation Guide
tuya TRV603 Smart WiFi Radiator Thermostat Instruction Manual