
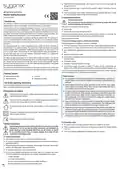
Sygonix 2735095 Wireless Indoor Thermostat Instruction Manual
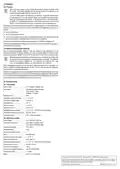


6.4 Icons
Icon
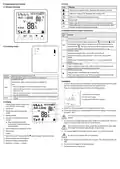
6 Components and controls
6.1 Wireless thermostat
Meaning
Visible when the keypad is locked. Disappears when keypad is unlocked.
Visible when heating is ON. Disappears when heating is OFF.
AUTO mode: Weekly schedule program is running.
Manual mode.
Holiday mode: Set the number of days you will be away and a temperature.
Flashes when there is no wireless connection to the switching module. When
connected, the symbol is displayed permanently.
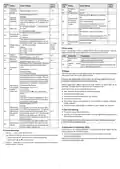
6.5 Wireless thermostat button functions (a)
B u t -
Function
ton
Press to turn the power ON/OFF.
Press this button briefly to toggle between manual
and automatic modes.
Programmable setting: Switch on the device and use this button to enable the
automatic mode . Then press and hold the button for three to five seconds.
6.2 Switching module
Advanced options setting: Turn power off, then press and hold 3 - 5 sec.
Confirms a setting.
During normal operation press to set the time and day of week.
During normal operation, press and hold 3 - 5 sec to enter “holiday mode”
settings.
With the power off, press and hold for approx. 3 - 5 secs to enter advanced
settings.
Press to increase a value.
Press to temporarily override “auto” mode and increase the temperature (auto
settings will be retained when exiting manual override).
Press to decrease value.
Press and hold to activate/deactivate the keypad lock.
Press to temporarily override “auto” mode and decrease the temperature (auto
settings will be retained when exiting manual override).
ON/OFF Switches the switching module on or off.
POWER Power light (green) goes on when the device is switched on.
Load/fault light (red)
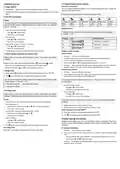
Installation
Normal status: Lights up when the consumer is switched on.
Error:
1. To remove the front panel of the thermostat or the switching module, press in the upper
clips with a small flat screwdriver and pull off the front panel to the front.
– When the light flashes 2 times, it means that the IP is faulty.
Load
2. There are 6 connecting terminals on the back of the switching module:
– When the light flashes 3 times, it means that the device has received no radio
signal for an hour.
– When the light flashes 4 times, it means that the sensor is faulty (only for recei-
vers with external sensors).
– Lights up within 10 seconds after power-on. Flashes when a switching signal is
received.
1, 2) electrical load (consumer)
3, 4) main power supply
Signal
5, 6) external NTC thermistor (optional).
6.3 Display
1
6 programmable periods (morning, work,
lunch, afternoon, evening, night)
12
11
1
ꢀ
Connect the mains power supply to the corresponding inputs 3 and 4.
2
3
Current time
2
3
ꢀ
Connect the consumer (e.g. an electric radiator or electric floor heating) to the correspond-
Wireless connection to the switching
ing outputs 1 and 2.
module
10
9
4
5
Weekday intervals
If the consumer requires a protective earth connection, it must be connected se-
parately.
4
Automatic mode (preset programme is
running)
3. You can connect an external temperature sensor (probe) to terminals 5 and 6. There is no
ꢀ
P
r
e
s
s
t
h
e
S
e
t
t
i
n
g
s
b
u
t
t
o
n
polarity so it does not matter which way you connect the wires.
5
6
7
8
briefly to switch between manual and
When routing the connection cables, ensure they are protected from sharp edges.
automatic modes.
Never fasten the connection cable with nails, screws or similar.
6
7
8
9
Manual mode (manual temperature control)
Holiday mode
Heating
4. The mounting height of the thermostat should be approx. 1.5 m above the floor level.
Be careful not to damage the cables during installation.
Button lock enabled: Press and hold the button for approx. 3 seconds to unlock.
10 Room temperature (actual temperature)
11 Temperature setting (set temperature)
12 Weekday (1 = Monday, 7 = Sunday)
5. Replace the front panels and press them firmly into place. They should click audibly into
place.
6. Turn on the mains voltage for the switching module.
7. The thermostat is now ready to use.
2

| General | Details |
|---|---|
| Name | Sygonix 2735095 Wireless Indoor Thermostat Instruction Manual |
| Make | Sygonix |
| Language | English |
| Filetype | PDF (Download) |
| File size | 0.79 MB |
 (1 votes, average: 5.00 out of 5)
 Loading...

sygonix SY-5470190 Wireless Indoor Thermostat Instruction Manual

Sygonix 2992337 DIN Rail Mounted Heating And Cooling Thermostat User Manual

sygonix 2735095 Wireless Heating Thermostat Instruction Manual

Sygonix SY-6052180 Wi-Fi Thermostat Instruction Manual

sygonix 3026090 WiFi Thermostat Installation Guide

sygonix 2522212 Installable Thermostat Instruction Manual

sygonix 2997033 Wi-Fi Radiator Thermostat Instruction Manual


SAUTER 396011 Universal Thermostat Owner’s Manual

Honeywell ADEMCO 4500 Thermostat User Guide

EBERLE UTE 1032-55, UTE 1032-50 Flush Mounted Room Thermostat Owner’s Manual

GENERAL ARUNA 300S RF Digital Room Thermostat User Manual

oventrop Vindo TH Thermostat Instruction Manual

GENERAL LIFE FH10 Underfloor Heating Thermostat User Manual

SALUS SQ610RF Smart Thermostat Instruction Manual

WATTS Tekmar Wi-Fi Thermostat Instruction Manual

EPH CONTROLS 2023-03-10 RFR-RF Room Thermostat Instruction Manual

GENERAL HT250 Smart Room Thermostat User Manual