ENGO E901 Programmable Wired Thermostat User Manual


E901 | Programmable, wired thermostat
FULL MANUAL

| General | Details |
|---|---|
| Name | ENGO E901 Programmable Wired Thermostat User Manual |
| Make | ENGO |
| Language | English |
| Filetype | PDF (Download) |
| File size | 1.47 MB |


ENGO E55W230WIFI Wi-Fi Thermostat User Guide

ENGO E20i Series Wi-Fi Wireless Internet Thermostat User Guide

ENGO EONEBATW, EONEBATB Internet Controlled Thermostat User Guide

ENGO E901 Wireless Internet Thermostat User Manual

ENGO EASY230W Wired Thermostat User Guide

ENGO EASYBATB Wired Battery Thermostat User Guide

Engo EFAN-230 Zigbee Smart Thermostat Owner’s Manual

ENGO E901 Programmable Wired Thermostat User Manual Overview
Summary of Contents
- Page 1: Programmable, wired thermostat Full manual
- Page 2: Introduction Product compliance Safety informations Product overview Package content Proper thermostat location Connection description Before you start (first power on) LCD icon description Button description
- Page 3: Introduction This product complies with the essential requirements and other relevant provisions of Directives 2014/53/EU and 2011/65/EU. Safety information Before starting installation work and before using the product, read the entire manual. The information contained in the instructions is essential for proper functioning. To avoid accidents resulting in personal injury and material damage, please follow all safety precautions specified in this manual. The device should not be used by people with limited mental, sensory or mental abilities, without experience, or insufficient knowledge as well as children. Installation must be carried out by a qualified person with appropriate electrical qualifications in accordance with standards and regulations in force in the given country and in the EU. Before assembly, repair or maintenance as well as during any connection works it is absolutely necessary to disconnect the mains supply. The device may not be exposed to extreme temperatures, strong vibrations or subjected to mechanical shock. Care for the natural environment is of paramount importance to us. The crossed out symbol on the product means that the product must not be disposed of with ordinary waste containers.
- Page 4: Product overview E901 is a programmable, surface-mounted electronic room thermostat for wireless control of heating and cooling devices. It allows users to create their own schedules and offers better temperature control accuracy than traditional mechanical thermostats. The thermostat requires AA, 1.5V alkaline batteries, and rechargeable batteries are not allowed. Product features include two types of time schedules, the option to choose hysteresis or built-in TPI algorithm, and maximum/minimum temperature limitation. It has two relay types that can be selected in thermostat settings: normally open or normally closed. The device supports heating and cooling modes and includes a PIN lock feature.
- Page 5: Package content includes the wireless programmable thermostat E901RF, hardwired programmable thermostat E901, power supply with 2xAA batteries, quick guide, short manual, and mounting screws. The ideal position for thermostat mounting is about 1.5m under floor level, away from heating or cooling sources. The thermostat should not be exposed to sunlight or extreme conditions like drafts. It is not allowed to use the thermostat in an atmosphere of explosive gases and flammable liquids. Additional protection measures are required in the presence of listed dangers, such as anti-dust and explosive gas covers. The thermostat cannot be used in conditions with water vapor condensation or exposed to water action.
- Page 6: Wall mounting Remove the thermostat cover as shown in the picture. If there are batteries inside, remove them. Use a screwdriver to push the plastic tabs in until you feel resistance, and tilt the front part of the housing. Separate the front part from the back part in the direction shown above. Fix the back cover to the wall using the supplied mounting screws and the holes provided. Connect the wires to the COM / NO connector. Using the hinges, fold the back and front covers by moving as shown in the picture above.
- Page 7: Connection description AC 230V Legend: Symbols explanation: L, N - power supply 230V COM, NO - voltage-free output Boiler - Boiler connection Boiler’s contacts for ON/OFF thermostat (according to the boiler’s instructions) Pump Valve actuator
- Page 8: Before you start (first power on) The thermostat is powered by two 1.5V AA alkaline batteries. Insert the batteries into the compartment under the front housing, paying attention to their polarity. The thermostat will start up showing the current software value and then go to the main screen. The LCD will turn on when the batteries are inserted.
- Page 9: LCD icon description includes various indicators such as program timeline, AM/PM, clock, and temperature modes. Key icons include frost protection mode, comfort mode, economic mode, cooling status, and heating status. Additional indicators are day of the week, settings icon, key lock function, and low battery indicator. The button description outlines functions for changing parameter values, setting time, and selecting modes. Buttons include options for comfort temperature, economic temperature, and programming type selection. The confirm button and factory reset function are also detailed.
- Page 10: Time settings In this chapter you will learn how to set the time on the thermostat using the D, H and M buttons. Press any button to highlight the display. Pressing D button sets the day. Pressing H button sets the hour. Pressing M button sets the minutes.
- Page 11: Operation Manual mode allows for two temperature setpoint levels. Comfort mode maintains a constant day temperature until changed. Economic mode maintains a reduced night temperature until changed. In comfort mode, the thermostat displays a sun icon. To set the comfort temperature, press any button to highlight the display. Press the designated button to enter comfort temperature mode. Use the adjustment buttons to set the new comfort temperature value. Confirm the new setting or wait for automatic approval. The thermostat will return to the main screen displaying the updated temperature.
- Page 12: Economic mode In the economic temperature mode, the thermostat maintains a reduced (night) temperature for economical operation of the heating system when away from home. The economic temperature level is indicated by the moon icon. To set the economic (night) temperature, press any button to highlight the display. Press the button to enter economic temperature mode. The moon icon should be visible on the display. Using the buttons, set the new economic temperature value. Confirm by pressing the button or wait for the thermostat to approve your choice. The thermostat will return to the main screen and display the actual changed temperature.
- Page 13: AUTO mode allows the thermostat to maintain the set temperature according to the user's selected schedule. Users can choose from two types of schedules to manage temperature during the week. Comfort and Economic temperature setpoints function in both manual and the first type schedule mode. The first type schedule mode is represented by a 24-hour timeline, with empty boxes indicating Economic setpoint hours and black boxes indicating Comfort setpoint hours. There are nine programs available within the first type schedule mode, with programs 0 to 3 being factory-defined and unchangeable. Detailed information on built-in factory programs (1-3) is provided, which are pre-programmed time settings for comfort and economy temperatures. By default, program 1 is set for each day of the week. To set up the program, users must enter programming mode and select the week period and program number. The comfortable temperature mode is set from 6 to 8 and from 4 to 11 p.m. Programs should be set for all days of the week.
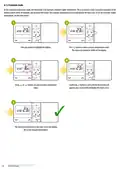
- Page 14: Choosing and programming user programs is necessary to create a custom schedule. Only user programs are editable. The thermostat switches between two setpoint temperatures represented by Sun and Moon icons. The switching time is indicated by a timeline. An example program defines comfort temperature from 8:00 a.m. to 4:00 p.m. and economic temperature from 0:00 a.m. to 8:00 a.m. and 4:00 p.m. to 0:00 a.m. Programming starts from 0:00 a.m. Press any button to highlight the display and enter the programming mode. Select the week period using the appropriate buttons and confirm your selection. Choose the desired program number to continue setting temperatures.
- Page 15: Confirm by button. From 4:00 p.m. to 0:00 a.m. use the button several times to set the economic temperature. The thermostat will return to the main screen saving the set program. Programs 0, 1, 2, 3 are factory set and cannot be edited. Programs 4 to 9 (user defined) are common to selected periods of the days of the week. If one of the user-defined day programs is changed, the change will also apply to other days in the period.
- Page 16: Frost protection mode protects the heating system against freezing. It is recommended to set this program if you are planning a long winter trip or if you do not heat up for a long time. The thermostat will maintain a constant temperature of 7˚C, thus reducing energy consumption to a minimum. Press any button to highlight the display. Press the button to enter the programming mode. Select the week period using the or buttons. Choose program number 0 and confirm by pressing the button. The thermostat will return to the main screen saving the set program. In the frost protection mode, the temperature setpoint can’t be changed and it is maintained constantly at 7°C.
- Page 17: Temporary overwrite mode When the thermostat is running on schedule, it can be temporarily overridden by a new setpoint temperature. Press any button to highlight the display. Use the buttons to set the temperature. Confirm by pressing the button. The display will show the hand symbol. The overwritten temperature is maintained until the next change forced by the schedule. The hand symbol will disappear from the display. The thermostat will return to automatic mode.
- Page 18: AUTO mode allows the thermostat to maintain the set temperature based on the user's selected schedule. Users can choose from two types of schedules to manage temperature throughout the week. Schedule type 2 offers a detailed schedule with more than two setpoint temperatures and precise timing. Schedule type 1 is limited to switching between two setpoint temperatures at full hour switching points. To switch between AUTO mode type 1 and type 2, press any button to highlight the display. Press the button for 5 seconds to enter the schedule programming selection mode. Use the buttons to choose the second type of schedule programming. Confirm the selection by pressing the button. The thermostat will return to the main screen, saving the second type of schedule programming. The timeline will disappear after confirming the selection.
- Page 19: Programming method of the AUTO mode - type 2 To set the second type of AUTO mode, please follow steps below: Select the week period using or buttons. Confirm by button. Press button to enter the programming mode. Using or buttons set the hour for the time period and then after confirmation by button, set the minutes. Use or buttons to set temperature setpoint. The thermostat will proceed to program selection for the next time period (a maximum of 6 time periods/switching points can be set).
- Page 20: Temporary overwrite mode allows for a temporary change in the thermostat's schedule. You can override the current settings by adjusting the work mode or setpoint temperature. Press any button to highlight the display. Use the up or down buttons to set the temperature during active AUTO mode. Confirm the new setting by pressing the confirm button. A hand icon will appear on the display. The adjusted temperature will be maintained until the next scheduled mode change. This feature provides flexibility in temperature control. It is useful for temporary adjustments without altering the overall schedule. The manual provides detailed instructions for using this feature.
- Page 21: Party mode allows the user to override the schedule with a comfort setpoint temperature for a defined number of hours. To activate party mode, select the number of hours using the appropriate buttons. Hold the designated button for 3 seconds to confirm. The comfort setpoint temperature will be maintained for the selected duration, up to a maximum of 9 hours. After the set time, the thermostat will revert to AUTO mode. Pressing the SUN, MOON, or AUTO button twice will disable party mode and return the thermostat to the appropriate mode. To cancel party mode, press any button to turn on the backlight, then press the designated button twice. The thermostat will stop party mode and return to the schedule.
- Page 22: Holiday mode is a special program temperature setpoint which the thermostat will maintain for specified days. During holiday mode, the thermostat is maintaining frost protection setpoint temperature. To set holiday mode, press any button to highlight the display. Press and hold the button for 3 seconds. Use the buttons to select the day period and confirm by pressing the button. Set the temperature setpoint for the selected day period and confirm by pressing the button. The thermostat is working in holiday mode when the plane icon is on the display. To stop holiday mode, press the button and confirm by pressing the button. The thermostat will return to the previous mode.
- Page 23: Installer settings Press button for 5 seconds to enter installer mode. Use buttons to move between parameters. Edit the parameter using buttons and confirm with the button. Installer parameters include function, value, and description. Display temperature resolution specifies the accuracy of the displayed temperature. If the thermostat indicates the wrong temperature, you can correct it with an offset temperature. Relay type options are normally open or normally closed. Clock format options include 24-hour or 12-hour. Temperature scale options are Celsius or Fahrenheit. Minimum and maximum setpoints define the range of heating/cooling temperatures that can be set.
- Page 24: Key sound can be enabled or disabled. A PIN code can be required to unlock the keys every time. Function can be disabled or enabled. Factory reset option is available. Default values for settings are provided. Various functions have a YES or NO option. Descriptions of functions are included. Settings can be cleared to factory reset. The manual includes a section for user instructions. Specific values are associated with each function.
- Page 25: User settings reset There is a small hole to the right of the OK button. This is the reset button. Pressing the reset button will restore the default values in the user settings. Do not use a pencil to press the reset button as the graphite build-up on the stylus can short-circuit and damage the thermostat. In environments with very strong electrostatic discharge (+/- 8KV), the product may not function as under normal conditions. Clear settings - factory reset To perform factory reset (which will remove all user/installer settings), use the CLR parameter from installer parameters menu. After confirming the parameter, the thermostat will restore the default settings.
- Page 26: Cleaning and maintenance of the E901 thermostat requires no special maintenance. The outer casing can be wiped clean using a dry cloth. Do not use solvents, polishes, detergents, or abrasive cleaners. There are no user serviceable parts within the unit. Any servicing or repairs should be carried out by ENGO Controls or their appointed agents. The transmitter’s power supply rating is max 2 x AA batteries. The output signal is NO/COM relay. The temperature range is 5 - 35°C. The display temperature accuracy is 0.1°C or 0.5°C. The control algorithm includes ITLC or hysteresis. The hysteresis values are 0.25°C and 0.5°C. The communication is wired. The dimensions are 150 x 84 x 22 mm.
- Page 27: Warranty ENGO Controls warrants this product to be free from any defects in material or workmanship for a period of five years from the date of installation. ENGO Controls reserves the sole responsibility for breach of this warranty by repairing or replacing the defective product. This product includes software that matches the distributor’s identification at the time of sale. The manufacturer/distributor provides a guarantee covering all functions and specifics of the product in accordance with this marking. The distributor’s warranty does not cover the correct operation of the functions and features available as a result of a product software update.
- Page 28: Power supply: 2xAA batteries Distributor: QL CONTROLS Sp z o.o. Sp. k. Date of issue: II 2022

Primevolve NFJ2002E Space Heater with Thermostat Instruction Manual

JUMO exTHERM-AT Explosion-Protected Surface-Mounted Thermostat Instruction Manual

VIMAR 02912 Wi-Fi Thermostat Instruction Manual

EvenAir T21WF WiFi Thermostat User Manual

EPH CDTP2 Room Thermostat Installation Guide

Honeywell TH8321WF1001 Programmable Thermostat User Guide

Vaillant VRT 51f sensoROOM Wireless Room Thermostat Instruction Manual

Hunter 44110 Set And Save Programmable Thermostat Owner’s Manual

White-Rodgers 1F83-277 Heating & Air Conditioning Auto Changeover Heat Pump Thermostat User Manual

Honeywell RCH9310 Lyric Round WiFi Thermostat User Guide