Danfoss RET230 Electronic Heat Cool Thermostat Instruction Manual


Instrukcja
instalacji
PL
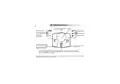
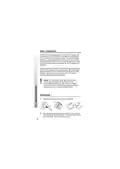
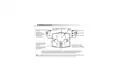
Prosimy pamiętać:
Produkt ten powinien być instalowany wyłącznie przez
wykwalifikowanego elektryka lub instalatora ogrzewania.
Montaż należy przeprowadzać zgodnie z aktualnymi
przepisami dotyczącymi przewodów elektrycznych IEEE.
Specyfikacja
Specyfikacja
Zakres temperatur, grzanie
5-30°C
Zmiana temperatury
- Chłodzenie na grzanie
- Grzanie na chłodzenie
> 30°C
< 16°C
Ręczny wybór prędkości
wentylatora
ꢀ
Stan pracy termostatu:
wyłączony/praca automatyczna
z wentylatorem
ꢀ
Zasilanie
230 Vac ± 15%, 50/60Hz
Wyjścia przekaźnika, grzanie/
chłodzenie i wentylator.
2 x SPST, 3(1)A, 10-230 Vac,
Type 1B
Wymiary (mm)
110 dł., 90 wys., 40 szer.
EN60730-2-9
2.5Kv
Zgodność z normą
Znamionowe napiecie impulsu
Dokładność regulacji
±1°C
59
| General | Details |
|---|---|
| Name | Danfoss RET230 Electronic Heat Cool Thermostat Instruction Manual |
| Make | Danfoss |
| Language | English |
| Filetype | PDF (Download) |
| File size | 0.66 MB |


Danfoss RET-MD Electronic Intelligent Dial Setting Thermostat Installation Guide
Danfoss VICUQ24M Icon Programmable II Room Thermostat Installation Guide

Danfoss MBC 8000, MBC 8100 Heavy Duty Thermostat Installation Guide

Danfoss UT 72-UT 73 Universal Thermostat Installation Guide

Danfoss ECtemp 530 Electronic Thermostat Installation Guide

Danfoss 014G0251 Eco Radiator Thermostat User Guide

Danfoss 014G0013 Z Wave Radiator Thermostat Installation Guide

Danfoss RET230P Electronic Thermostat Instruction Manual

Danfoss TP7000 Range Electronic 7 Day Programmable Room Thermostat Installation Guide

Danfoss RET1000 Series Electronic Thermostat User Guide


REPTITRIP HMT16N Reptile Heating Mat With Digital Thermostat User Manual

SIEMENS M3182 Room Thermostat Instruction Manual

GENERAL LIFE HT220S RF Digital Room Thermostat User Manual

InverterCool CPT100 2C Wi-Fi Thermostat Instruction Manual

HIVE HAH2INSTAMZ-01 Active Heating Thermostat User Guide

tekmar U-T-562 WiFi Thermostat User Manual

Honeywell VisionPRO TH8000 Series Touch Screen Programmable Thermostat User Guide

Sygonix SY-6052180 Wi-Fi Thermostat Instruction Manual

hansgrohe 10717000 AXOR STARCK X Highflow Concealed Thermostat Instruction Manual

Honeywell RTHL2510 Series Programmable Thermostat Owner’s Manual