
azbil TY6000Z2000 Neostat Room Thermostat Instruction Manual






AB-7258
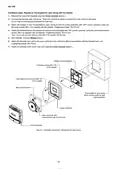
Installation steps: Neostat on Thermoplate with the adapter
1) Attach the mounting plate of Thermoplate to the outlet box cover (JIS C8340:1999 Boxes and box covers for rigid metal
conduits (mounting dimension: 83.5 mm)) on the mounting surface with two pan-head machine screws (M4 x 8) supplied
with Thermoplate.
2) Attach the main unit of Thermoplate to its mounting plate with two pan-head machine screws (M3 x 5) supplied with
Thermoplate.
Use this hole for upper screw-mount.
Note: Do not use the other hole for upper screw-mount.
Figure 7. Mounting plate of Thermoplate
3) Attach the adapter to Thermplate so that the arrow (indicated with "UP") points upwards, using two flat-head tapping screws
(M2.6 x 8) supplied with Thermoplate.
4) Remove the cover from Neostat. (See the Cover removal section.)
5) Unscrew the Neostat main unit screw. Then, hold and lift the guide to remove the main unit from the base.
Do not hold the setting dial to remove the main unit.
6) Attach the Neostat base to the adapter so that the arrow (indicated with "UP") points upwards, using two pan-head machine
screws (M4 x 6) supplied with the adapter. (Tightening torque: 78.5 Nꞏcm)
Note: Do not use pan-heat machine screw (M4 x 10) supplied with Neostat.
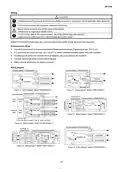
7) Wire Neostat. (See the Wiring section.)
8) Attach the Neostat main unit to the base, using the main unit screw (M3) preassembled with the Neostat main unit.
(Tightening torque: 39.2 N cm)
9) Attach the Neostat cover to the main unit. (See the Cover removal section.)
Mounting plate of Thermoplate
2 pan-head machine screws (M4 x 8)
of Thermoplate
Main unit of Thermoplate
(sold separately)
2 pan-head machine screws (M3 x 5)
of Thermoplate
2 flat-heat tapping screws (M2.6 x 8)
of the adapter
2 pan-head machine screws
(M4 x 6) of the adapter
Outlet box cover (JIS C8340
with 83.5 mm mounting dimension,
Main unit of Neostat
commercially available)
Adapter
(sold separately)
Base of Neostat
Main unit screw (M3)
preassembled with the main unit
Cover of Neostat
Figure 8. Installation: Neostat on Thermoplate
11

| General | Details |
|---|---|
| Name | azbil TY6000Z2000 Neostat Room Thermostat Instruction Manual |
| Make | azbil |
| Language | English |
| Filetype | PDF (Download) |
| File size | 0.75 MB |
 (1 votes, average: 5.00 out of 5)
 Loading...


BEOK TGR85-EP Underfloor Heating Thermostat User Guide

Danfoss RET1001M – V2 Room Thermostat Installation Guide

DEVI 610 Electronic Thermostat Installation Guide

WHITE-RODGERS 1F90-71 5-Day 2-Day Electronic Digital Thermostat Instruction Manual

GENERALLIFE ARUNA 302S RF Wireless Room Thermostat User Manual

HORSTMANN C-Stat 17-B 7 Day Programmable Room Thermostat Instruction Manual

Beca BHT-002 Electric Heating Wifi Thermostat User Guide

PREMTOOL BHT-009 GA ThermaHeat Smart Dial Wi-Fi Thermostat User Guide

REPTITRIP HMT16N Reptile Heating Mat With Digital Thermostat User Manual

BROUWLAND Brew Monk Fermenter Digital Thermostat Instruction Manual