tuya Mi-750 WiFi Smart Thermostat Instruction Manual


Mi-Heat Mi-750
WiFi Smart Thermostat
FR
DE EN
Inhalt
Content
Sommaire
Einführung..............................................................2
Lieferumfang..........................................................2
Besondere Merkmale .............................................2
Registrierung Tuya Smart App...............................2
App herunterladen ..........................................2
Konto registrieren ...........................................2
Wichtige Hinweise vor der Installation .................2
Montage..................................................................3
Installation Bodentemperaturfühler..............3
Thermostat anschließen.................................3
Thermostat einbauen .....................................3
Thermostat-Installation bei mehreren
Heizmatten ......................................................4
Übersicht Displaystruktur......................................4
Bedienung - Grundfunktionen...............................4
Ein- und Ausschalten.......................................4
Tastensperre aktivieren ..................................4
Ruhemodus Display ........................................4
Betriebsmodus wählen ...................................4
Betriebsarten..........................................................4
Komfortmodus.................................................4
ECO Modus .......................................................4
Programmmodus............................................5
Urlaubsmodus.................................................5
Einstellungen..........................................................5
F1 - Datum und Uhrzeit einstellen ..................5
F2 - Programmmodus einstellen ....................5
F3 - Betriebszeit ablesen.................................5
F4 - Erweiterte Einstellungen..........................5
F5 - WiFi-Verbindung .......................................7
Vorgaben für die WLAN-Verbindung,
Introduction..........................................................10
Scope of delivery ..................................................10
Special features....................................................10
Registration Tuya Smart app...............................10
App download ...............................................10
User account registration .............................10
Important notes before installation....................10
Installation ...........................................................11
Floor temperature sensor installation .........11
Connect the thermostat................................11
Mounting the thermostat..............................11
Thermostat installation for two or more
heating mats .................................................12
Display structure ..................................................12
Operation - basic functions .................................12
Switching ON/OFF .........................................12
Activate key lock............................................12
Display sleep mode .......................................12
Select operating mode..................................12
Operating modes .................................................12
Comfort mode................................................12
ECO mode.......................................................12
Program mode ..............................................13
Holiday mode ................................................13
Settings.................................................................13
F1 - Date and time setting.............................13
F2 - Program mode setting ...........................13
F3 - Operation time reading .........................13
F4 - Advanced setting....................................13
F5 - WiFi connection ......................................15
WiFi connection guidelines,
Introduction..........................................................18
Contenu de la livraison ........................................18
Caractéristiques particulières.............................18
Enregistrement de l'application Tuya Smart......18
Télécharger l'application..............................18
Enregistrement compte d'utilisateur...........18
Remarques importantes avant l'installation .....18
Installation ...........................................................19
Installation du capteur de tempér. au sol....19
Connectez le thermostat...............................19
Montage du thermostat ...............................19
Installation du thermostat pour deux ou
plusieurs nattes chauffantes ........................20
Structure de l'écran..............................................20
Utilisation - fonctions de base.............................20
Mise en marche/arrêt....................................20
Activer le verrouillage des touches...............20
Mode veille d'écran .......................................20
Sélection du mode de fonctionnement........20
Modes de fonctionnement...................................20
Mode Confort.................................................20
Mode ECO.......................................................20
Mode Programme .........................................21
Mode vacances..............................................21
Paramètres...........................................................21
F1 - Régler la date et l'heure.........................21
F2 - Régler le mode programme...................21
F3 - Lire le temps de fonctionnement...........21
F4 - Paramètres avancés...............................21
F5 - Connexion WiFi .......................................23
Guide d'utilisation Wifi, connecter
Automatisches Verbinden mit Bluetooth,
Manuelles Verbinden
Automatic Add method via Bluetooth,
Manual Add method
automatiquement avec Bluetooh,
connecter manuellement
Alarmhinweise und Fehlerbehebung....................7
Tuya Smart App-Navigation ..................................8
Technische Daten ...................................................8
Beanstandungen....................................................8
Garantie..................................................................8
Garantieschein .......................................................9
Alarm indication and troubleshooting................15
Tuya Smart App navigation.................................16
Technical data......................................................16
Claims ...................................................................16
Warranty...............................................................16
Guarantee card ....................................................17
Indications d'alarme et dépannage ...................23
Navigation l'app Tuya Smart ..............................24
Données techniques.............................................24
Réclamations .......................................................24
Garantie................................................................24
Certificat de garantie...........................................25
BENUTZERHANDBUCH
INSTRUCTIONS FOR USE AND INSTALLATION
INSTRUCTIONS D'INSTALLATION ET D'UTILISATION
| General | Details |
|---|---|
| Name | tuya Mi-750 WiFi Smart Thermostat Instruction Manual |
| Make | Tuya |
| Language | English |
| Filetype | PDF (Download) |
| File size | 2.71 MB |


tuya M3 Series Thermostat User Guide

tuya MTS700N Wireless Thermostat User Manual

tuya BHT-005 Wifi Heating Thermostat User Manual
tuya TRV603 Smart WiFi Radiator Thermostat Instruction Manual

tuya Mi-750 WiFi Smart Thermostat Instruction Manual Overview
Summary of Contents
- Page 1: Mi-Heat Mi-750 WiFi Smart Thermostat Introduction Scope of delivery Special features Registration Tuya Smart App App download User account registration Important notes before installation Installation Operation - basic functions Settings
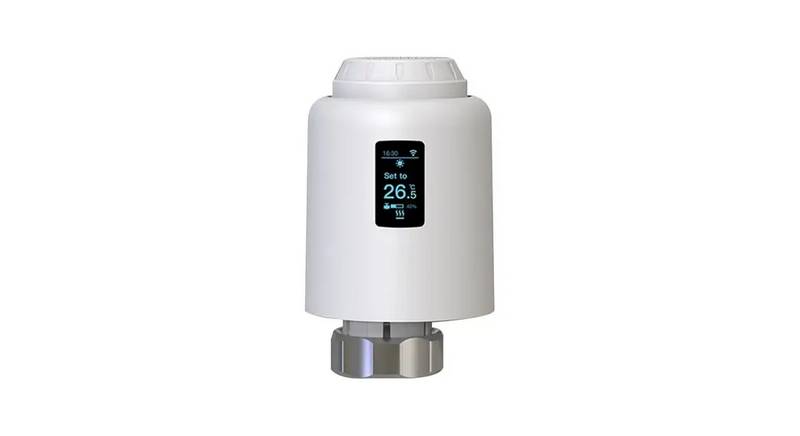
- Page 2: Konto registrieren Gehen Sie zur Registrierung eines Benutzerkontos in der „Tuya Smart“ App wie folgt vor. Öffnen Sie die „Tuya Smart“ App auf Ihrem Smartphone und tippen Sie auf „Erstellen eines neuen Kontos“, wenn Sie noch kein Benutzerkonto besitzen. Verwenden Sie das Land oder die Region, die das System automatisch erkennt und anzeigt, oder wählen Sie manuell ein Land oder eine Region aus. Wichtig: Nach der Registrierung kann das Land oder die Region nicht mehr geändert werden. Geben Sie eine E-Mail-Adresse ein und tippen Sie auf „Verifizierungs-code abrufen“. Der Thermostat Mi-750 dient zur Regelung von elektrischen Fußbodenheizsystemen in Innenräumen. Der Thermostat hält die für den Fußboden oder die für den Raum eingestellte Wunschtemperatur aufrecht und trägt zu einem energiesparenden Betrieb Ihrer Fußbodenheizung bei. Mit dem Thermostat Mi-750 können Sie Ihre Fußbodenheizung entweder direkt über das Touch-Display des Gerätes oder über Ihr Smartphone steuern. Die unterstützten WLAN-Netzwerkstandards sind: IEEE 802.11. b/g/n 2,4 GHz. Die Installation ist ausschließlich durch eine Elektrofachkraft sorgfältig nach den Regeln DIN-VDE und unter Einhaltung der gültigen nationalen Gesetze, Bestimmungen und Vorschriften auszuführen.
- Page 3: Verbinden Sie alle erforderlichen Kabel zum Thermostat und schließen Sie diese vorschriftsmäßig an die entsprechenden Klemmen an. Der Bodentemperaturfühler muss an die beiden mit NTC markierten Klemmen angeschlossen werden. Der Fühler muss unmittelbar unter der Heizmatte positioniert werden. Die Versorgungsspannung (230 V AC) wird an die Klemmen N und L angelegt. Der gelb-grün ummantelte Erdungsdraht ist mit der Schutzerdungsleitung zu verbinden. Ein Fehlerstromschutzschalter (30 mA) ist vorzusehen. Es wird empfohlen, eine maximale Last von 13 A (2990 W) zu schalten. Der elektrische Anschluss darf ausschließlich durch eine Elektrofachkraft durchgeführt werden. Schalten Sie Ihr lokales Stromnetz spannungsfrei, bevor Sie den Thermostat installieren. Vermeiden Sie im Zuge der Montage Beschädigungen oder ein Verbiegen der Kontakte des Steckverbinders.
- Page 4: Thermostat-Installation bei mehreren Heizmatten Bedienung - Grundfunktionen Ein-/Ausschalten Tippen Sie auf den Homebutton und halten Sie ihn für etwa 3 Sekunden gedrückt, um das Thermostat ein- bzw. auszuschalten. Wenn das Gerät ausgeschaltet ist, werden auf dem Display die Informationen entsprechend der getroffenen Auswahl in den erweiterten Einstellungen angezeigt. Durch einfaches Antippen einer der Eingabetasten wird das Display wieder aktiviert. Bei jedem Einschalten des Gerätes erscheinen für einen kurzen Moment sämtliche Icons auf dem Display. Gehen Sie zur Displayhauptanzeige und drücken Sie den Button für etwa 3 Sekunden, um die Bediensperre zu aktivieren. Um die Bediensperre zu deaktivieren, drücken Sie den Button erneut für 3 Sekunden. Wird kein Button gedrückt, wird das Display nach etwa 25 Sekunden in den Ruhemodus versetzt. Gehen Sie zur Displayhauptanzeige, drücken Sie kurzzeitig den Homebutton und wählen Sie eine der folgenden Betriebsarten aus: Programm - Komfort - Eco - Urlaub. In der Betriebsart Komfort hält der Thermostat eine zuvor eingestellte Temperatur dauernd aufrecht. Die Temperatur ist einstellbar von +5 °C bis +35 °C.
- Page 5: Programmmodus Im Programmbetrieb regelt der Thermostat die Heizung automatisch auf die eingestellte Temperatur. Der Thermostat arbeitet nach einem 4-Phasen-Zeitplan. Für alle Wochentage können vier Zeiträume mit Uhrzeit und Temperatur programmiert werden. Die Temperatur ist einstellbar von +5 °C bis +40 °C. Es gibt zwei verschiedene Wochenprofile zur Auswahl. Mit dieser Betriebsart können Sie die Fußbodenheizung bei geplanter Abwesenheit auf Sparbetrieb einstellen. Die Temperatur kann mit einem bestimmten Wochentag und Zeitraum eingestellt werden. Die erweiterten Einstellungen sollten nur von einer qualifizierten Person angepasst werden. Die verschiedenen Parameter der erweiterten Einstellungen sind in einer festen Reihenfolge angeordnet. Die in der Tabelle gekennzeichneten Parameter lassen sich nur direkt am Thermostat einstellen.
- Page 6: Sensorwahl Das Gerät ermöglicht eine Steuerung des Fußbodenheizsystems über einen Boden- und Raumtemperatursensor. Wahlweise kann entweder nur einer der beiden Sensoren aktiviert werden oder es können beide Sensoren gleichzeitig ausgewählt werden. Raumfühlerkalibrierung Ermöglicht es Ihnen, den Raumfühler zu kalibrieren, wenn die gemessene Temperatur von der tatsächlichen Raumtemperatur abweicht. Bodenfühlerkalibrierung Ermöglicht es Ihnen, den Bodenfühler zu kalibrieren, wenn die gemessene Temperatur von der tatsächlichen Bodentemperatur abweicht. Boden temperaturbegrenzung Ermöglicht es Ihnen, eine maximale Bodentemperatur als Temperaturobergrenze festzulegen. Wochenprofil Entsprechend dem ausgewählten Wochenprofil können entweder alle Tage individuell programmiert werden oder die Werktage werden als eine Gruppe zusammengefasst. Adaptiver Start Wird die adaptive Startfunktion erstmals aktiviert, wird die Heizung entsprechend der gewählten Vorheizzeit früher eingeschaltet. Fenster-Offen-Erkennung Der Thermostat überwacht permanent die Raumtemperatur und schaltet die Heizung aus, wenn die Temperatur um mehr als 5 Grad gesunken ist. Bodensensor-typ Das Gerät unterstützt auch andere Typen von Bodentemperaturfühlern. Frostschutzfunktion Diese dient dazu, die Temperatur über dem Gefrierpunkt zu halten, wenn ein Raum für längere Zeit nicht genutzt wird. Urlaubszeit Einstellung der Abwesenheitsdauer für den Betrieb der Heizung im Urlaubsmodus.
- Page 7: F5 - WiFi-Verbindung Methode 2: Manuelles Verbinden Vom Thermostat unterstützte WLAN-Standards: IEEE 802.11. b/g/n 2,4 GHz. Der Thermostat unterstützt zwei Pairing-Modi, den EZ-Modus und den AP-Modus. Positionieren Sie die Antennen des WLAN-Routers gemäß den Empfehlungen des Herstellers. Die Anzahl der Thermostate, die gleichzeitig an Ihr Heimnetzwerk angeschlossen werden können, hängt vom verwendeten Routertyp ab. Wenn der WLAN-Signalpegel gestört wird, empfehlen wir, auf einen weniger ausgelasteten WLAN-Kanal zu wechseln. Bei der Installation in großflächigen Räumen empfehlen wir, sich an einen Spezialisten zu wenden. Um das Thermostat über die „Tuya Smart“ App einzustellen, müssen Sie es zunächst in der App hinzufügen. Das automatische Verbinden wird empfohlen, die manuelle Methode steht als Alternative zur Verfügung. Arbeiten am Thermostat dürfen ausschließlich von einer qualifizierten Fachkraft durchgeführt werden. Nach einer Unterbrechung der Spannungszufuhr bleiben die Einstellungen für 30 Tage erhalten.
- Page 8: Tuya Smart APP-Navigation Technische Daten Thermostat Mi-750 Versorgungspannung: 230 VAC, 50 Hz Maximaler Schaltstrom: 16 A Stromverbrauch: < 2 W Abmessungen: 86x86x48 mm IP Schutzklasse: IP21 Garantiezeitraum: 2 Jahre ab Kaufdatum Einstellung Programmmodus Vorbehalt: Alle Angaben entsprechen dem aktuellen Stand unserer Kenntnisse.
- Page 9: Garantieschein ist Grundlage für Garantieanspruch. Der Thermostat Mi-750 hat alle Tests erfolgreich bestanden. Der Sensor kann in das Wellrohr (Leerrohr) eingesetzt und wieder herausgenommen werden. Bestätigung vor und nach Verlegung der Heizmatte bzw. des Heizkabels. Bestätigung vor und nach Verlegung des Fußbodenbelages. Kunde und Installateur müssen ihre Daten ausfüllen. Unterschrift des Kunden und Installateurs erforderlich. Kaufdatum und Installationsdatum sind wichtig. Firmenstempel des Installateurs erforderlich. Thermostat Typ-Bezeichnung und Artikelnummer müssen angegeben werden.
- Page 10: User account registration The following steps are to be performed for user account registration in the “Tuya Smart” app. Run the “Tuya Smart” app on your smartphone and tap “Register” if you don't have an account yet. Enter an email address and tap “Get Verification Code”. The Mi-750 is designed to control electrical underfloor heating systems indoors. The thermostat maintains a comfort temperature set for the floor or room. The thermostat offers temperature control using two sensors: floor sensor and air sensor. The thermostat is mounted onto a wall in close proximity to installation wires of the heating system used. The thermostat enables control of your floor heating directly from the device touch screen or by using the “Tuya Smart” app. Registration must be performed by a professional electrician in compliance with DIN-VDE norms and applicable national laws. Switch off power from all wiring before installing, testing or replacing the thermostat.
- Page 11: Connect all required wiring to the thermostat using its terminals with screw fastening. The floor temperature sensor must be connected to the two terminals marked with NTC. The sensor should be placed at heating level directly underneath the heating mat. Route the heating mat cold lead through the second corrugated tube. A fault-current circuit breaker (30 mA) has to be used. Double-check that the floor sensor is positioned in a corrugated tube (Ø16mm). We recommend using the services of qualified specialists when installing the thermostat and heating system. Disconnect your local wiring from the mains before connecting the thermostat. It is recommended to switch a maximum load current of 13 A (2990 W). Avoid damaging or bending the contacts of the connector during installation.
- Page 12: Thermostat installation for two or more heating mats Switching ON/OFF involves tapping the home button and holding it for about 3 seconds. When the device is switched off, the display shows information based on advanced settings. Each time the device is switched on, all icons appear on the display momentarily. To activate the key lock, tap the up button for about 3 seconds. A separate flush-mounted junction box is required if connecting two or more heating mats to the same thermostat. The display will switch to sleep mode after 25 seconds of inactivity. In sleep mode, the last active screen is displayed if the thermostat is on. The thermostat can operate in Comfort, Eco, Holiday, or Program modes. Using Comfort mode, the thermostat maintains the desired temperature continuously. ECO mode maintains a lower desired temperature, with a default setting of 18 °C.
- Page 13: Program mode allows the thermostat to automatically control heating based on time and day of the week. The thermostat operates on a 4-phase schedule, allowing programming for all weekdays or groups of weekdays. Temperature settings can range from +5 °C to +40 °C. Two different week profiles can be selected: 5-1-1 or 7. Manual temperature adjustments can be made from the running mode, but will not be saved after the current period. Holiday mode sets the floor heating to economy mode during planned absences to save energy. The thermostat automatically switches back to program mode after the absence period expires. Advanced settings should only be performed by a qualified person. The default setting for advanced settings is 10 °C. Parameters in advanced settings are arranged in a fixed order and cannot be returned to once passed.
- Page 14: Sensor selection allows control of underfloor heating using either a floor or room temperature sensor. Room sensor calibration enables adjustment if the measured temperature differs from the actual room temperature. Floor sensor calibration allows for adjustment if the measured temperature differs from the actual floor temperature. Floor temperature limitation sets a maximum floor temperature to protect flooring materials from excessive heat. Week profile programming can be set for individual weekdays or grouped working days. Adaptive start calculates the required turn-on time based on previous heating characteristics. Open window detection turns off heating if the room temperature drops significantly, saving energy. Anti-freezing mode keeps the temperature above freezing to prevent pipe damage during long absences. Switching delay adjusts when the thermostat activates heating based on a set temperature tolerance. Display accuracy determines how temperature is shown on the display, either in 0.1 °C or 0.5 °C increments.
- Page 15: F5 - WiFi connection WiFi connection guidelines: WiFi network standards supported by the device: IEEE 802.11.b/g/n 2.4 GHz. The thermostat supports two pairing modes, EZ mode and AP mode. Position the antennas of the WiFi router according to the manufacturer's recommendations to achieve the maximum WiFi signal level. When installing thermostats in large areas or complex configurations, it is recommended to contact a specialist in setting up WiFi equipment. To program and operate the thermostat with the “Tuya Smart” app, you must first add the device to the app and connect it via WiFi. The “Automatic Add” method is recommended, while the manual method is available as an alternative. Working on the thermostat must only be performed by a professional electrician. In case of an interruption of the power supply, certain settings will be retained for 30 days. Using the “Automatic Add” method does not require opening settings F5.
- Page 16: Tuya Smart APP navigation Technical data Thermostat Mi-750 Supply voltage: 230 VAC, 50 Hz Maximum load current: 16 A Power consumption: < 2 W Weight: 140 g Dimensions: 86x86x48 mm IP rate: IP21 Protection class: II Warranty period: 2 years from date of purchase.
- Page 17: Guarantee card is necessary for warranty claims. The thermostat Mi-750 has passed all the tests successfully. The sensor can be inserted in and removed from the corrugated tube (conduit). Confirmation before and after installation of the heating mat or heating cable. Confirmation before and after installation of the flooring.
- Page 18: Enregistrement compte d'utilisateur Les étapes suivantes doivent être effectuées pour l'enregistrement du compte utilisateur dans l'application « Tuya Smart ». Ouvrez l'application « Tuya Smart » sur votre smartphone et tapez sur « Créer un nouveau compte » si vous n'avez pas de compte utilisateur. Utilisez le pays ou la région que le système détectera et affichera automatiquement, ou sélectionnez manuellement un pays ou une région. Une fois celui-ci enregistré, le pays ou la région ne peut pas être modifié. Saisissez une adresse électronique et tapez sur « Récupérer le code de vérification ». Saisissez le code de confirmation que vous recevrez par courriel. Le thermostat Mi-750 est conçu pour contrôler les systèmes de chauffage par le sol électrique domestique. Le thermostat maintient une température de confort de la surface chauffée et assure une consommation d'énergie rationnelle. Le thermostat doit être connecté à un smartphone par WiFi. Scannez le code QR avec votre smartphone ou recherchez l'application gratuite « Tuya Smart » dans l'App Store ou Google Play Store et téléchargez-la. Lisez attentivement ces instructions avant d'utiliser l'appareil et conservez-les.
- Page 19: Raccordez tous les fils nécessaires au thermostat à l'aide de ses bornes à vis. Le capteur de température du sol doit être connecté aux deux bornes marquées NTC. La sonde de sol doit être positionnée directement sous la natte chauffante. Si la distance d'installation est plus courte que le câble de raccordement du capteur, le câble du capteur doit être raccourci en conséquence. La tension d'alimentation (230 VAC) est appliquée aux bornes N et L. Les fils d'installation des éléments chauffants doivent être connectés aux bornes N LOAD et L LOAD. Un disjoncteur à courant de défaut (30 mA) doit être prévu. Il est recommandé de faire appel à des professionnels qualifiés pour l'installation du thermostat et du système de chauffage. Débranchez votre câblage local du secteur avant de brancher le thermostat. Évitez d'endommager et de plier les contacts du connecteur au cours du montage.
- Page 20: Installation du thermostat pour deux ou plusieurs nattes chauffantes. Mise en marche/arrêt : Appuyez sur le bouton d'accueil et maintenez-le enfoncé pendant environ 3 secondes pour allumer ou éteindre le thermostat. Lorsque l'appareil est éteint, l'écran affiche les informations en fonction des paramètres avancés. Chaque fois que l'appareil est mis en marche, toutes les icônes apparaissent à l'écran pendant un court instant. Activer le verrouillage des touches : Appuyez sur le bouton pendant environ 3 secondes pour activer le verrouillage de la clé. Mode veille d'écran : L'écran passe en mode veille après environ 25 secondes d'inactivité. Sélection du mode de fonctionnement : Appuyez sur le bouton d'accueil et sélectionnez l'un des modes de fonctionnement suivants : Programme, Confort, Eco, Vacances. Mode confort : Le thermostat maintient en permanence la température souhaitée. Mode ECO : Le thermostat maintient une température préalablement réglée. Lorsque l'appareil est allumé pour la première fois, le signal WiFi clignote jusqu'à ce que vous vous soyez connecté à votre réseau WiFi local.
- Page 21: Mode programme En mode programme, le thermostat règle automatiquement le chauffage à la température définie en fonction de l'heure et du jour de la semaine. Le thermostat fonctionne selon un programme à 4 phases. Il est possible de programmer quatre périodes avec l'heure et la température pour tous les jours de la semaine ou un groupe de jours. La température est réglable de +5 °C à +40 °C. Vous pouvez choisir entre deux profils hebdomadaires différents. Mode vacances permet de mettre le chauffage par le sol en mode économique pendant une absence planifiée. La température est réglable de +5 °C à +20 °C en mode vacances. Les paramètres avancés ne doivent être ajustés que par une personne qualifiée. Les réglages effectués sont enregistrés automatiquement après quelques secondes d'inactivité. Les différents paramètres des réglages avancés sont disposés dans un ordre fixe.
- Page 22: Choix de capteur L'appareil permet de commander le système de chauffage par le sol via un capteur de température au sol et un capteur de température ambiante. Calibrage de la sonde d'ambiance Permet de calibrer la sonde d'ambiance lorsque la température mesurée diffère de la température réelle de la pièce. Calibrage de la sonde au sol Permet de calibrer le capteur de sol si la température mesurée diffère de la température réelle du sol. Limitation de la température au sol Permet de définir une température maximale du sol comme limite supérieure de température. Profil 5-1-1 Tous les jours de la semaine peuvent être programmés individuellement ou les jours ouvrables combinés en un seul groupe. Démarrage adaptatif Le thermostat calcule automatiquement le temps de mise en marche nécessaire pour atteindre la température réglée à temps. Détection de fenêtre ouverte Le thermostat coupe le chauffage pendant 30 minutes si la température ambiante a baissé de plus de 5 degrés en 15 minutes. Mode antigel Utilisé pour maintenir la température au-dessus de +5 °C lorsque la pièce n'est pas utilisée. Délai de commutation Le régulateur n'active ou ne désactive pas le chauffage lorsque la température de consigne est atteinte, mais plus tôt ou plus tard en fonction de la valeur de tolérance. Réinitialisation Offre la possibilité de réinitialiser l'appareil aux paramètres d'usine.
- Page 23: F5 - Connexion WiFi Méthode 2 : connexion manuelle Directives relatives à la connexion WiFi Les normes du réseau WiFi supportées par l'appareil : IEEE 802.11. b/g/n 2,4 GHz. Le thermostat prend en charge deux modes d'appariement, le mode EZ et le mode AP. Positionnez les antennes du routeur WiFi conformément aux recommandations du fabricant. Lors de l'installation de thermostats dans des pièces de grande superficie, il est recommandé de contacter un spécialiste de la mise en place d'équipements WiFi. Vous pouvez vérifier le niveau du signal WiFi et les canaux WiFi occupés à l'aide d’une application smartphone appropriée. Les travaux sur le thermostat doivent être effectués par un électricien professionnel. Le raccordement électrique et la connexion à l'alimentation électrique doivent être effectués par un électricien professionnel. En cas d'interruption de l'alimentation électrique, les paramètres suivants seront conservés pendant 30 jours. L'utilisation de la méthode « Ajout automatique » ne nécessite pas d'ouvrir les paramètres F5.
- Page 24: Navigation de l'app Tuya Smart Données techniques Thermostat Mi-750 Tension d'alimentation : 230 VAC, 50 Hz Courant de charge maximum : 16 A Consommation électrique : < 2 W Poids : 140 g Dimensions : 86x86x48 mm Indice de protection : IP21 Période de garantie : 2 ans à partir de la date d'achat.
- Page 25: Certificat de garantie Le rapport d’essais/ certificat de garantie remplis sont nécessaire pour les réclamations sous garantie. Le thermostat Mi-750 a répondu aux exigences de tous les tests requis. Le capteur peut être inséré dans le tube ondulé (tube vide) et en être retiré.
- Page 26: Personal settings can be recorded for the program mode. The document includes days of the week in multiple languages. Temperature settings are indicated in degrees Celsius. The program mode is referenced in German, English, and French. Users can input their personal settings for each day of the week. The layout suggests a structured format for entering temperature preferences. The document provides a multilingual approach to personal settings. There are placeholders for temperature values throughout the week. The content emphasizes customization for user preferences. The section is dedicated to personalizing the program mode.
- Page 27: Page 27

GENERAL LIFE 300S Wired Room Thermostat User Manual

EPH CONTROLS HRT Battery Operated Non Programmable Thermostat Installation Guide

Robertshaw RS9220 Programmable Thermostat Installation Guide

White Rodgers Big Blue Universal Thermostat 1F95-1277 Installation Guide

GENERAL FH25S Underfloor Heating Thermostat Owner’s Manual

GROHE 26984001 Vitalio Comfort 250 Shower System with Bath Thermostat Installation Guide

SIEMENS 194-2042 Pnuematic Room Thermostat User Guide

VIMAR 30810.G View Wireless Connected Dial Thermostat Instruction Manual

BAXI uSense 2 Wired Smart Thermostat Gateway Installation Guide

TELLUR TLL331431 WiFi Smart Ambient Thermostat TSH02 User Manual