
Home > GROHE > GROHE 26984001 Vitalio Comfort 250 Shower System with Bath Thermostat Installation Guide
GROHE 26984001 Vitalio Comfort 250 Shower System with Bath Thermostat Installation Guide













| General | Details |
|---|---|
| Name | GROHE 26984001 Vitalio Comfort 250 Shower System with Bath Thermostat Installation Guide |
| Make | GROHE |
| Language | English |
| Filetype | PDF (Download) |
| File size | 2.23 MB |
 (1 votes, average: 5.00 out of 5)
 Loading...

GROHE 266962431 QuickFix Vitalio Comfort 250 Shower System with Thermostat Instruction Manual

GROHE Vitalio Comfort 250 Manual: Questions and Answers
How do I install the GROHE Vitalio Comfort 250 thermostat mixer?
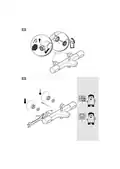
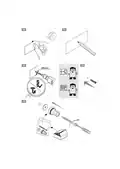
Installation must comply with local construction and plumbing regulations. Switch off the main shut-off valve before starting.
- Rinse water through the pipe to remove residue before installation.
- Ensure no pipes or electric cables run behind the wall at the drilling location.
- Drill into grout joints to avoid tile damage. Protect tiles with adhesive tape if needed.
- Install with temperature adjustment set to 38°C to meet safety requirements.
- Have an expert install the S connector to avoid piping damage.
- Check regularly that the installation is not leaking. Installation Guide, p. 21
What is the safety stop temperature for the GROHE Vitalio Comfort 250?
38 °C. Installation Guide, p. 20
What should I do if the GROHE Vitalio temperature connections are reversed?
The thermostatic compact cartridge needs to be replaced. A qualified expert is recommended. Installation Guide, p. 21

PNI-CT40 Smart Wireless Thermostat User Manual

GENERAL LIFE ARUNA 302S Wired Room Thermostat User Manual

QC Manufacturing Inc IT-30003 Attic Fan Adjustable Thermostat User Manual

DAIKIN DTST-ONE-ADA-A One Touch Smart Thermostat Installation Guide

Klima 825201 Intelligent Control Wi-Fi Underfloor Heating Thermostat User Manual

Ideal 229177 Halo Heat and System 2 Zone Extension Thermostat User Guide

GENERAL LIFE MITRA 250S RF Digital Room Thermostat User Manual

APATOR TH 480 Bi Metallic Thermostat Instruction Manual

BEOK TDR89 Wifi Heating Thermostat Instruction Manual

HASWILL ELECTRONICS STC-200 Thermostat User Guide