Home > thermotouch > thermotouch 5235W Wi-Fi Programmable Thermostat Instructions
thermotouch 5235W Wi-Fi Programmable Thermostat Instructions
| General | Details |
|---|---|
| Name | thermotouch 5235W Wi-Fi Programmable Thermostat Instructions |
| Make | thermotouch |
| Language | English |
| Filetype | PDF (Download) |
| File size | 0.98 MB |

thermotouch 5235W Wi-Fi Programmable Thermostat Instructions Overview
Summary of Contents
- Page 1: Thermotouch 5235W Wi-Fi enabled thermostat Simplified instruction version
- Page 2: Introduction Thank you for buying our Thermotouch 5235W thermostat. You can program the thermostat any way you want with the options provided under Heating Schedule and User Settings. The thermostat features an adaptive function that automatically changes heating start times. The thermostat will switch on your heating system at predetermined times each day of the week. You can set individual temperatures for up to six separate periods, called events, for each day of the week. Lowering the temperature when your home is unoccupied will reduce your energy costs without reducing comfort. The resistive touchscreen only requires a soft tap with your fingertip to register the touch. In this manual, the touch areas on the screen will be referred to as buttons. The Wi-Fi version of this Thermotouch offers remote control of your underfloor heating through the SWATT® app. The thermostat comes with a preset heating schedule suitable for most homes.
- Page 3: Installation guide and manual for the 5235W Thermotouch thermostat. Details required to install and setup the thermostat are provided. A full detailed user guide is available for additional settings and troubleshooting. The detailed guide includes general operation, icons, and language settings. It covers open window detection, display brightness, and screen saver options. Energy tariff, eco function, date format, and time format are also included. Daylight saving time, unit, sensor type, and calibration for floor and room sensors are addressed. Temperature scale and EN50559 compliance are mentioned. Instructions for removing from the app and restoring factory settings are provided. Detailed troubleshooting information is available in the full guide.
- Page 4: Introduction Adaptive function Heating schedule Child lock Before you start Installing your thermostat Wiring diagram Startup wizard Operating modes Troubleshooting
- Page 5: Before you start Check you have got everything: - 5235W thermostat - Mounting plate - Fixing screws - Electrical screwdriver - Wire strippers - Fixing bracket - 3M sensor probe - 2M sensor conduit - Electrical test meter Your thermostat should be: - Installed 1.2 - 1.5m up from the floor - On an internal wall - Outside any wet zones (IP21) - Installed on an RCD protected circuit - Away from drafts or heat influencers - Installed so that the floor sensor probe can be laid in a heated area of the floor - Installed by an electrician, in line with current electrical regulations and relevant local standards
- Page 6: Installing your thermostat Switch off main power You will be installing your thermostat as part of a high voltage mains electrical circuit. To ensure your safety and to protect the thermostat, switch off the mains power before you start the installation. Must be installed on an RCD circuit
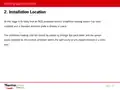
- Page 7: Installing your thermostat Installation location An RCD protected electric underfloor heating system has likely been installed. A standard electrical plate is already in place. The underfloor heating cold tail should be pulled up through the back plate. The sensor probe should be installed within the wall cavity or pre chased channel in a solid wall.
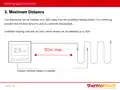
- Page 8: Installing your thermostat Your thermostat can be installed up to 50m away from the underfloor heating system it is controlling, provided that the floor sensor is used to control the temperature. Underfloor heating cold tails and floor sensor probes can be extended up to 50m. Connect multiple heaters in parallel.
- Page 9: Installing your thermostat Wiring diagram Connect the thermostat to the underfloor heating cold tail, power supply, and floor temperature sensor. The floor temperature sensor is not polarity sensitive.
- Page 10: Installing your thermostat Fix mounting plate Fix your thermostat in position onto the electrical plate in either the vertical or horizontal position. Ensure the unit is switched off using the switch on the side of the unit, to allow for the screen to be clipped into position.
- Page 11: Installing your thermostat It is important that all adhesives and grouts are dry and fully cured before you switch on your underfloor heating. Most adhesives take between 7 to 10 days to cure. Follow manufacturer guidelines. The temperature of your underfloor heating should be increased gradually to avoid thermal shock in the floor. Start at 15°C and work up to your desired temperature increasing 2-3°C per day. Observe any maximum temperature guidelines from your floor manufacturer. Australian regulation states the heating cannot exceed 28°C.
- Page 12: Startup Wizard When the system has been installed and turned on for the first time, or after you have performed a factory reset, you must set the region, language, date, time, and floor type. The thermostat will automatically guide you through the process. Region – set the time region in which the thermostat is located. Language – set the language to be used on the thermostat display. Date – set the current date. Use the Up Arrow or Down Arrow button to set the day, month, and year.
- Page 13: Time – set the current time. Tap the parameter you want to change. The selected parameter will enlarge and be underlined in black. Use the “Up Arrow” or “Down Arrow” button to set the hours and minutes. Confirm the date with the “Right Arrow”. Floor Type – choose between: Tile: floors made of tile or stone. Soft Floor: wooden or other engineered floors. Confirm each setting with “”. The thermostat is now ready for use and will control the underfloor heating according to the preset heating schedule.
- Page 14: The thermostat offers seven different modes of temperature control. Modes include scheduled operation, frost protect, manual, comfort, eco, boost, and holiday. Eco function must be enabled in the user settings menu.
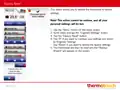
- Page 15: Scheduled operation will control the temperature automatically according to the programmed heating schedule. Manual and other modes are accessible from the home screen during scheduled operation. If the Eco function is enabled, Eco and other modes will be accessible from the home screen. The function of buttons and symbols on the home screen varies according to the chosen operating mode. The scheduled operation home screen displays day and time information. Users can tap to access menus from the home screen. An icon indicates the current operating mode, with a calendar symbol for scheduled operation. The current target temperature is shown, and if in red, heating is being provided. The time of the next scheduled event change is displayed. If shown, the adaptive function is enabled.
- Page 16: Manual allows you to override scheduled operation and maintain a specified temperature around the clock. From the scheduled operation home screen, tap the “Manual” button to access manual override. If Eco is enabled, “Manual” will be found in the “Other” menu. You can use “Manual” to override the programmed event schedule. The thermostat will continue to operate in Manual until you return it to Scheduled Operation. Use the “Up Arrow” or “Down Arrow” button to select the required temperature. While in Manual Override, an “X” button is shown in the lower left corner of the home screen. Press this button to return the thermostat to Scheduled Operation. The function of the buttons and symbols shown on the home screen varies according to the chosen operating mode. Indication of Manual Override is displayed on the manual home screen.
- Page 17: Comfort mode can be used to override scheduled operation for special occasions. You can manually set a comfort temperature for a chosen period of time. Access alternative operating modes by tapping the “Other” button. Select “Comfort” to override the programmed heating schedule. Use the arrow buttons to select the required temperature and confirm. Set the required duration of Comfort mode using the arrow buttons and confirm. The thermostat will automatically enter the Comfort mode home screen. An “X” button is shown on the home screen to return to Scheduled Operation.
- Page 18: Comfort home screen: Indication of Comfort mode. Tap here to access the menus. Icon indicating the current operating mode (Feet = Comfort). Current target/setpoint temperature (if shown in red, heating is being provided). The time at which the thermostat will return to Scheduled Operation. Tap here to quit Comfort mode and return to Scheduled Operation.
- Page 19: Boost mode is accessible from the “Other” menu. In Boost mode, the underfloor heating is constantly activated for one hour. After one hour, the thermostat returns to Scheduled Operation. From the Scheduled Operation home screen, tap the “Other” button to access the alternative operating modes. Choose “Boost”. Confirm that you wish the thermostat to activate Boost mode by tapping the confirmation button. While in Boost mode, an “X” button is shown on the home screen. Press this button to return the thermostat to Scheduled Operation. The Boost home screen indicates the current operating mode with an icon. The time at which the thermostat will return to Scheduled Operation is displayed.
- Page 20: Frost Protection mode is used when heating is not needed but the temperature must be kept above freezing point until changed manually. To activate Frost Protection, tap the “Other” button on the home screen, then tap the “Frost Protect” button. A confirmation screen will be displayed briefly before the thermostat enters the Frost Protect home screen. While in Frost Protection mode, an ice crystal and glove are displayed on the home screen along with the target/setpoint temperature (5.0°C). The home screen indicates Frost Protection mode with an icon showing the current operating mode. The fixed target/setpoint temperature will be shown, and if it appears in red, heating is being provided. There is an option to return to Scheduled Operation from the Frost Protection home screen.
- Page 21: Holiday mode allows you to set the heating of your home to a minimum while you are away on holiday, thus saving energy and money. You must set the date you leave to go on holiday and the date you return. The thermostat will ensure that your floor is kept above freezing point and that your home is warm upon your return. From the Scheduled Operation home screen, tap the “Other” button to access the alternative operating modes. Tap the “Holiday” button. Tap the “OFF/ON” button to “ON” and confirm with the “✓” button. Set the date on which you are going on holiday. Set the date on which you plan to return. A confirmation screen will then be displayed briefly before the thermostat automatically enters the Holiday home screen. During an active holiday period, a suitcase is displayed on the screen together with the programmed leaving and return dates.
- Page 22: Indication of Holiday mode. Tap here to access the menus. Icon indicating the current operating mode (suitcase = Holiday). The date on which the thermostat entered Holiday mode and the date on which the thermostat will return to Scheduled Operation. Tap here to quit Holiday mode and return to Scheduled Operation. If leaving and returning dates have been entered but Holiday mode is not yet active, an alternative Scheduled Operation home screen will be displayed, featuring a suitcase.
- Page 23: Eco Function reduces energy spent on unnecessary heating when leaving the room during a scheduled heating event. When enabled, the thermostat enters an energy-saving state using the lowest setback temperature as the setpoint. At the next scheduled event change, the thermostat returns to normal operation. To use the Eco Function, it must be enabled under User Settings. Access the Eco Function by tapping the “Eco” button on the Scheduled Operation home screen. The Eco Function home screen displays various indicators and options. An icon indicates the current operating mode (Leaf = Eco Function). The current target/setpoint temperature is shown, and if in red, heating is being provided. The time at which the thermostat will return to Scheduled Operation is also displayed. There is an option to return to Scheduled Operation from the Eco Function home screen.
- Page 24: Adaptive function allows the thermostat to calculate the time required to heat up and reach the desired temperature set point. It will turn on earlier to ensure the floor is at the desired temperature at the start of a scheduled heating event. The adaptive function is turned on by default. After a few days, the adaptive function will automatically calculate the necessary adjustments for heating times. Select “OFF” if you want the heating to start at the beginning of an event. To adjust the adaptive function, tap the “Menu” button on the home screen. Scroll down and tap the “Engineer Settings” button. Tap the “Adaptive Function” button to access the setting. Use the “OFF/ON” button to select your preferred setting and confirm with the “✓” button. The thermostat will automatically return to “Engineer Settings” after confirming changes.
- Page 25: Heating schedule allows you to control temperature automatically according to a programmed schedule. The thermostat comes with a pre-programmed schedule for easy and economic heating control. The heating schedule can easily be changed by accessing the menu. Choose between Work days/home days and All days are different. Work days/home days is best if you have fixed working hours. If you chose Work days/home days, an information screen about the schedule will be shown. Select the days on which you work, and the thermostat will automatically designate the remaining days as home days. If you chose All days are different, each day of the week must be individually programmed. Press the button to confirm when the information screen appears.
- Page 26: Heating schedule allows for automatic temperature changes at scheduled times. You can choose between a four or six event schedule. A four event schedule allows for four different events during work days and two during home days. A six event schedule allows for six different events during work days and two during home days. The four event schedule is suitable for a typical daily routine of waking up, going to work, returning home, and sleeping. The six event schedule is suitable for a routine that includes returning home for lunch. To set the schedule, tap the “Events per Day” button. On the confirmation screen, tap the “Right Arrow” button. Select the desired number of events per day and confirm.
- Page 27: You can now set up your personalised heating schedule. Tap the “Event Schedule” button to set up the target temperature and start time for each event. Tap the temperature if you want to change it, then tap the “Up Arrow” or “Down Arrow” button to set the required temperature. Tap the time if you want to change it, then tap the “Up Arrow” or “Down Arrow” button to set the time in increments of 15 minutes. Tap the “Left Arrow” or “Right Arrow” button to toggle through the various events. Once you have completed setting all the events, tap the “Right Arrow” button to view a confirmation screen and return to the Heating Schedule menu. Tap the back arrow to return to the menu.
- Page 28: Child lock prevents children and others from tampering with the thermostat. To access user settings, tap the “Menu” button on the home screen. Activate the child lock by tapping the “Child lock” button. Confirm your choice with “” or discard it with “X”. The child lock activates with the screen saver after 3 minutes of inactivity. To unlock the child lock, draw an “L” on the screen in a single stroke. The home screen will appear if the unlocking gesture is done correctly. The child lock will reactivate when the thermostat returns to screen saver mode. Deactivate the child lock in the menu: User Settings/Child Lock.
- Page 29: This setting allows you to change the date, which is sometimes shown on the home screen and is used for functions such as “Holiday” mode and “Daylight Saving Time”. Tap the “Menu” button on the home screen. Then tap the “User Settings” button to access the various user settings. Scroll down and tap the “Date” button. Tap the parameter you want to change. Tap the “Up Arrow” or “Down Arrow” button to set the day, month and year. Confirm each setting with “✓”. Tap the “Left Arrow” button to return to “User Settings”.
- Page 30: This option allows you to change the time, which is used by the thermostat to control heating schedule events during Scheduled Operation. Tap the “Menu” button on the home screen. Then tap the “User Settings” button to access the various user settings. Scroll down and tap the “Time” button. Tap the parameter you want to change. Tap the “Up Arrow” or “Down Arrow” button to set the hours and minutes. Confirm each setting with “✓”. Tap the “Left Arrow” button to return to “User Settings”.
- Page 31: Sensor application allows you to choose which sensor controls the heating system. The floor sensor is the default setting for controlling the heating system. The room/floor limit setting uses the room sensor with maximum and minimum limits for floor temperature. The maximum temperature limit protects wooden floors from excessive heat. The minimum temperature limit prevents the floor from becoming uncomfortably cold. Using the room sensor inside the thermostat is another option for controlling the heating system. Floor limit temperatures are set in the “Temperature Scale” menu. To set the sensor application, access the menu from the home screen. Navigate to “Engineer Settings” and select “Sensor Application.” Confirm your choice to set the desired sensor application.
- Page 32: Factory reset This option allows you to restore the thermostat to factory settings. This action cannot be undone, and all your personal settings will be lost. Tap the “Menu” button on the home screen. Scroll down and tap the “Engineer Settings” button. Tap the “Factory Reset” button. Tap “X” if you want to maintain your settings and return to “Engineer Settings”. Tap “Reset” if you want to restore the factory settings. The thermostat will then be reset and the “Startup Wizard” will appear on the screen. A factory reset will erase all data.
- Page 33: You can set up a Wi-Fi connection in the following way. Tap the “Menu” button on the home screen. Tap the “App Control” button to access the app setup options. Tap the “Wi-Fi Connection” button to set up the Wi-Fi connection. If a Wi-Fi configuration is already made, the “Status” screen will be displayed showing the current status of the Wi-Fi connection. Choose the desired connection type on the “Connection type” screen. Tap “WPS” for automatic setup or tap “Manual” for manual setup. Automatic setup requires that you can activate WPS on the router. Go to your Wi-Fi router and activate WPS. On your thermostat, tap the “Right Arrow” button to start connecting the thermostat.
- Page 34: Wi-Fi connection Manual connection The “Searching networks” screen is displayed while the thermostat is searching for available networks. The detected networks are then displayed in a list. Tap the name of the desired network on the list. If you cannot see the name of your network on the list, you have to enter the network name manually. Tap “Other” at the bottom of the list of networks. You are now asked to enter the network name (SSID). Enter the network key (password) for your wireless network at the top of the screen.
- Page 35: Tips on using the keyboard: Tap the “Character set” button to choose between different character sets. Tap the “Up Arrow” and “Down Arrow” buttons to scroll in the selected character set. Tap the highlighted character to enter it. Tap the “Delete” button to delete the last character. If the key is too long to be displayed, tap the text to see the entire text. Confirm the network key to start connecting the thermostat. The thermostat will attempt to connect to your wireless network. If the connection is successful, a confirmation screen will be displayed. If the connection fails, check troubleshooting and try again.
- Page 36: If problems persist, or if anything unexpected happens during setup of the Wi-Fi connection, please consult the “Troubleshooting” section in the detailed manual. You can disconnect a Wi-Fi connection in the following way: Tap the “Menu” button on the home screen. Then tap the “App Control” button to access the app setup options. Tap the “Wi-Fi Connection” button to show the “Status” screen which displays the status of the current Wi-Fi connection. Tap the “Right Arrow” button to proceed to the “Connection type” screen. Tap the down arrow and tap Disconnect to remove the current Wi-Fi connection. Confirm with “”. You will now return to the App Control menu. A confirmation screen will be displayed briefly. Note if you tap the “X” button you will return to the “Connection type” menu.
- Page 37: Install the OJ Microline® SWATT app on your smart device. When you have successfully set up a Wi-Fi connection on your thermostat, you can connect it to OJ Microline® SWATT app. Tap the “Menu” button on the home screen. Then tap the “App Control” button to access the app setup options. Tap the “Connect to App” button to connect to your app. Choose how to connect to your app: Tap “QR Code” to display a QR code that you can scan with your mobile phone. Tap “Thermostat ID” to display the thermostat ID that you can enter in your app.
- Page 38: Connect to app. You can now name your thermostat and heating zone. Your thermostat name helps you identify the exact thermostat such as kitchen. The zone allows you to place the thermostat in a zone and then add additional thermostats to that zone such as living zone which includes thermostats in the hallway, kitchen and living room. Wait until the confirmation screen appears on the thermostat before confirming on both the thermostat and the app. This can take up to a minute. This completes your wireless connection.
- Page 39: Using the app allows you to manage your thermostats effectively. You can add additional thermostats immediately after adding your first thermostat. Tap the add more thermostats button at the bottom of the screen to proceed. Alternatively, you can add additional thermostats at any time through the menu in the top right corner. Select manage zones to add a new zone or a new thermostat to an existing zone. Consider adding a family room with multiple thermostats as an example of a new zone.
- Page 40: Using the app allows you to control your thermostat. To control the mode of your thermostat, tap the required zone from the home screen of your app. You can adjust all of the thermostats on that zone or select each thermostat individually. This enables you to choose between manual mode, boost mode, holiday mode, eco mode, or return to your heating schedule. To operate in manual mode, press and hold the green circle on the dial and slide to achieve your desired temperature. To operate in boost, comfort, or eco modes, press the icon at the bottom of the app screen.
- Page 41: Using the app Setting up your schedule To set your heating schedule, select the menu button in the top right-hand corner and select set up schedule. If you have multiple zones, the various zones will be displayed; select your desired zone. Depending on your daily settings, you will have either 4 or 6 zones showing each day. You can select the day that you wish to set your schedule for along the top of the screen. The heating schedule can then be copied to your desired days through using the copy schedule button located at the bottom of the screen.
- Page 42: When setting your schedule, begin with event 1 and tap the start time to adjust this. Select the temperature to set your desired temperature. Move on to set event 2, which is normally considered the off time. You can turn this event on and off using the slide button located directly below the event name. This action turns the entire switching period on or off, not just the temperature. Follow the above process to set all the desired times and temperatures for the various events. This schedule can be copied to the various days of the week using the copy schedule button. To save your schedule, select OK located in the top right corner of the screen.
- Page 43: Using the app involves setting holiday mode. To enter holiday mode, select the menu button in the top right corner and choose the holiday field. Tap the start date to select your holiday start date and press OK to confirm. Follow the same process to set the holiday end date. Tap the select zones button to set the desired zones for holiday mode. Tap OK to save.
- Page 44: Using the app allows you to view a range of thermostat settings. The Thermostat Information tab displays information regarding your thermostat. Open Window, Adaptive function, and sensor settings need to be adjusted via the thermostat settings. You can view a readout of your energy usage by the thermostat. Adjusting your energy usage information can be done on the thermostat.
- Page 45: Using the app Adding multiple users to the thermostat Each individual thermostat can only be connected to one account at any given time. If multiple people want to control the same thermostats, they will need to log in under the same account. Your account information can be found under the My Profile tab in the menu section on the app.
- Page 46: Troubleshooting Error messages: If a fault or error occurs, the thermostat will display one of the following error messages: E0: Internal failure. The thermostat is defective. Contact your heating engineer. E1: Internal sensor defective or short-circuited. Contact your heating engineer. E2: Check that a floor sensor has been installed and try switching the unit to ambient sensor. E5: Internal overheating. Contact your heating engineer in order to have the installation inspected. The thermostat is in “Child Lock” mode. To unlock connect the dots in an L shape pattern and refer to page 28 for how to disable. For further troubleshooting information please refer to the detailed product instructions.
- Page 47: Technical information includes wiring diagram and box contents. Wiring diagram specifies connections for 230/240V AC supply, UFH live and neutral, and sensor connections. Box contents include a thermostat, mounting plate, fixing bracket, sensor probe, sensor conduit, and fixing screws. Technical data outlines supply voltage, maximum load, temperature range, compatible sensors, and accuracy. Supply voltage is 230/240V 50/60Hz with a maximum load of 16A. Temperature range is from 5 to 40°C. Compatible sensors include various resistances at 25°C. Accuracy is ±0.5°C with a warranty of 3 years. IP rating is IP21 with dimensions of 84mm width, 115mm height, and 40mm depth. Display features a 176x220 pixels TFT with resistive touch and backup storage for 5 years.
- Page 48: Service & Support For the detailed instruction version for the 5235W, please refer to the website. Watch the video guide on our website.