Satel ART-210 Wireless Radiator Thermostat Instruction Manual


SATEL
ART-210
7
The used batteries must not be discarded, but should be disposed of in
accordance with the existing rules for environment protection.
3.1 Tips for installation
• The thermostat should be installed indoors, in spaces with normal air humidity.
• When selecting a place of installation, consider the radio communication range.
The thermostat must be located within the radio range of the ABAX 2 controller.
• Thick walls, metal partitions, etc. reduce the range of the radio signal.
• Use the ARF-200 tester to test the radio signal strength. Place the tester close to the
valve on which you want to install the thermostat. If the radio signal level indicated by the
tester is higher than 40%, you can install the thermostat there.
• The thermostat is fitted for radiator valves with the M30 x 1.5 mm threaded connection.
It is compatible with most radiator valves on the market.
• In order to install the thermostat on the Danfoss RA, Danfoss RAV or Danfoss RAVL
valve, use one of the provided adapters (Fig. 3).
• The thermostat should be installed in such a way to ensure display visibility and knob
accessibility.
• You do not need any special tools to install the thermostat. Draining the heating system is
not required.
• Before you remove the old thermostatic head, make sure to turn it several times from
minimum to maximum position and back. Unscrew the old thermostat when it is in the
maximum position. When the thermostat is removed, the valve pin should be fully
extended.
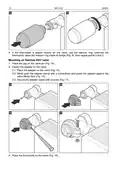
3.2 Mounting
1. Remove the thermostat cover (Fig. 4).
2. Install two 1.5 V LR6 AA alkaline batteries (they are not supplied with the thermostat).
When the batteries are installed, the actuator rod that moves the valve pin is
completely withheld inside the thermostat cover. If the actuator rod is not completely
withheld inside the cover, remove the batteries and install them again.
After the thermostat has started, the message will be displayed. The message
indicates that the thermostat is ready for calibration.
3. Add the thermostat to the wireless system (see the ABAX 2 controller manual).
The sticker with the serial number required for registration of the thermostat in the system
can be found on the thermostat body.
| General | Details |
|---|---|
| Name | Satel ART-210 Wireless Radiator Thermostat Instruction Manual |
| Make | Satel |
| Language | English |
| Filetype | PDF (Download) |
| File size | 0.47 MB |


Satel ART-200 Wireless Radiator Thermostat Installation Guide


ENGO CONTROLS EASY-24W 24V Wired Thermostat User Guide

Honeywell CM907 Programmable Room Thermostat User Guide

legrand WZ3TSTATH Thermostat Instruction Manual

aube technologies CT230-120GA Slave and Master Thermostat Instruction Manual
Stelpro STE362RNP Electronic Thermostat User Guide

sinope TH1134ZB Smart Line Voltage Thermostat Installation Guide

EcoNet UETST800SYS Smart Thermostat User Guide

sensi 1F76U-22WFB Lite Smart Thermostat User Manual

ALARM ADC-T25 Smart Thermostat Installation Guide

vtech T961NN50 Wired Thermostat User Guide