Rayotec Coloursense Wi-Fi Thermostat Instruction Manual


Rayotec Coloursense Wi-Fi Thermostat Manual
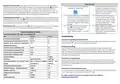
Description of icons
Before wiring and installing
1. Read instructions carefully. Failure to follow them could cause damage or a hazardous condition.
Programming mode
Installer must be a trained and qualified Electrician.
2. Thermostat is 16 Amp max rated – Do not exceed max load.
3. When installing heating in a bathroom/wet room the thermostat needs to be placed outside the room.
4. The thermostat is mounted onto a standard 35mm backbox, this should be placed at light switch level,
away from other heat sources, so that it can get an average temperature of the room.
Manual mode
Temporary manual mode
Wiring Order in Terminals
3 & 4 = Incoming power
5 & 6 = Heating mat
7 & 8 = Floor probe
Child lock
Holiday mode
Heating on
Sensor error
Activate window function
Return to last menu
Password
The default password for the thermostat is “123456” You can change the password in the advanced settings
menu. You can turn password request off in the Advanced settings menu by clicking function to “off”.
Programming the thermostat
Default Programming Schedule
Floor probe sensor
Time Schedule
06:00-08:00
08:00-11:30
11:30-12:30
12:30-17:30
17:30-22:00
22:00-06:00
Temperature (default)
You must always install the floor probe sensor. Always check that the temperature limit for the floor probe
is set to a suitable temperature for your flooring (typically 27℃). This can be done in the advanced setting
menu A6 (see next page). Always test the floor probe with a megger tester or fluke tester set to 2000 ohms,
the reading should be between 8-15 ohms. The live and neutral are interchangeable. Floor probe must
fitted under the heating mat, equal distance between two heating elements within a conduit (see heating
mat instructions). Failure to do so will cause heating to turn off prematurely or not provide adequate
protection.
Period 1
Period 2
Period 3
Period 4
Period 5
Period 6
20
15
15
15
20
15
This icon will indicate an error with the floor probe, if this appears check the connection and run a
continuity test on the cables to ensure no damage has been done.
Programming schedule directly on thermostat: To access schedule tap
“Settings” button,
then press the “Programming Parameters” tab. To change the time and temperature of each section,
simply tap on the desired option and then use the up and down arrows on screen to change it to your
required time / temperature, when you have the correct setting click “confirm” to accept. Repeat this until
you are happy with all of the time and temperature schedules. You can have different times and
temperatures for weekdays and weekends if you are on 5+2 mode (default) or have all days the same on 7
day mode. If you just want a different setting for Sunday only, select the 6+1 day mode.
Button Functions
Symbol
Function
A
B
Turns the display ON/OFF
1. Tap to change temperature until next programmed time schedule
2. Hold for a few seconds to unlock child lock
C
1. Tap to change temperature until next programmed time schedule
Programming schedule using “Smart life” App: Once Wi-Fi pairing has been completed (see
last page) – Go to “Settings” and select “Weekly Program Setting”. Then simply set the “Workday” and
D
Tap to enter Settings menu

| General | Details |
|---|---|
| Name | Rayotec Coloursense Wi-Fi Thermostat Instruction Manual |
| Make | Rayotec |
| Language | English |
| Filetype | PDF (Download) |
| File size | 0.18 MB |


Rayotec PERGARP0DCN6YB3I Wi-Fi Thermostat Instruction Manual

Rayotec Freedom Wi-Fi Thermostat Instructions

Rayotec Coloursense Wi-Fi Thermostat Instruction Manual Overview
Summary of Contents
- Page 1: Rayotec Coloursense Wi-Fi thermostat manual Read instructions carefully. Failure to follow them could cause damage or a hazardous condition. Installer must be a trained and qualified electrician. Thermostat is 16 Amp max rated – Do not exceed max load. When installing heating in a bathroom/wet room, the thermostat needs to be placed outside the room. The thermostat is mounted onto a standard 35mm backbox, this should be placed at light switch level, away from other heat sources. You must always install the floor probe sensor. Always check that the temperature limit for the floor probe is set to a suitable temperature for your flooring. This icon will indicate an error with the floor probe; if this appears, check the connection and run a continuity test on the cables. To access the schedule, tap the “Settings” button, then press the “Programming Parameters” tab. Programming schedule using “Smart life” app: Once Wi-Fi pairing has been completed, go to “Settings” and select “Weekly Program Setting.”
- Page 2: WiFi Pairing Search for Smart life from Google Play or App Store to install the app. Setting the time and date: If you pair the thermostat with the Smart Life app it will automatically set the time and date. You will need to select your 2.4ghz WiFi network and enter your password. Changing heating modes: You can change between Automatic programming, Manual control, and Holiday mode. Applying child lock: To enable child lock, tap on “Lock” and select “Yes.” Troubleshooting: Screen not responding to button presses may indicate that the child lock is on. Thermostat not powering on: Check for incorrect wiring or ensure incoming power cables are live. Thermostat not connecting to the app: This can be caused by the router being stuck in 5ghz output. Advanced Settings Menu: Access by tapping the button then Advanced tab. For further assistance and step-by-step guides, check out the user manual.

GENERAL HT100S Digital Room Thermostat User Manual

BEOK Color TFT-LCD Heating Thermostat User Manual

King K302PE ClearTouch Programmable Thermostat Instruction Manual

Honeywell evohome Smart Thermostat User Guide

EUROTRONIC Programmable Energy-Saving Radiator Thermostat User Manual

ENGO CONTROLS ESIMPLE230B 230V Simple Dial Thermostat User Guide

BVF Heating L-1 Smart Outdoor Thermostat User Manual

Chytre Vypinace HC-T020-EWF Series Thermostat Owner’s Manual

Roth Minishunt Plus Thermostat and Capillary Sensor Installation Guide

PRO1 T771 Programmable Electronic Thermostat Instructions