Home > Owon Technology > Owon Technology PCT 523-W-TY Tuya WiFi 24VAC Thermostat User Guide
×
- 1. Wi-fi Smart Thermostat (Quick Start Guide)
- 2. Impoant Information (Failure To Follow These Safety Instructions → Could Result In Fire, Electric Shock, Or Other Injury Or Damage. → Professional Installation → Electrical Safety → Installation Location)
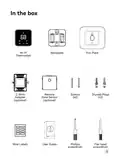
- 3. In The Box (Wi-fi → Backplate → Trim Plate → Thermostat → C-wire Adapter (optional) → Zone Sensor (optional))
- 4. These Tools Will Help With Installation
- 5. Step 1. Turn Off The Power (Step 2. Remove Your Old Thermostat Faceplate)
- 6. Step 3. Compatibility Check (High Voltage → C-wire)
- 7. Step 4. Take A Photo Of Your Old Wiring (Step 5. Remove All Jumper Wires)
- 8. Step 6. Check Which Set Of Labels You Will Be Using (If Your System Has A Heat Pump, Please Use The Heat Pump Wire Labels Or The Set Of Wires That Includes The 'o/b' Label. → If Your System Does Not Have A Heat Pump, Please Use The Conventional Wire Labels Or The Set Of Wires Without The 'o/b' Label.)
- 9. Wire Identification (Heat Pump Wire Labels → Conventional Wire Labels)
- 10. Step 7. Label Your Wires (Special Labels:)
- 11. Checkpoint: C-wire (Do You See Any Wire Connected To The C Terminal On Your Old Thermostat?)
- 12. Install The Thermostat With A C Wire (Step 8. Disconnect Wires → Step 9. Remove Your Old Wall Plate)
- 13. Step 10. Pull The Wires Through The Backplate (Step 11. Attach The Backplate To The Wall → Optional: Use The Trim Plate To Cover Screw Holes Or Gaps Left Over From Your Old Thermostat's Installation.)
- 14. Step 12. Connect The Wires (Special Wires:)
- 15. If You Only Have One R Wire (that Includes R, Rc, And Rh), Connect It To Rc Terminal.
- 16. Step 15. Attach The Thermostat Faceplate (Step 16. Power On Your System)
- 17. Once Powered Up, The Thermostat's Screen Will Light Up And Display 'hi'.
- 18. Install The Thermostat Without A C Wire (Your Wiring Requires A C-wire Adapter → Step 8. Go To Your Hvac System)
- 19. Step 9. Remove The Cover (Step 10. Take A Photo Of Your Wiring)
- 20. Step 11. Label The Wires On Control Board (Step 12. Disconnect The Wires)
- 21. Connect Labelled Wires To The C-wire Adapter (Connect The Adapter To The Control Board → Hvac Control Board)
- 22. Step 15. Close The Cover Panel
- 23. Step 16. Disconnect Wires (Step 17. Remove Your Old Wall Plate)
- 24. Step 18. Pull The Wires Through The Backplate (Step 19. Attach The Backplate To The Wall → Optional: Use The Trim Plate To Cover Screw Holes Or Gaps Left Over From Your Old Thermostat's Installation.)
- 25. Step 20. Connect The Wires (Special Wires:)
- 26. If You Have More Than One R Wire (that Includes R, Rc, And Rh), Connect Them As Follows: Wires You Have Wire To Rc Terminal Wire To Rh Termi…
- 27. Step 22. Check For Air Drafts (Step 23. Attach The Thermostat Faceplate)
- 28. Step 24. Power On Your System (Please Go To Page 34 To Set Up The Thermostat.)
- 29. Wiring Diagrams (Thermostat Connectors → Terminals → What It Means)
- 30. Below Are The Wiring Diagrams For Common Hvac Equipment. (Conventional 2 Stage Heating → Conventional 2 Stage Heating, 2 Stage Cooling)
- 31. Stage Heat Pump With 2 Stage Aux Heat (Stage Heat Pump With Aux Heat And Emergency Heat)
- 32. C-wire Adapter Wiring (Control Board)
- 33. Setup
- 34. Using Your Thermostat (Cool / Heat / Fan Settings Icon → Auto Mode → Lock Icon → Avg. Temp Icon → Running Status → Air Vent For Temp Measurement)
- 35. Avg. Temp Icon (Info Icon → Settings Page Toggle → Factory Reset)
- 36. Adding Your Sensor (Link Alexa And Google Assistant)
×
Owon Technology PCT 523-W-TY Tuya WiFi 24VAC Thermostat User Guide
You can also identify it by the colors of wire with W and O/B labels.
W
Y2 W2
G
W
C
C
Y
Y
R
R
RC
RC
Conventional
Heat Pump
AUX/E
L
OG/BO/B
• If it is orange, please use the heat pump wire labels or the set of wires
that includes the "O/B" label.
Y2 W2
G
G
W
C
C
Y
R
RC
Conventional
AUX/E
L
O/B
Y
R
RC
Heat Pump
AUX/E
L G O/B
C
Y
R
RC
Heat Pump
• If it is white, please use the conventional wire labels or the set of wires
without the "O/B" label.
Y2 W2
G
W
C
Y
R
RC
Conventional
Y2 W2
G
G
W
C
Y
R
RC
conventional
AUX/E
L
O/B
C
Y
R
RC
Heat Pump
9
| General | Details |
|---|---|
| Name | Owon Technology PCT 523-W-TY Tuya WiFi 24VAC Thermostat User Guide |
| Make | Owon Technology |
| Language | English |
| Filetype | PDF (Download) |
| File size | 1.75 MB |


ecoartheating B07QZRVC8K Temperature Controller Electric Thermostat Instruction Manual

HYSEN HY511 WiFi Heating Thermostat Owner’s Manual

BEOK CONTROLS TGR86 WiFi Thermostat User Guide

MODINE 5-580.4 Programmable Room Thermostat Installation Guide

niko 550-00550 Home Control HVAC Thermostat Instructions

Schneider Electric CCTFR6100Z3 Wiser Radiator Thermostat User Manual

Danfoss RT 2 Series Capillary Tube Thermostat Installation Guide

sinope TH1300ZB-C4 3600W Smart Floor Heating Thermostat Installation Guide

SALUS RT310 Thermostat User Manual

EPH CONTROLS RDTP-24 24V Recessed Room Thermostat Instruction Manual
Table of Contents
- 1. Wi-fi Smart Thermostat - Quick Start Guide →
- 2. Impoant Information - Failure To Follow These Safety Instruc... →
- 3. In The Box - Wi-fi →
- 4. These Tools Will Help With Installation →
- 5. Step 1. Turn Off The Power - Step 2. Remove Your Old Thermos... →
- 6. Step 3. Compatibility Check - High Voltage →
- 7. Step 4. Take A Photo Of Your Old Wiring - Step 5. Remove All... →
- 8. Step 6. Check Which Set Of Labels You Will Be Using - If You... →
- 9. Wire Identification - Heat Pump Wire Labels →
- 10. Step 7. Label Your Wires - Special Labels: →
- 11. Checkpoint: C-wire - Do You See Any Wire Connected To The C ... →
- 12. Install The Thermostat With A C Wire - Step 8. Disconnect Wi... →
- 13. Step 10. Pull The Wires Through The Backplate - Step 11. Att... →
- 14. Step 12. Connect The Wires - Special Wires: →
- 15. If You Only Have One R Wire (that Includes R, Rc, And Rh), C... →
- 16. Step 15. Attach The Thermostat Faceplate - Step 16. Power On... →
- 17. Once Powered Up, The Thermostat's Screen Will Light Up And D... →
- 18. Install The Thermostat Without A C Wire - Your Wiring Requir... →
- 19. Step 9. Remove The Cover - Step 10. Take A Photo Of Your Wir... →
- 20. Step 11. Label The Wires On Control Board - Step 12. Disconn... →
- 21. Connect Labelled Wires To The C-wire Adapter - Connect The A... →
- 22. Step 15. Close The Cover Panel →
- 23. Step 16. Disconnect Wires - Step 17. Remove Your Old Wall Pl... →
- 24. Step 18. Pull The Wires Through The Backplate - Step 19. Att... →
- 25. Step 20. Connect The Wires - Special Wires: →
- 26. If You Have More Than One R Wire (that Includes R, Rc, And R... →
- 27. Step 22. Check For Air Drafts - Step 23. Attach The Thermost... →
- 28. Step 24. Power On Your System - Please Go To Page 34 To Set ... →
- 29. Wiring Diagrams - Thermostat Connectors →
- 30. Below Are The Wiring Diagrams For Common Hvac Equipment. - C... →
- 31. Stage Heat Pump With 2 Stage Aux Heat - Stage Heat Pump With... →
- 32. C-wire Adapter Wiring - Control Board →
- 33. Setup →
- 34. Using Your Thermostat - Cool / Heat / Fan Settings Icon →
- 35. Avg. Temp Icon - Info Icon →
- 36. Adding Your Sensor - Link Alexa And Google Assistant →


