
Home > ENGO CONTROLS > ENGO CONTROLS EONE230 Internet Controlled Thermostat User Guide
ENGO CONTROLS EONE230 Internet Controlled Thermostat User Guide
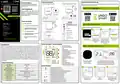
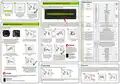


Installer parameters
4
5
6
Binding thermostat with the ECB62ZB wireless control box
Default
value
Pxx
Function
Value
Desription
12h
24h
12 hour
24 hour
Heating
P01
Clock format
24h
Make sure that the ECB62ZB control box and thermostat are in the same ZigBee network (they are added to
the same gateway EGATEZB) and the POWER LED lights up blue.
P02
Heating/Cooling Selection
1
Cooling
TPI for Underfloor Heating
TPI for Radiators
TPI for Electrical Heating
SPAN +/-0,1°C
TPI UFH
TPI RAD
TPI ELE
HIS 0.2
HIS 0.4
HIS 0.6
HIS 0.8
HIS 1.0
HIS 2.0
HIS 3.0
HIS 4.0
3
Name the device
and click„Done”.
The thermostat has been
installed and displays the
main interface.
On the controller screen globe
icon appeared stating that
he has been he added to the
ZigBee network.
TPI UFH
for heating
HIS 1.0 for
cooling
SPAN +/-0,2°C
P03
Control algorithm
SPAN +/-0,3°C
SPAN +/-0,4°C
SPAN +/-0,5°C
SPAN +/-1,0°C
2
1
SPAN +/-1,5°C
2
SPAN +/-2,0°C
In order to correctly link thermostat with the control box, first select the zone in the control box with the SELECT
button (1) (zone which you want to link with thermostat). The LED (2) will flash 3 times for the selected zone.
Confirm your selection by clicking PAIR button (2). The LED (2) will flash green with the previously selected
zone - binding process has started, it is active for 10 minutes and during this time you can link thermostat
with the selected zone.
If the thermostat indicates wrong temperature, you can correct it by
max 3.5°C"
P04
Offset temperature
-3.5°C do +3.5°C
5°C - 45°C
0°C
Binding thermostat with the module/relay
P05
P06
"Minimum setpoint"
"Maximum setpoint"
Minimum heating / cooling temperature that can be set
5°C
5°C - 45°C
Maximum heating / cooling temperature that can be set
Disable
35°C
Make sure that the module/relay and thermostat are in the same ZigBee network (they are added to the
same gateway EGATEZB).
1
2
3
4
External sensor as a floor sensor
External sensor as an air sensor
Occupnacy sensor (ON/OFF volt free input)
2
3
4
P07
P08
S1/S2 Input
1
1
2
10 sek.
5x
10 sek.
10 sek.
Maximum floor temperature for heating
(function active when P07=2)
In order to protect the floor, the heating will be turned off, when the
temperature of the floor sensor rises above the maximum value.
5°C - 45°C
35°C
or
Minimum floor temperature for heating
(function active when P07=2)
In order to protect the floor, the heating will be switched on, when the
temperature of the floor sensor drops below the minimum value.
P09
P10
P11
5°C - 45°C
5°C - 45°C
5°C - 45°C
10°C
15°C
7°C
10 sek.
Maximum floor temperature for cooling
(function active when P07=2)
In order to protect the floor, cooling will be switched on, when the
temperature of the floor sensor exceeds the maximum value.
5x
Minimum floor temperature for cooling
(function active when P07=2)
In order to protect the floor, cooling will be turned off, when the
temperature of the floor sensor drops below the minimum value
On the EONE thermostat, hold
and buttons until the
"bind"message appears.
Release the keys, binding
functionprocess of linking
thermostat with control box
is active.
The "binding" process takes
up to 300 seconds.
To properly link thermostat with the module/relay
first click the button on the device 5 times.
The LED diode will start flashing slowly on red, which
means the device is in binding mode.
On the EONE thermostat, hold and
buttons until the "bind" message appears.
OFF
This function helps to keep the floor warm, even if there is no heating
demand from the room thermostat. This feature is available only for
Heating Mode. User can select 5 levels of warm floor feature. Note that
comfort warm floor function will activate heating for specified amount
of time (in relation to Level setting choosen by user). Heating will be
activated only if in the past 1 hour heating was OFF.
Level 1 = 7min
Level 2 = 11min
Level 3 = 15min
Level 4 = 19min
P12
Comfort warm floor
OFF
5
6
4
3
ATTENTION:
Level 5 = 23min
If the binding process fails,
it must be repeated taking into
account the distances between
devices, obstacles and local radio
signal interferences.
ON
OFF
Function disabled
Function enabled
P13
P14
Valve protection
Internal relay
OFF
NO
NO
Relay type NO-COM
NC
Relay type NC-COM
OFF
Relay disabled
Release the keys, binding function
process of linking thermostat with control box
is active.
The "binding" process takes up to 300
seconds.
P15
P16
Backlight brightness
10% - 100%
Adjustable in the range from 10 to 100%
50%
NO
Remember:
Radio range can
be increased by Engo
ZigBee repeaters.
3
Both devices have been successfully
After successfull binding
operation„End”message linked. Thermostat displays the main
NO
PIN
NO
Function disabled
Function enabled
Function disabled
Function enabled
No action
PIN Code for settings access
Require a PIN to unlock the keys every time
(function active when P16=PIN)
5
6
will be displayed.
screen, icon "
" appeared on the
P17
CLR
NO
NO
YES
NO
screen indicating connection with
the receiver (ECB62ZB in this case).
Clear settings factory reset
YES
Factory Reset
3
Installer settings
To enter installer parameters press and hold button for 3 seconds.
Factory reset
After successfull binding operation
„End”message will be displayed.
LED on the module will stop flashing.
Both devices have been successfully linked.
Thermostat displays the main screen,
To RESET Thermostat to factory settings, hold down the and buttons for approx. 15 seconds. FA will
be displayed. Then release the keys. Thermostat will restart, will restore the default (factory) settings and
display the main screen. If the regulator was added to the gate and the ZigBee network, it will be removed
from it and you will need to add / pair it again.
1
2
icon "
" appeared on the screen
indicating connection with the receiver
(module/relay in this case).
5 sek.
ATTENTION:
1
2
3
If the binding process fails, it must be repeated taking into account the distances between devices,
obstacles and local radio signal interferences.
SET
10sek.
10sek.
Remember:
Radio range can be increased by Engo ZigBee repeaters.
Use or . button to move between parameters. Enter the parameter by . Edit the parameter using
or . Confirm the new parameter value with the button.

| General | Details |
|---|---|
| Name | ENGO CONTROLS EONE230 Internet Controlled Thermostat User Guide |
| Make | ENGO CONTROLS |
| Language | English |
| Filetype | PDF (Download) |
| File size | 0.5 MB |
 (1 votes, average: 5.00 out of 5)
 Loading...

ENGO Controls EONE230W Internet Controlled Thermostat User Guide

ENGO CONTROLS EFAN-230W Fan Coil Thermostat User Guide

ENGO CONTROLS FAN-24W 24V Fan Coil Thermostat User Guide

ENGO CONTROLS EASY230W Non-Programmable Wired Thermostat User Guide

ENGO CONTROLS EONEBATW, EONEBATB Internet Controlled Thermostat User Manual

ENGO Controls E901WIFI Internet Wireless Thermostat User Guide

ENGO CONTROLS EONE-BATW, EONE-BATB Internet Controlled Thermostat User Guide

ENGO CONTROLS EFAN-24W Fan Coil Thermostat User Guide

ENGO CONTROLS EFAN-230W WIFI 230V Fan Coil Thermostat User Guide

ENGO CONTROLS E10-MBUSW, E10-MBUSB Wi-Fi MODBUS Thermostat User Guide


GENERALLIFE ARUNA 302S RF Wireless Room Thermostat User Manual

Danfoss VICUV40F,088N3650 Room Thermostat User Guide

AIRZONE IBPRO6 FLEXA 3.0 Blueface Zero Wired Thermostat User Manual

RITTAL SK 3114.200 Digital Enclosure Internal Temperature Display and Thermostat Instructions

APATOR TH 480 Bi Metallic Thermostat Instruction Manual

Satel ART-210 Wireless Radiator Thermostat Instruction Manual

ENGO CONTROLS E901 Wireless Programmable Smart Wifi Thermostat User Manual

SALUS Thermostat RT520 User Manual

heatit Z-TRM6 DC Z Wave Electronic Thermostat Instruction Manual

BOSCH BCC110 Connected Control Thermostat Instruction Manual