Home > ENGO CONTROLS > ENGO Controls E901WIFI Internet Wireless Thermostat User Guide
ENGO Controls E901WIFI Internet Wireless Thermostat User Guide
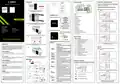

Wall mounting
Manual mode - temperature settings
LCD icon description
E901TXWIFI
E901RXWIFI
RECEIVER
1
In manual mode, the thermostat maintains a constant setpoint temperature
as long as the user will not change it again or will not switch to another
operating mode (e.g. schedule mode).
3V
2 x AA
6
7
8
9
10
11 12
E901WIFI | Internet, wireless thermostat
COM NO
L
N
5
4
3
Setting setpoint temperature in manual mode
13
14
N
L
SL1
Press any button to highlight the screen, then follow the
steps below:
1 - 8 Zones
2
1
Remove the thermostat cover as shown in the picture.
If there are batteries inside, remove them
ECB08M230
15
16
Wiring centre
1
N
SL1
2
1. AM/PM
2. Clock
E901RXWIFI receiver
3. Day of the week indicator
4. Settings icon
Ver. 1
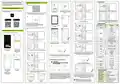
Receiver’s switches description:
LEFT SWITCH
Release date: IX 2022
ON - Manual mode
- receiver ON
1.
2.
5. Key lock function
6. Send a signal (pairing)
7. Internet connection
8. Holiday Mode
Quick Guide
OFF - Manual mode
- receiver OFF
Press , button to enter manual mode.
The hand icon should be visible on the display.
RIGHT SWITCH
2
1
2
3
4
Use a screwdriver to push the plastic tabs in as shown in the figure until you
feel resistance, and tilt the front part of the housing.
MANUAL - Receiver works in
manual mode
(according to the left switch)
9. Low battery indicator
10. Antifrost Mode
11. Cooling mode
3.
4.
3
AUTO - Receiver works in AUTO
mode (according to the
thermostat’s command)
12. Heating mode
Distributor:
Producer:
13. Temperature unit
QL CONTROLS Sp z o.o. Sp. k.
43-262 Kobielice
4 Rolna St.
Engo Controls S.C.
43-200 Pszczyna
3E Górnośląska St.
LED indications in the receiver
14. Room / setpoint temperature
The status of the receiver is indicated
by two LEDs. These are LEDs with the
following colors:
Using
or
button set new comfort temperature value.
15. Manual mode/ Temporary override mode
16. Program number
Poland
Poland
3
Separate the front part from the back part in the direction shown above
- red (upper one),
- green (upper one),
- blue (upper one),
1
1
2
4
Button description
Button Function
- orange (lower one).
Change the parameter value down
Change the parameter value up
2
A detailed explanation of the meaning of the LEDs can be found in the
table below:
D
Set the day of the week
Confirm by button or wait until the thermostat will approve your choice
itself and display the main screen.
H
Use the supe wall (use
holes as shown arrows)
DESCRIPTION
INTRODUCTION:
Set the hour
The receiver and thermostat are prepared for installation
in the app.
The LED always flashes red:
-if thethermostathasnotbeenaddedtotheapplication
- after starting the parameter“APP”->YES
(in installer settings)
M
E901WIFI is a wireless, Wi-Fi room thermostat which enables economical and
ecological control of any type of heating. The operation of the thermostat is very
simple and allows the user to adjust the heating cycle to user’s rythm of the day.
Built-in WiFi module (in the receiver) enables remote control of the heating system
via a smartphone or a tablet using the ENGO application Smart / TUYA Smart. The
devices are pre-paired and ready for work.
Set the minutes
OFF mode
5
Manual mode
The red
LED flashes
Press any button to highlight the screen, then follow the
steps below:
OFF mode / Holiday mode
AUTO
AUTO mode / Back button
- after removing the thermostat from the application
(device automatically enters the pairing mode with app)
1
Product Compliance
This product complies with the following EU
Programming / Program selection
PROG
The green
lights up
The receiver is connected to a router but there is
no connection to Internet (router is offline)
Confirm function
Directives: 2014/53/EU, 2016/65/EU
868.0 MHz - 868.6 MHz; <13dBmWIFI 2,4 GHz
Reset
Thermostat reboot, time reset
The green
LED flashes
the receiver lost connection with a router
(router is off)
Please note!
This document is a brief manual of the installation and operation of the product and
highlights its most important features and functions.
Using the hinges on the left, fold the front and back covers together as
shown in the picture above until they click into place.
The blue
LED lights up
The receiver is connected to a router that has In-
ternet access (router is online)
Wiring Diagrams
The receiver was paired but lost communication
with the thermostat due to out of range or low
battery in the thermostat. When receiver lost
communication with thermostat it starts flashing
after 15 minutes.
Press , button to enter OFF mode.
SAFETY INFORMATION:
Setting Time / Setting Date
In the online mode - the thermostat reads the current time from the application.
In the offline mode - D/H/M buttons are active and day/time can be set manually
Use in accordance with national and EU regulations. Use the device only as intended,
keeping it in a dry condition. The product is for indoor use only. Please read the entire
manual, before installation or use.
The blue
LED flashes
WI-FI 2,4GHz
E901RXWIFI
RECEIVER
AC 230V
In automatic mode, the receiver received a heat-
ing / cooling signal from the thermostat or
the receiver was started in manual mode (left
switch ON, right switch MANUAL)
INSTALLATION:
L
The orange
LED lights up
Installation must be performed by a qualified person with appropriate electrical
qualifications, in accordance with the standards and regulations in force in a given
country and in the EU. The manufacturer is not responsible for non-compliance with
the instructions.
L
E901TXWIFI
L
COM
NO
E901RXWIFI
RECEIVER
3V
2 x AA
The receiver is in the pairing mode and is looking
for a signal from the thermostat (then you must
activate the “SYNC” parameter in the thermo-
stat). The receiver was paired but lost communi-
cation with the thermostat due to out of range
or low battery in the thermostat. Orange diode
starts flashing 15 minutes after lost communica-
tion from the thermostat.
N
LCD is turned OFF, Thermostat is not sending signal for heating/cooling to
the receiver.
N
WARNING:
For the entire installation, there may be additional protection requirements, which
The orange
LED flashes
N
L
3
the installer is responsible for.
OR
-
-
Press D button to set the day
Press H button to set the hour.
AC 230V
L
Care for the natural environment is of paramount importance to us. The awareness that we
manufacture electronic devices obliges us to dispose of used electronic components and devices
safely. Therefore the company has received a registration number issued by the Chief Inspector
for Environmental Protection. The crossed out symbol the trash can on the product means that
the product must not be disposed of with ordinary waste containers. Sorting waste for recycling
helps to protect the environment. It is the user’s responsibility to surrender used equipment to a
designated collection point for recycling waste from electrical and electronic equipment.
E901TXWIFI
The orange
LED is off
The receiver does not send a heating / cooling
signal.
COM
NO
E901RXWIFI
RECEIVER
3V
2 x AA
MAX
16 (5) A
-
Press M button to set the minutes.
Update process started. To increase the chance
of success of the update - immediately after the
pink diode appears, click any thermostat’s button
to turn on backlight
The pink
LED is on
N
To exit the OFF mode press again the button.
The thermostat will return to the previous mode.
N

| General | Details |
|---|---|
| Name | ENGO Controls E901WIFI Internet Wireless Thermostat User Guide |
| Make | ENGO CONTROLS |
| Language | English |
| Filetype | PDF (Download) |
| File size | 0.45 MB |
 (1 votes, average: 5.00 out of 5)

ENGO Controls EONE230W Internet Controlled Thermostat User Guide

ENGO CONTROLS EFAN-230W Fan Coil Thermostat User Guide

ENGO CONTROLS FAN-24W 24V Fan Coil Thermostat User Guide

ENGO CONTROLS EASY230W Non-Programmable Wired Thermostat User Guide

ENGO CONTROLS EONE230 Internet Controlled Thermostat User Guide

ENGO CONTROLS EONEBATW, EONEBATB Internet Controlled Thermostat User Manual

ENGO CONTROLS EONE-BATW, EONE-BATB Internet Controlled Thermostat User Guide

ENGO CONTROLS EFAN-24W Fan Coil Thermostat User Guide

ENGO CONTROLS EFAN-230W WIFI 230V Fan Coil Thermostat User Guide

ENGO CONTROLS E10-MBUSW, E10-MBUSB Wi-Fi MODBUS Thermostat User Guide

ENGO Controls E901WIFI Internet Wireless Thermostat User Guide Overview
Summary of Contents
- Page 1: Wall mounting In manual mode, the thermostat maintains a constant setpoint temperature as long as the user will not change it again or will not switch to another operating mode. Setting setpoint temperature in manual mode Press any button to highlight the screen, then follow the steps below. The receiver and thermostat are prepared for installation in the app. M E901WIFI is a wireless, Wi-Fi room thermostat which enables economical and ecological control of any type of heating. This document is a brief manual of the installation and operation of the product and highlights its most important features and functions. Installation must be performed by a qualified person with appropriate electrical qualifications, in accordance with the standards and regulations in force in a given country and in the EU. Care for the natural environment is of paramount importance to us. The product must not be disposed of with ordinary waste containers. Sorting waste for recycling helps to protect the environment.
- Page 2: Installer settings Installation of the E901WIFI thermostat in the app Make sure your router is within range of your smartphone. Use only Wi-Fi 2.4GHz network. Download the ENGO Smart app from Google Play or Apple App Store and install it on your smartphone. After finding the thermostat, go to the next step. To enter installer parameters, press and hold the button for 5 seconds. When first powered up, the red LED will start flashing, indicating that devices are ready to be added to the application. The thermostat started to send a signal to find the receiver. The pairing process may take up to 10 minutes. When the blue LED on the receiver lights up, it means the device has been correctly added to the application. If the orange LED on the receiver has not stopped blinking after 10 minutes, repeat the pairing process. Enter the verification code received in the email within 60 seconds to complete the registration.

TELLUR TLL331441 Thermostat Instructions

Beca BHT-9000 Smart Knob Thermostat User Guide

tecnoswitch Raffaello 230 TE215VU Electronic Recessed Thermostat User Guide

COMAP L151002001 Smart Home Thermostat User Manual

EUROLAMP HY06BW Digital Heating Smart Thermostat User Manual

Ebeco EB-Therm 55 Thermostat User Manual

Smart Temp SMT-850 Halo Thermostat User Guide

ELECTECK 701 Non-Programmable Digital Thermostat for Home Instruction Manual

STELPRO STCP Floor Heating Thermostat Multiple Programming User Guide

EUROTRONIC SPIRIT ZigBee Energy Saving Thermostat User Guide