
Home > ENGO CONTROLS > ENGO Controls E901WIFI Internet Wireless Thermostat User Guide
ENGO Controls E901WIFI Internet Wireless Thermostat User Guide
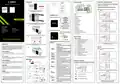
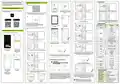


Installer settings
1
9
10
4
Installation of the E901WIFI thermostat in the app
STEP 3 - CONNECT THE THERMOSTAT TO WI-FI
Engo
Make sure your router is within range of your smartphone. Make sure you
are connected to the Internet. This will reduce the pairing time of the de-
vice. Use only Wi-Fi 2,4GHz network
1
After installing the app and creating an account:
STEP 1 - DOWNLOAD ENGO SMART ENGO SMART APP
5 sek.
5 sek.
Download the ENGO Smart app from Google Play or Apple App Store and
install it on your smartphone.
Select the Wi-Fi network which ther-
mostat should connect and put it’s
password.
Press and hold the
button for 5 seconds.
After finding the thermo-
stat, go„Next”.
To enter installer parameters press and hold button for 5 seconds.
5
2
1. Turn on Wi-Fi and Bluetooth on your smartphone. Connect mobile phone
to the Wi-Fi network to which you want to assign the thermostat.
11
12
2
Use
. Edit the parameter using
with the button.
or . button to move between parameters. Enter the parameter by
Use
button to select SYNC parameter.
or
,
or . Confirm the new parameter value
6
Connect the receiver to the power supply.
Installer parameters
When first powered up, the red led will start flashing, which
means that devices are ready to be added to the application.
Go to step 7 (adding devices in the app).
Default
value
Pxx
F
u
n
c
t
i
o
n
Value
Description
Wait for the app to configure
thermostat.
Name the device
and click„Done”.
Cooling
Heating/Cooling
Selection
P01
If the red LED on the receiver is not flashing, proceed with the next
steps.
13
14
Heating
1
2
SPAN 0,25°C
SPAN 0,5°C
STEP 2 - REGISTER THE NEW ACCOUNT
3
Confirm with button.
3
TPI for Underfloor Heating
TPI for Radiators
To register a new account, please follow the steps below:
Control
algorithm
7
P02
1
4
5
1
2
TPI for Electrical Heating
If the thermostat indicates
wrong temperature, you
can correct it by 3.5°C
5 sek.
Offset -3.5°C
temperature to + 3.5°C
P03
P04
0°C
3
...and it shows on the main app
window.
Press and hold button for 5 seconds.
NO
Relay type
NC
Normally Open type of relay
Normally Closed type of relay
24 hour
NO
Using
or
buttons choose YES and start the pairing process on a
new frequency by pressing the button
4
.
Thermostat has been installed
and displays the main interface.
24h
P05 Clock format
24h
8
12h
12 hour
Minimum
P06
Minimum heating / cooling
temperature that can be set
15
5°C - 34,5°C
5°C
setpoint
Maximum
P07
Maximum heating / cooling
temperature that can be set
5,5°C - 35°C
35°C
setpoint
Click„Register”to create
new account.
Enter your e-mail
address to which the
verification code will
be sent.
Use or , button to choose APP - add to application parameter.
NO
YES
NO
Key sound Off
Key sound On
Disabled
P08
P09
Key sound
PIN Code
YES
NO
3
5
The thermostat started to send a signal to find the receiver (the symbol
of the blinking antenna) and started the countdown with the number 10
(min). The pairing process may take up to 10 minutes.
PIN
Enabled
3
4
When the blue LED on the receiver will light up, it means the device has been
correctly added to the application and is now connected to the Internet.
9
NO
Function disabled
Function enabled
Require a PIN to
P10 unlock the keys
every time
YES
NO
YES
E901WIFI pairing process with the receiver
NO
Function disabled
Function enabled
3
Pairing with
SYNC
Confirm with button.
receiver function
PLEASE NOTE!
E901WIFI THERMOSTAT IS ALREADY PAIRED
WITH THE RECEIVER!
YES
6
When the orange LED stops blinking,
the devices have been paired on a new frequency.
Pairing with
application
function
NO
YES
NO
Function disabled
Function enabled
No action
APP
CLR
NO
NO
10
1
2
3
Clear settings
factory reset
YES
Factory Reset
Enter the verification
code received in the
email.
Remember that you
only have 60 seconds to
enter the code!
Then set the login
password.
Technical specification
Thermostat supply
Receiver supply
Use
or
button to choose YES and confirm with (OK) button to start
the process of adding to the application.
2 x AA batteries
3
.
230 V AC 50 Hz
If you want to re-pair the receiver and thermostat with each other and
then add it to the application, make sure that the receiver is disconnected
from the power supply, and the switches on it are in the ON and AUTO
positions. Then connect the receiver to the power supply and wait a few
seconds. Next, move the left switch to the OFF position and back to the ON
position with a quick motion. The orange LED will start blinking, which
will confirm that the receiver has entered the pairing mode.
7
8
The thermostat will display the message„good”, which means
that the devices are successfully paired with each other. Thermostat will
return to the next APP parameter in the service menu (adding to appli-
cation). You can skip this step and return to the main menu by clicking
(OK) button a few times
Receiver rating max
Receiver outputs
16 (5) A
Voltage-free NO/COM relay
5 - 35°C
Temperature range
Control algorithm
Communication
TPI or Histeresis ( 0.25°C or 0.5°C)
Wireless, 868 Mhz +WIFI 2,4 GHz
WARNING! If the orange LED on the receiver has not stopped
blinking after 10 minutes, repeat the pairing process taking into
account the distance between devices, obstacles and interference.
In the app, select:
„Add Device”.
Then choose:
„Auto Scan”.
thermostat: 150 x 84 x 22
receiver: 96 x 96 x 27
Dimensions [mm]

| General | Details |
|---|---|
| Name | ENGO Controls E901WIFI Internet Wireless Thermostat User Guide |
| Make | ENGO CONTROLS |
| Language | English |
| Filetype | PDF (Download) |
| File size | 0.45 MB |
 (1 votes, average: 5.00 out of 5)
 Loading...

ENGO Controls EONE230W Internet Controlled Thermostat User Guide

ENGO CONTROLS EFAN-230W Fan Coil Thermostat User Guide

ENGO CONTROLS FAN-24W 24V Fan Coil Thermostat User Guide

ENGO CONTROLS EASY230W Non-Programmable Wired Thermostat User Guide

ENGO CONTROLS EONE230 Internet Controlled Thermostat User Guide

ENGO CONTROLS EONEBATW, EONEBATB Internet Controlled Thermostat User Manual

ENGO CONTROLS EONE-BATW, EONE-BATB Internet Controlled Thermostat User Guide

ENGO CONTROLS EFAN-24W Fan Coil Thermostat User Guide

ENGO CONTROLS EFAN-230W WIFI 230V Fan Coil Thermostat User Guide

ENGO CONTROLS E10-MBUSW, E10-MBUSB Wi-Fi MODBUS Thermostat User Guide


SAUTER 396011 Universal Thermostat Owner’s Manual

tado Smart Thermostat V3+ User Guide

Drayton RF902 Digistat 3rd Generation Wireless 2-Channel Programmable Thermostat Installation Guide

REPTITRIP HMT16N Reptile Heating Mat With Digital Thermostat User Manual

Danfoss RET230 Electronic Heat Cool Thermostat Instruction Manual

Moes ZigBee 002 Series Thermostat User Manual

ecoer EST01 Wi-Fi Programmable Thermostat User Guide

neptronic TFC54F3X1 Fan Coil Thermostat Installation Guide

sinope TH1500ZB Smart Double Pole Thermostat Installation Guide

SunTouch SunStat CommandPlus Programmable Thermostat Instruction Manual