Dettson 2-Stage WiFi Thermostat R02P033 Owner’s Manual


INSTALLATION INSTRUCTIONS AND
HOMEOWNER’S MANUAL
R02P033
2-Stage WiFi Thermostat
Phone App
Thermostat
Printed in Canada on
100% recycled paper
2021-04-07
X00499 Rev.B

| General | Details |
|---|---|
| Name | Dettson 2-Stage WiFi Thermostat R02P033 Owner’s Manual |
| Make | Dettson |
| Language | English |
| Filetype | PDF (Download) |
| File size | 0.15 MB |
 (1 votes, average: 5.00 out of 5)

Dettson R02P034 Communicating Thermostat Instruction Manual

Dettson 2-Stage WiFi Thermostat R02P033 Owner’s Manual Overview
Summary of Contents
- Page 1: Installation instructions and homeowner’s manual for the 2-stage WiFi thermostat. Includes information about the phone app and thermostat. Printed in Canada on 100% recycled paper. Document version is Rev.B dated 2021-04-07.
- Page 2: Failure to read and follow all instructions carefully before installing or operating this control and system could cause personal injury and/or property damage. The R02P033 2-Stage WiFi Smart Thermostat combines user-friendly touch sensitive buttons with WiFi wireless smart control application, offering unparalleled user control. Its efficient control system can save up to 32% of heating and cooling costs. It includes a local energy-saving programmable solution to provide highly accurate temperature control with a full 7-day schedule. The App supports Google Home and Amazon Echo integration. To prevent electrical shock and/or equipment damage, disconnect electric power to the system at the main fuse or circuit breaker box until installation is complete. This thermostat has been designed to control conventional heating and cooling systems or heat pump systems. Mercury and products containing mercury must not be discarded in household trash. Power supply: 24V AC 50/60Hz. Temperature setting range: 5-37°C.
- Page 3: Installation Wiring Wiring Diagram System Modes Operation Display and Controls Display Settings Operating Settings Schedule Settings WiFi and App
- Page 4: Wiring diagram includes conventional and heat pump systems. Terminal definitions specify outputs for cooling, heating, fan, and reversing valve. Cooling power is indicated for systems with one or two transformers. Heating output is defined for various stages and types of systems. System modes include configurations for 1H/1C, 1H/2C, 2H/2C, and others. Compressor delay is set to a default of one minute. Different terminal types are listed for conventional and heat pump systems. Outputs for auxiliary heat and second stage cooling are specified. The document outlines various system configurations and their corresponding terminals. It provides essential information for understanding wiring and system modes.
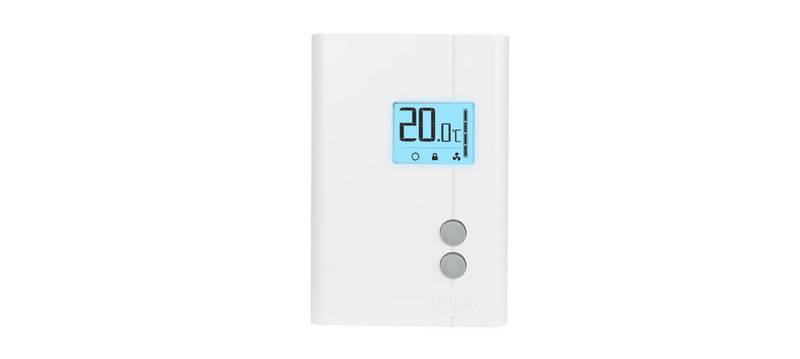
- Page 5: Operation Display and controls Temperature set point can be adjusted using specific controls. Normal display resumes after a short delay or by pressing a designated button. Display settings Temperature display is not available in Hold or Hold Until modes. Press and hold a button for 3 seconds to enter the clock setting interface. Adjust to the current year using designated controls. Once set, press to switch to month setting. Repeat to set the month, day, hours, and minutes. Operating settings At the main display, slowly press to switch among Heat, OFF, Cool, and Auto modes.
- Page 6: The temporary temperature set point can be adjusted. In the OFF state, the system will not be running. In Auto mode, the system will maintain the set temperature, automatically switching between heating and cooling based on room temperature. In Heat mode, if the room temperature is 1°C colder than the set point, the thermostat will display Heat on and activate the first heating stage. If the room temperature is 2°C colder than the set point, the second stage will be activated and AUX will be displayed (2-stage systems only). With a heat pump system, the reversing valve signal B is activated below 3 degrees, and auxiliary heat is activated. In Cool mode, if the room temperature is 1°C hotter than the set point, the thermostat will display Cool on and activate the first cooling stage. After an operation of the heat pump, there will be a one minute delay before processing a new demand to protect the compressor. Press to switch between Fan On and Fan Auto modes. Setting the schedule is only possible if one of the scheduling icons is displayed and the system mode is not set to OFF.
- Page 7: To set the schedule, press under the time setting interface. Select the schedule format between 7 days, 5+2 days, or 1 day. Use to set the hour or minute. Press to switch to the temperature setting, and adjust using and. Press to switch to the next time period of the current day, and repeat steps 1 and 2. Once the schedule is set, press to return to the main display. In hold mode, the thermostat will permanently maintain the set temperature. In hold until mode, the thermostat will maintain the set temperature for an adjustable number of days before returning to the schedule. During any schedule period, press to override the temperature setting. Changes only apply for the current period.
- Page 8: WiFi network configuration involves powering on the thermostat and pressing a button until the WiFi icon starts blinking. Follow the instructions indicated on the phone application for setup. The mobile app can be downloaded by searching Plus Thermostat in the App Store or Google Play, or by scanning the QR code on the cover page of the manual. Access rights can be shared between users registered with the application. A filter cleaning reminder will periodically be displayed on the screen, with a default period of 90 days. To clear the message, hold a specific button for 3 seconds. If FF flashes instead of the temperature display, there is an error with the temperature sensing circuitry, and the system will not operate while this error is displayed. To reset all settings to factory defaults, hold two specific buttons for 3 seconds.
- Page 9: Installer menu access requires holding specific buttons. The password is necessary for entry. Settings can be changed using designated buttons. The menu includes parameters like O/B selection and auxiliary heat type. System mode options are available for selection. Temperature adjustments can be made for various settings. A filter change reminder is included in the menu. Clock format can be set to 12 or 24 hours. Compressor protection delay can be adjusted between 1 minute and 10 minutes. A factory reset option is available for restoring default settings.

BEOK BOT306RF-WIFI Thermostat Owner’s Manual

nVent RAYCHEM GM-TA Thermostat Instruction Manual

Danfoss 013R9355 Radiator Thermostat Instructions

Klima 825201 Intelligent Control Wi-Fi Underfloor Heating Thermostat User Manual

KETOTEK LL0269 WiFi Digital Heating Thermostat User Manual

EPH CONTROLS TRFPi2 COMBIPACK2 Programmable RF Thermostat Instruction Manual

TIOEVO0003 TEVO Wireless Thermostat User Manual
STELPRO STE241 Low Voltage 24V Electronic Thermostat User Guide

SOGEDIS 1001 MODEL UP Refrigerator Thermostat Instruction Manual

Klima H001 Smart Thermostat For Air Conditioner User Manual