
vtech T961 Wired Thermostat Owner’s Manual


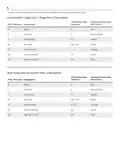


Mount and Wire Your Thermostat
1
2
Confirm that Dip Switch #2 is in the UP (On) position
which enables the Wall Thermostat control.
Power down the PTAC and remove the cover.
UP/ON
3
If replacing an old/existing thermostat, carefully remove the cover from your old thermostat and take a photo
of the wires while still connected to the old thermostat. Make note of the wire colors that are attached to each
terminal (R, C, G, Y, W, etc…). Disconnect the wires from the old thermostat.
4
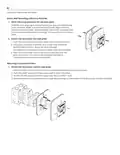
Install the thermostat wall plate.
Mounting Directly to the Wall:
1. Mark the screw positions for the wall plate
Hold the wall plate up to the wall where you want the thermostat
to be mounted. Make sure that the wire bundle aligns near the
center of the wall plate. Verify the plate is level with a bubble
level, then mark the screw positions through the screw holes in
the wall plate.
2. Attach the wall plate
Using your marks as reference, drill 2 holes and install the
provided wall anchors. Route the wires through the opening
in the center of the wall plate, then secure it to the wall with the
provided screws. The slots in the wall plate will help to
compensate for any minor misalignment.

| General | Details |
|---|---|
| Name | vtech T961 Wired Thermostat Owner’s Manual |
| Make | vtech |
| Language | English |
| Filetype | PDF (Download) |
| File size | 1.62 MB |
 (1 votes, average: 5.00 out of 5)
 Loading...

vtech Installing E-Smart W960 Thermostat User Manual

vtech T961NN50 Amana Wired Thermostat User Guide

Vtech E-Smart W960 Thermostat Instruction Manual

vtech W960 E-Smart Wireless Thermostat User Manual

vtech W960 Installing E-Smart Thermostat Instruction Manual

vtech T961NN50 Universal Wired Thermostat User Guide

vtech T961NN50 E-Smart Thermostat Installation Guide

vtech T961NN50 Wired Thermostat User Guide


CLIMATE MC-LR-THERMOS Wireless Thermostat User Manual

Honeywell Home DT4 Channel Wired Room Thermostat Instruction Manual

Honeywell Lyric Thermostat THP2400A1019 Installation Guide
COLDBUSTER CB Dual Thermostat User Manual

PBU 2 Degrees 2 Save Thermostat User Manual

PURGEAR STC-2302 Digital Thermostat User Guide

terneo bx Smart Thermostat Instruction Manual

SUNSKY BAC-2005 Smart Thermostat User Manual

emos P5686 Immersion Thermostat Instructions

GENERAL LIFE 260S Digital Room Thermostat User Manual