Home > Thermogroup > Thermogroup 5255 Manual Thermostat Installation Guide
Thermogroup 5255 Manual Thermostat Installation Guide

Installation & User Guide
5255 Manual Thermostat
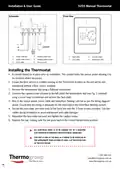
Schematic
Front View
1
2
3
4
1. Supply cable live
2. Supply cable neutral
3. Earth cables
4. Heating system live
1. Back plate
2. Face plate
3. On & off switch
4. Temperature dial
5. Heating system neutral
6. Sensor probe
Installing the Thermostat
• A conduit should be in place prior to installation. This conduit holds the sensor probe allowing it to
be removed where necessary.
• Ensure the floor sensor is installed running to the Thermostat location as the unit will be non-
operational without a floor sensor installed.
1. Remove the temperature dial using a flathead screwdriver.
2. Unscrew the captive screw situated to the left under the temperature dial (see Fig. 1 overleaf)
using a cross head screwdriver and remove the face plate.
3. Wire in the sensor probe, mains cable and Underfloor Heating cold tail as per the wiring diagram
above. Ensure that the wiring is adequate for the total load of the Underfloor Heating system.
4. Secure the back plate and main body to the back box with the 3.5mm screws provided. Tidy the
cables during installation to avoid entrapment and cable damage.
5. Reposition the face plate surround and tighten the captive screw.
6. Replace the cap, making sure the dial goes back in the correct temperature position.
ALL ELECTRICAL WORK IS TO BE CARRIED OUT BY A QUALIFIED
ELECTRICIAN IN ACCORDANCE WITH ELECTRICAL GUIDELINES
THIS UNIT IS 240V AT THE BASE SO IT NEEDS TO BE INSTALLED IN
THE APPROPRIATE ZONE (OUTSIDE OF ZONE 1) AT THE DISCRETION
OF THE ELECTRICIAN
1300 368 631

| General | Details |
|---|---|
| Name | Thermogroup 5255 Manual Thermostat Installation Guide |
| Make | Thermogroup |
| Language | English |
| Filetype | PDF (Download) |
| File size | 0.05 MB |


Thermogroup Thermotouch 4.3dC Dual Control Thermostat Installation Guide

Thermogroup 5255 Manual Thermostat Installation Guide Overview
Summary of Contents
- Page 1: Installation & user guide 5255 manual thermostat Schematic Front view Installing the thermostat A conduit should be in place prior to installation. This conduit holds the sensor probe allowing it to be removed where necessary. Ensure the floor sensor is installed running to the thermostat location as the unit will be non-operational without a floor sensor installed. Remove the temperature dial using a flathead screwdriver. Wire in the sensor probe, mains cable and underfloor heating cold tail as per the wiring diagram above. Secure the back plate and main body to the back box with the screws provided. All electrical work is to be carried out by a qualified electrician in accordance with electrical guidelines. This unit is 240V at the base so it needs to be installed in the appropriate zone at the discretion of the electrician.
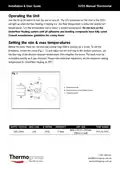
- Page 2: Installation & user guide Operating the unit Use the On & Off switch to turn the unit on and off. The LED will light up when the floor heating is heating. Turn the temperature dial to select a desired temperature. Do not turn on the underfloor heating system until all adhesives and levelling compounds have fully cured. Setting the min & max temperatures To set the limitations, loosen the screw and adjust the red limit ring to the desired maximum, set the blue ring to the desired minimum temperature, then retighten the screw. The knob must be re-installed exactly as it was removed. Please note Australian regulations set the maximum running temperature for underfloor heating at 28ºC. Temperature range: 10°C to 50°C. Warranty: 3 years.

heatmiser Slimline-RF V3 Programmable Wireless Thermostat Instructions

Danfoss RET Series Electronic Thermostat Instruction Manual

GENERAL LIFE HT250 RF Digital Room Thermostat User Manual

MOES BRT-100 Radiator Thermostat User Guide

Danfoss INT69 Thermal Protection Thermostat Instruction Manual

STEGO STO 011 Compact Thumbwheel Thermostat User Guide

ENGO CONTROLS E901RF Series Programmable Thermostat User Guide

Honeywell Home DT92E Wireless Room Thermostat User Manual

WHITE-RODGERS 1F86-0471 Blue Single 1 1 Stage Thermostat Instruction Manual

Honeywell RTHL3550 Non-programmable Thermostat Installation Guide