Home > QuietWarmth > QuietWarmth THERMAEGH-ET72 Thermaegh Wifi Programmable Touchscreen Thermostat User Manual
QuietWarmth THERMAEGH-ET72 Thermaegh Wifi Programmable Touchscreen Thermostat User Manual


Event default parameter list
Home
Tap OK to confirm.
Tap OK to return to the real-time temperature interface.
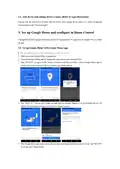
Step 3: Click ‘Add Device’ or ‘+’ on the top-right to add device.
Return
Sleep
Week
Wake
Leave
8.Readout
Tempera-
ture
Tempera-
ture
Tempera-
ture
Tempera-
ture
This thermostat has the function of calculating the percentage of heating time over a period of time.
The relevant parameters can be queried through the Readout item.
Readout query method:
After entering Settings, tap ▲ or ▼ to select Readout.
Tap OK to enter the selection.
Start time
Start time
Start time
Start time
Step 4: Click ‘WiFi thermostat’.
Mon--Fri
6:00
8:00
78°F
78°F
8:00
8:30
69°F
79°F
17:00
17:30
78°F
78°F
22:00
22:00
69°F
69°F
Sat--Sun
Office
Step 5: Operate thermostat. If the WIFI icon flash quickly,
User
Click ‘Press to connect’.
Tap ▲ or ▼ to select 1Day, 30Days or 365Days to query.
Tap OK to return to the setting item selection.
Week
on-work
off-work
Step 6:
Enter Wifi password, and click ‘Confirm’.
Tempera-
ture
9.Factory reset
Tempera-
ture
manual
Start time
Start time
This thermostat has the function of restoring factory parameters.
Mon--Fri
Sat--Sun
7:00
7:00
78°F
68°F
18:00
18:00
69°F
69°F
Factory Reset setting method:
After entering Settings, tap ▲ or ▼ to select Factory Reset.
Tap OK to enter the selection.
Tap ▲ or ▼ to select Yes or No.
Tap OK to confirm.
Step 7: If device added successfully, you can change the device name and set region,
then, click ‘Done’.
Attention: If failed, please confirm the Wifi is 2.4G version and check the Wifi
signals, then, use the ‘AP mode’ in the top right to connect again.
Settings
In addition to the above common functions, the thermostat also provides a number of settings for
more occasions. It should be noted that such settings need to be set by professional technicians
to avoid damage caused by abnormal settings.
Tap OK to return to the real-time temperature interface.
Step 8: You can check the real-time temperature and set temperature etc. at the control
Settings access method:
Settings default parameter list
interface.
Under real-time temperature interface, tap OK to enter the first level menu, and Mode is flashing.
Tap ▲ or ▼ to select Settings.
Tap OK to enter Settings.
NO.
1
Name
Time
Default Parameter
/
Setting Range
/
°F
°C
Settings contains the following items:
2
°F/°C
°F
1.Time
00 3950
01 3600
02 3700
Set the current real time and day of the week.
Note: The WiFi version of the thermostat will automatically update to local time after networking.
Time setting method:
3
Sensor Type
00 3950
Functions and operation
On/Off
Room
The GFCI Reset button is also the switch button. Press the [Reset] button to switch on and off.
After entering Settings, tap ▲ or ▼ to select Time.
Tap OK to enter the hour setting for the time.
Tap ▲ or ▼ to select the hour value for the current time.
Tap OK to enter the minute setting for the time.
Tap ▲ or ▼ to select the minute value for the current time.
Tap OK to enter the day of the week setting.
Tap ▲ or ▼ to select the day of the week.
4
Sensor Selection
Floor
FLoor
Room.Limit
Temporary Override Temperature
5
6
Calibration
Location
0°F
-9°F -- 9°F
This function is enabled in the automatic intelligent mode, when the temperature demand changes
at this moment, the setting temperature is enabled, but the parameters in the Event are not
changed.
Home
Office
Home
Yes
No
Operation method:
7
Adaptive
No
Under the interface showing the real-time temperature, tap ▲ or ▼ to modify the set temperature.
Tap OK to confirm and return to the interface showing the real-time temperature.
Tap OK to enter the hour setting for the time.
8
9
Readout
/
/
Tap
multi times to return to the real-time temperature interface.
Yes
No
Factory Reset
No
Mode selection
2. Temp unit
°F or °C can be selected as the temperature unit.
Temp Unit setting method:
After entering Settings, tap ▲ or ▼ to select °F/°C.
Tap OK to enter the selection.
Tap ▲ or ▼ to select the desired temperature unit.
Tap OK to confirm.
Tap OK to return to the real-time temperature interface.
This thermostat provides three operating modes:
Automatic mode: According to the weekly program, the thermostat automatically adjusts the set
temperature operation.
Manual mode: The thermostat runs continuously according to the set temperature.
Frost protection mode: The temperature controller runs at a lower set temperature. The temperature
range is set from 41°F to 59°F in this mode. This mode is used when you want to keep your room at a
lower temperature when you are on vacation.
Troubleshooting
E1: Built-in probe failure, please contact your dealer or professional technician.
E2: External probe failure, please contact your dealer or professional technicia
Installation
How to set the mode selection:
In the interface displaying the real-time temperature, tap OK to enter the first level menu, and
Mode is flashing.
Tap OK to enter the mode selection.
Tap ▲ or ▼ to change the mode.
Tap OK to confirm your selection.
If you select manual mode or freeze protection mode, you also need to tap ▲ or ▼ to set the
temperature.
1.Loosen the bottom screw by a Phillips screwdriver. Then
open the thermostat from the upper right side as shown.
Note: Screw the nut out of the groove and do not need to
unscrew it.
3.Sensor type
This thermostat can be connected not only to the floor sensor but also to two other
commonly used floor sensors. When replacing the old thermostat, there is no need to replace the
floor sensor for easy installation.
Sensor Type setting method:
After entering Settings, tap ▲ or ▼ to select Sensor Type.
Tap OK to enter the selection.
Tap ▲ or ▼ to select the type of floor sensor you are currently using.
Tap OK to confirm.
Tap OK to return to the real-time temperature interface.
THERMAEGH English V1.2
2
.
W
i
r
e
a
s
s
h
o
w
n
:
L/N lead: Connect the power cord using the terminal block.
L1/N1 lead: Use a terminal block to connect the load line.
IN/SNR terminal:Connect the floor sensor.
OUT terminal:Connect to IN/SNR of Power Module.
Tap OK to return to the interface showing the real-time temperature.
Instruction
Key lock
Note: Disconnect the main power supply before wiring.
If an electric floor heating cable or mat system requires more than 15 Amps, install a power module.
Wiring diameter: 12 to 22 AWG.
Install the back
cover into the
The THERMAEGH thermostat controls the floor heating system based on built-in weekly program. The
weekly program runs in 4 or 2 stages per day, 7 days a week. The default weekly program parameters
can satisfy most usage scenarios. If your living habits are different, you can also modify the weekly
program parameters in the thermostat or APP. When there is no one in the house, it is recommended
to set the temperature down to save energy. Besides, the thermostat has built-in adaptive function.
When this function acts, the thermostat heats or stops heating in advance of next stage to bring the
room temperature to the set temperature of the next stage. Please note that after turning adaptive on,
the thermostat takes a few days to learn the time required.
The thermostat provides a key lock function to prevent the thermostat setting parameters from
being incorrectly modified.
Note: the [Reset] button and the [Test Monthly] button can still operate normally so as to response
to an emergency.
No.
00
Sensor Type
3950(default)
3600
Parameters
erminal box and
secure it with
the set screw.
Set the key lock mode:
1. Under real-time temperature interface, press and hold
2. Under real-time temperature interface, tap OK to enter the first level menu, and Mode is
01
02
R(25°C)=12kΩ R(10°C)=22.2kΩ
R(25°C)=10kΩ R(10°C)=19.1kΩ
until the lock symbol appears.
3700
flashing.
4.Sensor selection
Tap ▲ or ▼ to select Key Lock.
Tap OK to enter the key lock setting.
Tap OK to confirm.
Tap OK to return to the interface showing the real-time temperature.
Cancel the key lock mode:
In addition to the floor sensor, this thermostat has built-in sensors to detect room temperature.
Therefore, three sensor applications are available:
Symbols
Room: Controls room temperature based solely on built-in sensors.
Floor: Controls the floor temperature based solely on the floor sensor.
Room.Limit: Controls the room temperature based on the built-in sensor while monitoring the floor
temperature not to exceed the upper limit. This application, like Floor, can be used in places such as
wood floors where floor temperature is critical.
Under real-time temperature interface, press and hold
disappears.
until the lock mark on the screen
4. Fit the left side of the front and rear covers as shown
the right again and press the upper half of the right
border until you hear a click. Use a screwdriver to
secure the bottom screw. Turn on the power and
test the GFCI function.
1 On/Off/GFCI reset button
2 GFCI test button
3 Mode
6 WiFi indicator
7 Setpoint
8 Event
Weekly program parameter setting
In the automatic mode, the thermostat runs automatically according to the setting parameters of the
Sensor Selection setting method:
After entering Settings, tap ▲ or ▼ to select Sensor Selection
Tap OK to enter the selection.
Tap ▲ or ▼ to select the sensor application type.
Tap OK to confirm.
Tap OK to return to the real-time temperature interface.
.
weekly program. The weekly program parameters contain two parameters: Schedule and Event.
4 Temperature
5 Sensor selection
9 Day and time
10 Touch key
1. Schedule
WARNINGS
Assign seven days a week to the following two schedules:
5+1+1: The Event parameter is the same from Monday to Friday, with separate Event parameters
on Saturday and Sunday.
To avoid risk of electric shock, disconnect all power coming to
heater at main service panel before installation of the thermostat. Keep air vents of thermostat clean
and free from obstructions. All wiring must conform to local and national electrical codes and
ordinances. Installation must be carried out by qualified personnel.
Note: If Room.Limit is selected, you need to set the maximum temperature that the floor can accept.
7: With separate Event parameters every day.
5. Calibration
Schedule parameter setting method:
Under real-time temperature interface, tap OK to enter the first level menu, and Mode is flashing.
Tap ▲ or ▼ to select Schedule.
Tap OK to enter the parameter settings.
Tap ▲ or ▼ to select a parameter.
Tap OK to confirm.
Ground Fault Circuit Interrupter (GFCI)
This thermostat has built-in probe and floor sensor calibration function. In the case of demand for
higher precision
Calibration setting method:
After entering Settings , tap ▲ or ▼ to select Calibration .
This thermostat has a built-in GFCI function that protects people from electric shock. It is very
important to check whether the GFCI function is normal or not every month. Here are the check
steps:
Classification
The thermostat is a Class II device (reinforced insulation) and used for controlling electrical floor
heating. The product must be connected to the following leads:
L/N lead: Connect the power cord using the terminal block.
L1/N1 lead: Use a terminal block to connect the load line(Max 15A).
Note:
Tap OK to go to select Room or Floor .
Tap ▲ or ▼ to select Compensate Built-in Probe or Floor Sensor.
Tap OK to enter the compensation setting.
Tap ▲ or ▼ to adjust the real-time temperature to match the displayed temperature value of the
calibration instrument.
Tap OK to return to the setting item selection.
1. Confirm that the thermostat is turned on.
2. Press the [Test Monthly] button. If a red light appears in the upper left corner of the
Tap
to return to the real-time temperature interface.
OK
thermostat and GROUND FAULT appears on the screen, the GFCI function is normal. If there is
no response, it means the function is invalid, please contact the dealer or electrical installer.
Note: Do not press and hold the [Test Monthly] button.
Electric floor heating cable/mat must be in accordance with the supply voltage.
The terminals are designed to handle a cross-section of wire measuring 12-22AWG.
2. Event
In the Home scenario, the day is divided into four events: Wake--
(In the Office scene, the day is divided into two phases: on work--
temperature for each stage can be set separately.
Leave--
Return--
off work-- ). The set
Sleep--
3. Press the [Reset] button. The red light is off and the screen shows the power off state.
4. Press the [Reset] button again. The thermostat is turned on.
Technical specification
Supply voltage:
GFCI:
6. Location
This thermostat is suitable for use in both homes and offices. For the office, a set of weekly
program parameters is built in. See the Weekly Program Parameters section for details.
Location setting method:
After entering Settings, tap ▲ or ▼ to select Location.
Tap OK to go to select Office or Home.
Tap ▲ or ▼ to select one.
Event parameter setting method:
Under real-time temperature interface, tap OK to enter the first level menu, and Mode is flashing.
Tap ▲ or ▼ to select Event.
Tap OK to enter the week selection.
Tap ▲ or ▼ to select the day you want to modify the parameters.
Tap OK to enter the stage selection for the day.
If in daily use, the red light is on and the screen appears GROUND FAULT. Then you need to
check if the ground fault is present by pressing the [Reset] button. If the red light is off and the
screen shows the shutdown status, it is nuisance tripping. If not, it means that ground fault has
occurred. Please contact your dealer or professional technician immediately.
120/240 VAC 50/60 Hz
Class A (5 mA trip level)
Load:
Setpoint range:
max.15 A (resistive load)
+5 to +40°C / +41 to +104°F
Temperature range: +5 to +45°C / +41 to +113°F
Dimension(Inch)
Tap OK to confirm.
WiFi connection(Only for THERMAEGH)
Tap ▲ or ▼ to select the stage that you want to modify the parameters.
Tap OK to enter the temperature setting of the current phase.
Tap ▲ or ▼ to select the temperature value you want to set.
Tap OK to enter the hour setting for the start time of the current phase.
Tap ▲ or ▼ to select the hour of the start time.
Tap OK to enter the minute setting for the start time of the current phase.
Tap ▲ or ▼ to select the minute of the start time.
Tap OK to return to the stage selection for the day.
Tap OK to return to the real-time temperature interface.
Step 1: Scan the QR code or download Warmme from APP store/Google browser.
7.Adaptive
This thermostat has an adaptive function. When this function is enabled, the thermostat heats up or
stops heating in advance so that the next stage comes and the temperature just reaches the set
temperature.
Adaptive setting method:
After entering Settings, tap ▲ or ▼ to select Adaptive.
Tap OK to enter the selection.
Step 2: Register and log in with mobile number
or email address in the APP.
Attention: Please read and agree “Privacy Policy
and Service agreement” before registration.
Note: Return to the interface of the real-time temperature and tap
multiple times.
Press ▲ or ▼ to get Yes or No.

| General | Details |
|---|---|
| Name | QuietWarmth THERMAEGH-ET72 Thermaegh Wifi Programmable Touchscreen Thermostat User Manual |
| Make | QuietWarmth |
| Language | English |
| Filetype | PDF (Download) |
| File size | 0.51 MB |
 (1 votes, average: 5.00 out of 5)

QUIETWarmth Type UCG Thermostat User Manual

QuietWarmth THERMAEGH-ET72 Thermaegh Wifi Programmable Touchscreen Thermostat User Manual Overview
Summary of Contents
- Page 1: This thermostat has the function of calculating the percentage of heating time over a period of time. The relevant parameters can be queried through the Readout item. After entering Settings, tap ▲ or ▼ to select Readout. Tap OK to enter the selection. This thermostat has the function of restoring factory parameters. Factory Reset setting method: After entering Settings, tap ▲ or ▼ to select Factory Reset. Tap OK to confirm. Settings contains several items that need to be set by professional technicians to avoid damage. The thermostat provides a key lock function to prevent incorrect modifications. This thermostat has built-in probe and floor sensor calibration function for higher precision.
- Page 2: Quick guide of using Google Home to control smart devices What you need to get started Before using Google Home to control your devices, make sure you meet the following conditions. A Google Home device, or Android phone with Google Assistant. Latest Google Home app. Latest Google app (Android only). A Google account. The device display language must be set to English US. Smart Life app and a related account. Smart devices. Add devices in Smart Life app You can skip this part if you've already added some devices to your Smart Life account, and in the meantime the devices' names are easily recognized. Download Smart Life app You can scan the QR code below to download the Smart Life app. Register a Smart Life account and sign in the app Open the Smart Life app, tap Register to register an account, then sign in the app.
- Page 3: Add device and change device's name. Sign in with the Smart Life account, add the device, then change device name to an easily recognized word or phrase, like bedroom light. Set up Google Home and configure in Home Control. Configuration needs Google Home app. You can skip this part if your Google Home is already set up. Make sure your Google Home is energized. Open the Google Home app by tapping the app icon on your mobile device. Tap ACCEPT to agree to the Terms of Service and Privacy Policy. Allow Google Home app to access the device location to discover and set up nearby devices. The Google Home app scans nearby devices that are energized and are ready to set up.
- Page 4: When the Google Home app is successfully connected to the Google Home device, tap PLAY TEST SOUND to confirm the connection. If you heard the test sound, tap I HEARD IT. Select the room where your Google Home is located to help identify the device when casting. Choose the Wi-Fi network you want to connect to your Google Home. To automatically fetch the password for the network, tap OK to populate the password field. You can also manually enter your password before tapping CONTINUE. Google Home will attempt to connect to the provided Wi-Fi network. When successfully connected to your Wi-Fi network, tap CONTINUE.
- Page 5: In order for the Google assistant to answer your questions and to enjoy a personalized experience, you must sign into your Google account, then tap SIGN UP. Choose the Google account you want to link to your Google Home device, then tap CONTINUE AS XXX. Enter the address where this Google Home is installed, and select your default music service. Tap SKIP TUTORIAL to finish the setup. You can also tap CONTINUE to watch the Google Home tutorial. Tap Home Control in the hamburger menu on the Google Home app’s home page, then tap +.
- Page 6: Find Smart Life in the list and select your Smart Life account’s region, type your account and password, then tap Link Now. After assigning rooms for devices, your devices will be listed in the Home Control page. You can control your smart devices through Google Home. Supported voice commands for controlling the bedroom light include turning it on/off, setting it to 50 percent, brightening, dimming, and changing its color to red.
- Page 7: 3-year limited warranty for MP Global thermostats MP Global warrants this product to be free from defects in workmanship or materials for a period of three years from the date of purchase. If the product is determined to be defective or malfunctions, MP Global shall repair or replace it. To claim the warranty, return the product with proof of purchase or contact MP Global Customer Care. This warranty does not cover removal or reinstallation costs. The warranty does not apply if the defect was caused by damage while in the consumer's possession. MP Global’s sole responsibility is to repair or replace the product. MP Global shall not be liable for any loss or damage, including incidental or consequential damages. This warranty is the only express warranty MP Global makes on this product. The duration of any implied warranties is limited to the three-year duration of this warranty. This warranty gives you specific legal rights, which may vary from state to state.

EPH CONTROLS 20221026 RFRA – RF Room Thermostat Instruction Manual

GENERAL SENNA 300 Digital Room Thermostat User Manual

GENERAL LIFE MITRA-261S Smart Room Thermostat User Manual

Vaillant senso Comfort Thermostat Instructions

Digital Touch Thermostat Troubleshooting User Guide

STN855W WiFi Digital Programmable Thermostat Instruction Manual

VASCO BHT-3000 Series Thermostat User Guide

OJ ELECTRONICS MCD5 Touch Thermostat Instructions

ENGO Controls E901WIFI Internet Wireless Thermostat User Guide

Network Thermostat NetXTM X-Series Thermostat Installation Guide