5. Plinth Heater Settings(Turn On The Programmable Thermostat → Setting The Clock → Switching Between Manual And Program Mode → Manual Operation → Setting The Target Temperature → Power On/off)
Get the free PDF manual for the hyco PT01 Programmable Thermostat Instruction Manual and access setup steps, usage instructions, and troubleshooting tips. 👉 View online or download now to keep your thermostat running smoothly!
Page 2: Overview Thank you for purchasing a programmable thermostat. It will give you easy control of your Mistral plinth heater from a wall mounted location near the heater. Please read and follow these instructions to ensure that installation and operation are as simple and safe as possible. Installation The programmable thermostat is designed to fit in a standard pattress box. It must be located within reach of the plinth heater cable. Electrical connection This programmable thermostat should only be installed and maintained by a competent person in accordance with any local electrical regulations. Electrical connection should be made via a 13A switched fuse spur. Connect mains supply neutral and mains supply live to terminals 3 and 4 respectively. Connect plinth heater live and plinth heater neutral to terminals 1 and 2 respectively. Connect mains supply earth to plinth heater earth with terminal block or similar connector. Wall mounting Using a flat head screwdriver carefully insert into either of the 2 slots on the underside of the programmable thermostat and pull upwards to release. Lift the front cover away from the body of the programmable thermostat. Place the programmable thermostat into its required final mounting position and using the 2 fixing screws supplied secure in place. To refit the front cover place the top side first onto 2 tabs which should click when in place.
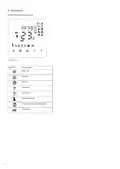
Page 4: Operation Control panel overview On/off Select Clock Increase Decrease Manual mode Program mode (advanced) Heating
Page 5: Plinth heater settings require the heater to be switched on and the thermostat set to maximum. To turn on the programmable thermostat, use the on/off button for display options. If the display is dimmed or unlit, refer to the diagram for the on/off button location. To set the clock, press the designated button and cycle to the current time. After setting the time, you will proceed to set the day of the week, which will save automatically. The manual mode icon indicates when the thermostat is in manual mode. To switch between manual and program mode, press the toggle button. To set the target temperature, press the button and cycle to the desired temperature. The programmable thermostat will control the plinth heater to reach the desired temperature until switched off. Ensure the thermostat is in manual mode before switching it on or off.
Page 6: Advanced program operation allows for setting a program made up of 6 separate segments per day. You can configure your week with different programs for weekdays and weekends. Each program must contain 6 segments with specific times and temperatures. To set the program, use the designated buttons to select and store your desired time and temperature. The segment symbol will flash while you are working on it, and confirmation is required to save changes. If the program mode times out, the settings will be stored, but you will need to restart the program mode to continue. An example personalized program includes wake up, leave for work, return for lunch, and sleep times with corresponding temperatures. The factory preset is for a working week of Monday to Friday and the weekend of Saturday to Sunday. Press and hold the appropriate button to begin setting the hour segment. Use the cycling buttons to navigate through time and temperature settings.
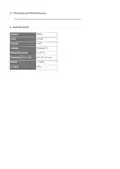
Page 7: Cleaning and maintenance should be done with a soft damp cloth, avoiding excessive use of liquids. The model is PT01. The power is 3.0 kW. The voltage is 230 V. Controls are digital LCD. The temperature range is 5 - 35 °C. Dimensions are 86 x 86 x 10 mm. The weight is 0.25 kg. The IP rating is IP20.
Page 8: Guarantee and service policy This product is covered by a standard parts or replacement warranty for a period of 1 year from the date of purchase. If there is a manufacturing defect within the warranty period, we will send spare parts, repair and return the unit, or supply a replacement product. Incorrect installation or failure to follow correct operating and maintenance instructions are excluded. Consequential costs such as labour charges or damage to fittings and surroundings are expressly excluded. Contact us If you experience a problem with this product, you should first contact our service department. Information for correct disposal of the product in accordance with the European directive 2012/19/EU. At the end of its working life, this equipment must not be disposed of as household waste. Disposing of electrical and electronic equipment separately enables its components to be recovered and recycled. The product is marked with a crossed out dustbin to underline the duty to dispose of this equipment separately.