Honeywell TH2320WF4010 FocusPRO Smart Thermostat User Guide


Paramètres de fonctionnement du système
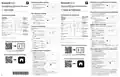
System operation settings
1
Appuyez sur la touche Mode pour
passer au mode système suivant (par
exemple : Heat (chauffage), off (arrêt),
cool, (refroidissement).
1
Press the Mode button to cycle to the
next available System mode (Ex: Heat,
off, cool).
MODE
Indoor
Heat
MODE
Indoor
Heat
Série FocusPRO Smart S200 Thermostat
FocusPRO Smart S200 Series Thermostat
MENU
Hold
2
Cycle through the modes until the
required System mode is displayed
and leave it to activate.
MENU
2
Faites défiler les modes jusqu'à ce que
le mode souhaité s'affiche et laissez-le
s'activer.
FAN
Hold
TH2110WF4008, TH2320WF4010
TH2110WF4008, TH2320WF4010
Auto
FAN
Auto
FR Guide de l'utilisateur
EN User Guide
MF39511
M39511
Paramètres de fonctionnement du ventilateur
1
Appuyez et relâchez le bouton Fan (Ventilateur)
Fan operation settings
pour passer au mode Ventilateur suivant.
MODE
Commandes du thermostat
1
Press/release the Fan button to cycle to
the next available Fan mode.
2
Lorsque le mode de ventilation souhaité est
affiché, arrêtez d'appuyer sur la touche de
ventilation.
Thermostat controls
Indoor
Heat
Point de consigne
de la température
intérieure
Heure,
MENU
Hold
MODE
2
When the desired Fan mode is
displayed, stop pressing fan button.
Time, outdoor
Indoor
température
extérieure
ou humidité
FAN
Indoor
Heat
temperature, or
temperature
Auto
Modes du ventilateur :
indoor humidity
(depends on
MENU
Appuyez sur
ou
Hold
‒
Auto : Le ventilateur fonctionne
Fan modes:
setpoint
pour modifier
le réglage de la
température
FAN
intérieure
P
r
e
s
s
or
to
uniquement lorsque le système de
chauffage ou de refroidissement
est en marche.
‒
Auto: Fan runs only when the
heating or cooling system
configuration by
installer)
Auto
(selon la
configuration de
l'installateur)
change temperature
setting
MF39512
is on.
On: Fan is always on.
Circ: Fan runs about 33% of the
time to circulate air.
Set To
MODE
Mode
Température/
Navigation
Augmentez ou
diminuez le point
de consigne de
la température et
naviguez dans les
menus
‒
‒
On : Le ventilateur est toujours en marche.
Circ : Le ventilateur fonctionne de manière aléatoire environ 33 % du temps.
‒
‒
PM
Temperature/
Heat/Off/Cool/
Auto/EM Heat
(emergency heat)
Indoor
Heat
Set To
Mode
MODE
M39512
Navigation
PM
Heat/Off/Cool/
Auto/EM Heat
(chauffage
d'urgence)
Indoor
MENU
Heat
Hold
Increase or decrease
temperature setpoint
and navigate menus
Réglez l'heure et la date
FAN
MENU
Hold
Menu
Remarque : Si l’heure et la date sont réglées par Internet, seule le format
d’horloge 12 ou 24 heures est disponible pour la modification.
Auto
Heat On
FAN
Press to display
options. (Schedule,
WiFi, active alerts,
reminders)
Set the time and date
Note: If time/date is set by the Internet, only the 12 or 24 hour clock option is
available to edit.
Smart
Auto
System status
Cool On/Heat
On/Aux Heat On
Heat On
Menu
L'heure
1
Smart
Appuyez sur pour
afficher les
options
Etat du système
Cool On/Heat
On/Aux Heat On
Appuyez sur Menu sur le thermostat.
Appuyez sur ou pour aller à
TIME. Appuyez sur Select (Sélectionnez).
Appuyez sur ou sur pour choisir
le format d'horloge 12 ou 24 heures et
appuyez sur Next (Suivant).
MODE
Indoor
Heat
M39553
Time
1
2
Schedule
information
Following time based
schedule
Fan
Auto/On/Circulate
(Programme, WiFi,
alertes actives,
rappels)
MENU
Hold
Press Menu on the thermostat.
MODE
MF39553
Informations
FAN
Indoor
Heat
2
Press
Select.
or
to go to TIME. Press
3
4
5
Auto
sur la
MENU
WiFi status
Hold
Programmation
basée sur l'heure
suivante
FAN
Fan (Ventilateur)
Auto/On/
Circulation
3
4
5
Press
hour clock format and press Next.
or
to choose 12 or 24
Actual indoor
temperature
Note: “Waiting for Equipment”
shown during compressor
protection delay
Auto
Appuyez sur
ou
pour régler
MF39509
l'heure et la date l'heure et appuyez sur
Next (Suivant).
Température
intérieure réelle
Press
press Next.
or
to adjust the hour and
État du WiFi
M39509
Appuyez sur
les minutes et appuyez sur Save & Exit.
Date
ou sur
pour régler
Press or to adjust the minute
and press Save & Exit.
Compatible with 2.4 or 5 GHz WiFi network
Remarque : "Waiting for Equipment" s'affiche pendant le délai de protection du
compresseur
Hold
Date
1
2
1
Appuyez sur Menu sur le thermostat.
Appuyez sur ou sur pour aller à
DATE et appuyez sur Select (Sélectionnez).
Appuyez sur ou pour choisir
YEAR (ANNÉE) et appuyez sur Next (Suivant).
Press Menu on the thermostat.
2
Hold
Press or
press Select.
to go to DATE and
to choose YEAR and
to adjust the MONTH
to choose DATE and
Scan for the full User Manual
Compatible avec les réseaux WiFi 2.4 ou 5 GHz
3
4
5
3
4
5
Press or
press Next.
M39510
Appuyez sur
(Suivant).
ou sur
pour régler le MONTH (MOIS) et appuyez sur Next
Recherchez le manuel complet de l'utilisateur De l'utilisateur
Press
or
M39510
and press Next.
Appuyez sur
ou sur
pour sélectionner DATE et appuyez sur Save & Exit.
Press
or
press SAVE & EXIT.
Pour régler les horaires des programmes
1
2
Appuyez sur Menu. Appuyez ensuite sur
ou jusqu'à ce que SCHED s'affiche.
You can search online for Resideo 33-00694EFS
for the User’s Manual or scan the QR code.
To adjust program schedules
Appuyez sur Select (Sélectionnez).
1
Press Menu. Then press
SCHED is displayed. Press Select.
or
until
Un carré apparaît autour de ON ou OFF à
l'écran. Si vous souhaitez utiliser un horaire,
Hold
Vous pouvez rechercher en ligne Resideo 33-00694EFS
pour trouver le manuel de l'utilisateur ou scanner le code QR.
2
A square appears around ON or OFF
in the display. If you want to use a
schedule, press
Press NEXT to edit the schedule or
press EXIT to exit the menu.
appuyez sur
ou
pour sélectionner ON.
Scan to Download First Alert App
Appuyez sur Next (Suivant) pour modifier
la programmation ou appuyez sur EXIT
pour quitter le menu.
Hold
or
to select ON.
3
4
Si vous modifiez le programme, appuyez
sur Next (Suivant) pour modifier le ou les jours
qui clignotent à l'écran.
3
4
5
If editing the schedule, press NEXT to
edit the day or days flashing in the
display.
Balayez pour télécharger l'application First Alert
Le mot Wake devrait être clignotant.
The word Wake should be flashing.
Press NEXT. Press
schedule period on or off. Press NEXT.
Appuyez sur NEXT (Suivant). Appuyez sur
or
to turn this
Hold
ou
pour activer ou désactiver cette
période de programmation. Appuyez sur
NEXT (Suivant).
Hold
If the schedule period was set to ON,
the time will be flashing. Press
to adjust the time for this period.
Press NEXT.
or
5
Si la période de programmation a été réglée
sur ON, l'heure clignote. Appuyez sur
pour régler l'heure de cette période.
Appuyez sur NEXT (Suivant).
ou
MF39532
6
The Heat setpoint will be flashing.
Press
or
to adjust the Heat
M39532
6
7
8
9
Le point de consigne de la chaleur clignote. Appuyez sur
point de consigne de la chaleur pour cette période. Appuyez sur NEXT (Suivant).
ou
pour régler le
setpoint for this period. Press NEXT.
7
8
9
The Cool setpoint will be flashing. Press
or
Le point de consigne Cool clignote. Appuyez sur ou pour régler le point de
consigne de refroidissement pour cette période. Appuyez sur NEXT (Suivant).
to adjust the Cool setpoint for this period. Press NEXT.
The display will show the next schedule period flashing. Repeat steps 4–7
for the other schedule periods and days.
L'écran affiche la prochaine période de programmation en clignotant. Répétez les
étapes 4 à 7 pour les autres périodes et jours de l'horaire.
Press the SAVE & EXIT button at upper left.
33-00685EFS-04
Appuyez sur le bouton SAVE & EXIT en haut à gauche.

| General | Details |
|---|---|
| Name | Honeywell TH2320WF4010 FocusPRO Smart Thermostat User Guide |
| Make | Honeywell |
| Language | English |
| Filetype | PDF (Download) |
| File size | 0.33 MB |


Honeywell T6 Pro Programmable Thermostat User Manual

Honeywell D1-528 Direct Thermostat Installation Guide

Honeywell FocusPRO P200 Programmable Thermostat User Guide

Honeywell RCHT8610WF Series Smart Thermostat Installation Guide

Honeywell T9 Smart Thermostat Installation Guide

Honeywell TH2320WF4011 FocusPRO Smart S200 Series Thermostat User Guide

Honeywell TL116A Thermostat Installation Guide

T10 Pro Smart Thermostat with Redlink Room Sensor

Honeywell TH6320WF2003 Lyric T6 Pro Wi-Fi Programmable Thermostat User Guide

Honeywell RTH9580 Wi-Fi Color Touchscreen Programmable Thermostat User Guide

Honeywell TH2320WF4010 FocusPRO Smart Thermostat User Guide Overview
Summary of Contents
- Page 1: System operation settings Press the Mode button to cycle to the next available System mode (Ex: Heat, off, cool). Cycle through the modes until the required System mode is displayed and leave it to activate. Fan operation settings Press/release the Fan button to cycle to the next available Fan mode. When the desired Fan mode is displayed, stop pressing the fan button. Increase or decrease temperature setpoint and navigate menus. Set the time and date. Note: If time/date is set by the Internet, only the 12 or 24 hour clock option is available to edit. To adjust program schedules, press Menu. Then press until SCHED is displayed. If you want to use a schedule, press ON.
- Page 2: Caution: Risk of equipment damage. To prevent possible compressor damage, do not operate cooling system when outdoor temperature is below 50°F (10°C). Fan operation adjustments: Press the FAN button to switch to the next available fan mode. Troubleshooting: If you have difficulty with your thermostat, please try the following suggestions. Most problems can be corrected quickly and easily. Display is blank: Check circuit breaker and reset if necessary. Make sure power switch at heating and cooling system is on. Ensure furnace door is closed securely. Temperature settings do not change: If display says “unlock”, thermostat owner has set a lockout setting. Verify you are in the correct mode (heat, cool, em heat, or auto). Compressor protection feature is engaged: Wait 5 minutes for the system to restart safely, without damage to the compressor. Regulatory information: This device complies with Part 15 of the FCC Rules. Operation is subject to the following two conditions: (1) This device may not cause harmful interference, (2) This device must accept any interference received. RF exposure statement: The antenna(s) used for these transmitters must be installed to provide a separation distance of at least 20 cm from all persons. Operation of this equipment is subject to the following two conditions: (1) This equipment may not cause harmful interference, (2) This equipment must accept any interference, including interference that may cause undesired operation.

Danfoss TP5001 Programmable Room Thermostat User Guide

homematic IP C-2 Radiator Thermostat Instruction Manual

ENSTO ECO10BTW-J Floor Heating Thermostat Instruction Manual

BOSCH Smart Home Room Thermostat Instruction Manual
Danfoss VICUQ24M Icon Programmable II Room Thermostat Installation Guide

White-Rodgers 1E78 Non Programmable Heat Only Thermostat User Manual

QUIETWarmth Type UCG Thermostat User Manual

SHANGHAI TR9B Ultra Large Colorful Screen Capacitive Touch LCD Smart Thermostat User Guide

GLOBAL CEG Series Convector with Thermostat Instruction Manual

DEVI 140F1134 Plug In Electronic Thermostat Installation Guide