Honeywell T8131A Programmable Thermostat Owner’s Manual


T8131A,B Programmable Thermostat
OWNER’S GUIDE
Weekday/Weekend (5-day/ 2-day)
Programmable Heat and/or Cool
Low Voltage (20 to 30 Vac)
Thermostat and Mounting Plate
69-1636-1

| General | Details |
|---|---|
| Name | Honeywell T8131A Programmable Thermostat Owner’s Manual |
| Make | Honeywell |
| Language | English |
| Filetype | PDF (Download) |
| File size | 0.15 MB |


Honeywell T6 Pro Programmable Thermostat User Manual

Honeywell D1-528 Direct Thermostat Installation Guide

Honeywell FocusPRO P200 Programmable Thermostat User Guide

Honeywell RCHT8610WF Series Smart Thermostat Installation Guide

Honeywell T9 Smart Thermostat Installation Guide

Honeywell TH2320WF4011 FocusPRO Smart S200 Series Thermostat User Guide

Honeywell TL116A Thermostat Installation Guide

T10 Pro Smart Thermostat with Redlink Room Sensor

Honeywell TH6320WF2003 Lyric T6 Pro Wi-Fi Programmable Thermostat User Guide

Honeywell RTH2300 Thermostat User Guide

Honeywell T8131A Programmable Thermostat Owner’s Manual Overview
Summary of Contents
- Page 1: T8131A,B programmable thermostat Owner’s guide Weekday/weekend (5-day/2-day) Programmable heat and/or cool Low voltage (20 to 30 Vac) Thermostat and mounting plate
- Page 2: Welcome to the world of comfort and energy savings with your new Honeywell programmable thermostat. By following the programming instructions in this manual, your new thermostat will automatically control the temperature in your home, keeping you comfortable while saving energy.
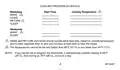
- Page 3: Cooling program schedule includes start times and cooling temperatures for weekdays and weekends. Wake and return start times should include extra lead time based on outside temperature and furnace response time. The temperatures cannot be set higher than 88°F (31°C) or lower than 45°F (7°C). If the thermostat is not programmed, it automatically controls heating at 68°F (20°C) and cooling at 78°F (26°C), 24 hours a day.
- Page 4: This guide can be used for programming your new thermostat. Batteries are required for operation and programming. When inserting batteries, set the system switch to OFF. Remove the battery door using a coin at the bottom. To set the time, press and release the Clock/Day button once. To set day, press the Back button. With system switch at HEAT, press and release the display. Set Schedule once. WAKE, MON-FRI and SET appear on the display.
- Page 5: Use to program WAKE time and to program WAKE temperature for Mon-Fri. Repeat sequence for LEAVE, RETURN, and SLEEP. Press until SAT, SUN, WAKE and SET appear on the display. Use to program WAKE time and to program WAKE temperature for SAT-SUN. Cooling program follows the same instructions as for the heating program. After programming, adjust fan and system switches as desired. Press and release the program to start.
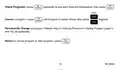
- Page 6: A quick guide for operating or making changes follows. Set system switch to Heat or Cool to perform the following. Temporarily change temperature for current period only—press. Cooler indicator shows on display; this is cancelled at next scheduled change. Hold a temperature indefinitely (such as when you are on vacation)—press. HOLD appears on display; to cancel, press. Check current temperature setting—press. Pressing this cancels your change.
- Page 7: Run program to set schedule. Check programs by pressing repeatedly to see each time and temperature. To cancel a program, press until the program to cancel shows, then press together. To permanently change a program, repeat steps in heating program or cooling program. Return to normal program or start program by pressing.
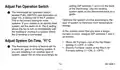
- Page 8: Setting DIP switches 1 and 2 on the back of the thermostat is necessary for configuration. Use the heating system table on the thermostat back as a guide. The thermostat fan operation switch is factory-set in the F position, which is correct for most systems. If your system is an electric heat system, set the switch to E to allow the fan to turn on immediately with heating or cooling. In the unlikely event that you want a longer furnace on-time, readjust DIP switches 1 and 2. The thermostat on-time is factory-set for a warm air, gas, or oil heating system. Adjust the on-time accordingly if installing on another type of system. Warm air furnace should be set at the Hot Water setting (1—OFF, 2—ON). Electric furnace should remain at the Warm Air Furnace setting (1—ON, 2—OFF). Optimize the system on-time to minimize room temperature swings.
- Page 9: Set fan and system switches for optimal operation. AUTO is the normal setting for most homes. The fan turns on automatically with the air conditioner or furnace. COOL allows the thermostat to control the air conditioning system. HEAT allows the thermostat to control the heating system. OFF turns both heating and air conditioning systems off. If the fan operation switch is set to E, the fan operates only with the furnace. ON means the fan runs continuously for improved air circulation. A two-speed fan usually runs on high with the air conditioner and on low with the furnace. Use the fan switch settings to enhance air cleaning efficiency.
- Page 10: Replace the batteries as soon as possible after the indicator starts flashing. After the batteries are completely dead, the bAt Lo indicator disappears, leaving the display completely blank and the heating and/or cooling system not operating. Batteries must be installed for programming and operating the thermostat and heating/cooling system. Use two AA alkaline batteries; nonalkaline batteries do not last as long. Make sure the thermostat is set to the OFF position. Use a coin to remove the battery door. As the batteries are running low, a bAt Lo indicator flashes for one to two months before the batteries run out completely.
- Page 11: To remove batteries, press down on the left ends of batteries. If you insert the new batteries within 20 to 30 seconds of removing the old ones, you do not need to reprogram the thermostat. However, if the display is blank, the batteries are dead or incorrectly installed and you need to reprogram. Install two AA alkaline batteries as shown. Install the fresh batteries, making sure positive and negative terminals are oriented correctly. Replace the battery door.
- Page 12: Troubleshooting Guide Display will not come on. Check that the green light emitting diode (LED) located to the left of the LCD is lit, indicating the thermostat is powered properly. Temperature display will not go lower than 45°F (7°C) or higher than 88°F (31°C) during programming. You have reached the temperature setting limit. The setting range is 45°F to 88°F (7°C to 31°C). Temperature change occurs at the wrong times. Check the program times for the period in question. Be sure that AM and PM indications are correct. Make sure the current day and time are correct. Reprogram if necessary. Heating will not come on. Check that the green LED is lit. Check that the switch on the thermostat is set to HEAT.
- Page 13: Limited one-year warranty Honeywell warrants this product, excluding battery, to be free from defects in workmanship or materials, under normal use and service, for a period of one year from the date of purchase. If the product is defective or malfunctions, Honeywell shall repair or replace it within a reasonable period of time. Return the product with proof of purchase to the dealer or package it carefully and mail it to Honeywell. This warranty does not cover removal or reinstallation costs. Honeywell’s sole responsibility shall be to repair or replace the product within the terms stated above. Honeywell shall not be liable for any loss or damage of any kind, including incidental or consequential damages. This warranty is the only express warranty Honeywell makes on this product. The duration of any implied warranties is hereby limited to the one-year duration of this warranty. This warranty gives you specific legal rights, and you may have other rights which vary from state to state.

HERSCHEL T-MT Mains Powered WiFi Thermostat

ENGO EASYBATB Wired Battery Thermostat User Guide

Honeywell Home DT4 Channel Wired Room Thermostat Instruction Manual
Roth Basicline Wired Thermostat Installation Guide

HYSEN HY511 WiFi Heating Thermostat Owner’s Manual

Honeywell RLV4305A1000 Programmable Thermostat Owner’s Manual

Danfoss RAV Ally Radiator Thermostat User Guide

BEOK CONTROLS TR9B Capacitive Touch LCD Smart Thermostat Owner’s Manual

SALUS RT100 Electronic Room Thermostat Instruction Manual
MClimate MC-LW-FCT-01 LoRaWAN Fan Coil Thermostat User Manual