×
- 1. Quick Installation Guide (Non-programmable Thermostat)
- 2. Installation Is Easy (Label Wires And Remove Your Old Thermostat → Install And Wire Your New Thermostat → Set Your New Thermostat To Match Your Heating/cooling System)
- 3. Turn Off Power To Heating/cooling System
- 4. Remove Old Thermostat (Mercury Notice)
- 5. Label Wires With Tags (Wire Labels → Note: Jumper Wire Used On Old Thermostat?)
- 6. Separate Wallplate From New Thermostat (Remove Battery Holder)
- 7. Mount Wallplate (Mount The New Wallplate Using The Included Screws And Anchors.)
- 8. Connect Wires (Labels Dont Match? → Have A Heat Pump System? → We Are Here To Help.)
- 9. Install Batteries
- 10. Install Thermostat Onto Wallplate
- 11. Turn Power Back On
- 12. If Your System Type Is: (Single Stage Heat And Cool → Multistage Heat And Cool → Heat Pump Without Backup Heat → Heat Pump With Backup Heat → Heat Only → Cool Only → Continue With Advanced Installation)
- 13. Advanced Installation (System Setup → Wiring → Troubleshooting → Customer Assistance → Limited Warranty)
- 14. Advanced Installation Guide (System Setup → Function)
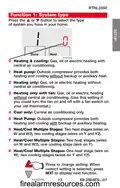
- 15. Function 1: System Type (Heating & Cooling: Gas, Oil Or Electric Heating With Central Air Conditioning. → Heat Pump: Outside Compressor Provides Both Heating And Cooling Without Backup Or Auxiliary Heat. → Heating Only: Gas, Oil Or Electric Heating Without Central Air Conditioning. → Heating Only With Fan: Gas, Oil Or Electric Heating Without Central Air Conditioning. → Cool Only: Central Air Conditioning Only. → Heat Pump: Outside Compressor Provides Both Heating And Cooling With Backup Or Auxiliary Heating. → Heat/cool Multiple Stages: Two Heat Stages (wires On W And W2), Two Cooling Stages (wires On Y And Y2).)
- 16. Advanced Installation Guide (Cooling Changeover Valve → Heating Changeover Valve)
- 17. Gas Or Oil Heat (Electric Heat → Heating System And Fan Operation)
- 18. Advanced Installation Guide (Gas Or Oil Furnace → Electric Furnace → Hot Water Or High-efficiency Furnace → Gas/oil Steam Or Gravity System)
- 19. Function 6: Stage 2 Heat Cycle Rate (Gas Or Oil Furnace → Electric Furnace → Hot Water Or High-efficiency Furnace → Gas/oil Steam Or Gravity System)
- 20. Advanced Installation Guide (Function 8: Emergency Heat Cycle Rate → Electric Furnace: Use This Setting If You Have Any Type Of Electric Heating System. → Gas/oil Steam Or Gravity System: Use This Setting If You Have A Steam Or Gravity Heat System. → Hot Water Or High-efficiency Furnace: Use This Setting If You Have A Hot Water System Or A Gas Furnace Of Greater Than 90% Efficiency. → Gas Or Oil Furnace: Use This Setting If You Have A Standard Gas Or Oil Furnace That Is Less Than 90% Efficient.)
- 21. Changeover (Manual Changeover: (heat/off/cool) → Automatic Changeover: (heat/off/cool/auto) → Caution → Note)
- 22. Advanced Installation Guide (Temperature Display)
- 23. Maximum Heat Temperature Setting (f)
- 24. Advanced Installation Guide (Minimum Cool Temperature Setting (f); (10.5c To 37c) → Congratulations, Youre Done!)
- 25. Wiringconventional System
- 26. Advanced Installation Guide (Connect Wires: Heat Pump → Labels Dont Match?)
- 27. Alternate Wiring (for Heat Pumps Only) (If Labels Do Not Match Letters On The Thermostat, Check The Chart Below And Connect To Terminal As Shown Here. → Wiring Complete, Return To Step 7.)
- 28. Advanced Installation Guide (Troubleshooting → Display Is Blank → Temperature Settings Do Not Change → Cannot Change System Setting To Cool → Fan Does Not Turn On When Heat Is Required → Heating And Cooling Equipment Running At The Same Time)
- 29. Troubleshooting (Heating Or Cooling System Does Not Respond → 'cool On' Or 'heat On' Is Flashing → Heat Pump Issues Cool Air In Heat Mode, Or Warm Air In Cool Mode)
- 30. Advanced Installation Guide (Customer Assistance → Accessories/replacement Parts)
- 31. Warranty Information (Customer Care → Limitations And Exclusions → Legal Rights)
- 32. Mercury Notice (Caution → Automation And Control Solutions → Honeywell International Inc. → Honeywell Limited-honeywell Limitée → Http://yourhome.honeywell.com)
- 33. Guía De Instalación Rápida (Termostato No Programable)
- 34. La Instalación Es Fácil! (Rotule Los Cables Y Retire El Termostato Viejo → Instale Y Conecte Los Cables De Su Nuevo Termostato → Ajuste Su Nuevo Termostato Para Que Concuerde Con → Su Sistema De Calefacción/refrigeración)
- 35. Desconecte La Alimentación (En El Sistema De Calefacción/refrigeración)
- 36. Remueva Su Viejo Termostato (Retire El Termostato Existente Pero Deje La Placa De Pared → Aviso De Mercurio → Instrucciones Para Su Desecho Apropiado)
- 37. Identifique Los Cables Con Etiquetas (Rótulos Para Los Cables → Nota: Cable De Puente Utilizado En El Termostato Usado?)
- 38. Separe La Placa De Pared Del Termostato Nuevo (Quite El Soporte De La Batería → Hale De Aquí Para Quitar La Placa De Pared Del Nuevo Termostato → Placa De Pared)
- 39. Monte La Placa De Pared (Taladre Agujeros De 3/32 In. (2,4 Mm) En Yeso. → Taladre Agujeros De 3/16 In. (4,8 Mm) En Paneles De Yeso. → Utilice Un Martillo Para Golpear Ligeramente Los Anclajes En La Pared.)
- 40. Conecte Los Cables (Los Rótulos No Coinciden? → Tiene Un Sistema De Bomba De Calor? → Estamos Aquí Para Ayudarle.)
- 41. Instale Las Baterías (Parte De Atrás Del Termostato)
- 42. Instale El Termostato En La Placa De Pared
- 43. Active Nuevamente El Suministro Eléctrico Del Sistema De Calefacción/refrigeración.
- 44. Si Su Tipo De Sistema Es: (Calor Y Frío De Una Sola Etapa → Calefacción Y Refrigeración De Etapas Múltiples → Bomba De Calor Sin Calor De Respaldo → Bomba De Calor Con Calor De Respaldo → Calefacción Únicamente → Refrigeración Únicamente)
- 45. Guía De Instalación Avanzada (Cómo Cambiar La Configuración → Cableado → En Caso De Dificultades → Asistencia Al Cliente → Garantía Limitada)
- 46. Guía De Instalación Avanzada (Función → Configuración)
- 47. Función 1: Tipo De Sistema (Calefacción Y Refrigeración → Bomba De Calor → Calefacción Únicamente → Refrigeración Únicamente → Etapas Múltiples De Calefacción/refrigeración)
- 48. Guía De Instalación Avanzada (Función 2: Válvula Inversora De La Bomba De Calor → Válvula Inversora De Refrigeración → Válvula Inversora De Calefacción)
- 49. Función 3: Control Del Ventilador Para Calefacción (Sistemas De Calefacción A Gas O A Aceite → Sistema De Calefacción Eléctrico)
- 50. Guía De Instalación Avanzada (Función 5: Velocidad Del Ciclo Térmico → Sistemas De Calefacción A Gas O A Aceite → Sistema De Calefacción Eléctrico → Sistema De Calefacción De Agua Caliente O De Alta Efectividad → Sistemas De Vapor O De Gravedad A Gas O A Aceite)
- 51. Función 6: Índice Del Ciclo De Calefacción En La Etapa 2 (Sistemas De Calefacción A Gas O A Aceite → Sistema De Calefacción Eléctrico → Sistema De Calefacción De Agua Caliente O De Alta Efectividad → Sistemas De Vapor O De Gravedad A Gas O A Aceite)
- 52. Guía De Instalación Avanzada (Sistema De Calefacción Eléctrico → Sistemas De Vapor O De Gravedad A Gas O A Aceite → Sistema De Calefacción De Agua Caliente O De Alta Efectividad → Sistemas De Calefacción A Gas O A Aceite)
- 53. Function 12: Cambio Manual/automático (Cambio Manual: (calefacción/apagado/enfriamiento) → Cambio Automático: (calefacción/apagado/enfriamiento/automático) → Precaución: Para Evitar Posibles Daños Al Compresor → Nota: El Sistema Mantiene Un Mínimo De 3ºf Entre Las Configuraciones De Calefacción Y Enfriamiento)
- 54. Guía De Instalación Avanzada (Función 14: Visor De La Temperatura → About Your New Thermostat → Visualización De La Temperatura En Celsius (c))
- 55. Función 27: Máxima De Temperatura (La Configuración Máxima De Temperatura (f);)
- 56. Guía De Instalación Avanzada (Función 28: Mínima De Enfriamiento)
- 57. Rthl3550 (Si Las Etiquetas No Coinciden Con Las Letras Del Termostato, Controle El Cuadro De La Derecha Y Conecte El Terminal Como Se Ilustra Aquí (ver Notas Más Abajo).)
- 58. Guía De Instalación Avanzada (Conecte Los Cables: Bomba De Calor → Los Rótulos No Coinciden?)
- 59. Cableado Alternativo (para Bombas De Calor Únicamente) (Conexiones Del Termostato → Instrucciones De Conexión → Verificación De Conexiones → Finalización Del Cableado)
- 60. Guía De Instalación Avanzada (Dificultades → La Pantalla Está Vacía → El Ventilador No Arranca Cuando Se Requiere Calor → Equipos De Calefacción Y Refrigeración Funcionando Al Mismo Tiempo)
- 61. El Sistema (Decalefacción O Enfriamiento No Responde → La Función De La Protección Del Compresor → El Mensaje 'cool On' O 'heat On' Titila → La Bomba De Calor Emite Aire Frío En El Modo De Calor O Aire Caliente En El Modo De Frío → Controle La Función 1 (tipo De Sistema))
- 62. Guía De Instalación Avanzada (Ayuda Al Cliente → Accesorios Y Piezas De Repuesto → Soporte De La Batería → Garantía Limitada De 1 Año)
- 63. Devolución De Mercaderías De Honeywell (Garantía → Responsabilidad De Honeywell → Limitaciones De La Garantía → Derechos Legales Específicos → Preguntas Sobre La Garantía)
- 64. Aviso De Mercurio (Precaución → Soluciones Para Automatización Y Control)
×
Honeywell RTHL3550 Non-programmable Thermostat Installation Guide
RTHL3550
Function 1: System type
Press the s or t button to select the type
of system you have in your home:
Done
Next
MCR32599
0 Heating & cooling: Gas, oil or electric heating with
central air conditioning.
1 Heat pump: Outside compressor provides both
heating and cooling without backup or auxiliary heat.
2 Heating only: Gas, oil or electric heating without
central air conditioning.
3 Heating only with fan: Gas, oil or electric heating
without central air conditioning. (Use this setting if
you could turn the fan on and off with a fan switch on
your old thermostat.)
4 Cool only: Central air conditioning only.
5 Heat Pump: Outside compressor provides both
heating and cooling with backup or auxiliary heating.
6 Heat/Cool Multiple Stages: Two heat stages (wires on
W and W2), two cooling stages (wires on Y and Y2).
7 Heat/Cool Multiple Stages: Two heat stages (wires
on W and W2), one cooling stage (wire on Y).
8 Heat/Cool Multiple Stages: One heat stage (wire on
W), two cooling stages (wires on Y and Y2).
Press to change setting. When
correct setting is selected, press
NEXT to display next function.
2
13
69-2584ES—01
firealarmresources.com
| General | Details |
|---|---|
| Name | Honeywell RTHL3550 Non-programmable Thermostat Installation Guide |
| Make | Honeywell |
| Language | English |
| Filetype | PDF (Download) |
| File size | 0.72 MB |

Honeywell T6 Pro Programmable Thermostat User Manual

Honeywell D1-528 Direct Thermostat Installation Guide

Honeywell FocusPRO P200 Programmable Thermostat User Guide

Honeywell RCHT8610WF Series Smart Thermostat Installation Guide

Honeywell T9 Smart Thermostat Installation Guide

Honeywell TH2320WF4011 FocusPRO Smart S200 Series Thermostat User Guide

Honeywell TL116A Thermostat Installation Guide

T10 Pro Smart Thermostat with Redlink Room Sensor

Honeywell TH6320WF2003 Lyric T6 Pro Wi-Fi Programmable Thermostat User Guide

Honeywell RTH9580 Wi-Fi Color Touchscreen Programmable Thermostat User Guide


Danfoss TP5000 Si Electronic 5-2 Day Programmable Room Thermostat Installation Guide

Honeywell Home DT4M Wired Room Thermostat User Manual

Honeywell Home T6 Pro Smart Programmable Thermostat User Guide

Roth Touchline SL Standard Room Thermostat Installation Guide
GENERAL HT300S Wired Room Thermostat User Guide

beca BAC-003 Series WiFi Thermostat Fan Coil User Guide

GENERAL FH10, FH10S Underfloor Heating Thermostat User Manual

Honeywell T827 Series Programmable Thermostat Owner’s Manual

ENGO CONTROLS E901 Wireless Programmable Smart Wifi Thermostat User Manual

Braemar BRA639659 Manual Digital Thermostat Instruction Manual
Table of Contents
- 1. Quick Installation Guide - Non-programmable Thermostat →
- 2. Installation Is Easy - Label Wires And Remove Your Old Therm... →
- 3. Turn Off Power To Heating/cooling System →
- 4. Remove Old Thermostat - Mercury Notice →
- 5. Label Wires With Tags - Wire Labels →
- 6. Separate Wallplate From New Thermostat - Remove Battery Hold... →
- 7. Mount Wallplate - Mount The New Wallplate Using The Included... →
- 8. Connect Wires - Labels Dont Match? →
- 9. Install Batteries →
- 10. Install Thermostat Onto Wallplate →
- 11. Turn Power Back On →
- 12. If Your System Type Is: - Single Stage Heat And Cool →
- 13. Advanced Installation - System Setup →
- 14. Advanced Installation Guide - System Setup →
- 15. Function 1: System Type - Heating & Cooling: Gas, Oil Or Ele... →
- 16. Advanced Installation Guide - Cooling Changeover Valve →
- 17. Gas Or Oil Heat - Electric Heat →
- 18. Advanced Installation Guide - Gas Or Oil Furnace →
- 19. Function 6: Stage 2 Heat Cycle Rate - Gas Or Oil Furnace →
- 20. Advanced Installation Guide - Function 8: Emergency Heat Cyc... →
- 21. Changeover - Manual Changeover: (heat/off/cool) →
- 22. Advanced Installation Guide - Temperature Display →
- 23. Maximum Heat Temperature Setting (f) →
- 24. Advanced Installation Guide - Minimum Cool Temperature Setti... →
- 25. Wiringconventional System →
- 26. Advanced Installation Guide - Connect Wires: Heat Pump →
- 27. Alternate Wiring (for Heat Pumps Only) - If Labels Do Not Ma... →
- 28. Advanced Installation Guide - Troubleshooting →
- 29. Troubleshooting - Heating Or Cooling System Does Not Respond →
- 30. Advanced Installation Guide - Customer Assistance →
- 31. Warranty Information - Customer Care →
- 32. Mercury Notice - Caution →
- 33. Guía De Instalación Rápida - Termostato No Programable →
- 34. La Instalación Es Fácil! - Rotule Los Cables Y Retire El Ter... →
- 35. Desconecte La Alimentación - En El Sistema De Calefacción/re... →
- 36. Remueva Su Viejo Termostato - Retire El Termostato Existente... →
- 37. Identifique Los Cables Con Etiquetas - Rótulos Para Los Cabl... →
- 38. Separe La Placa De Pared Del Termostato Nuevo - Quite El Sop... →
- 39. Monte La Placa De Pared - Taladre Agujeros De 3/32 In. (2,4 ... →
- 40. Conecte Los Cables - Los Rótulos No Coinciden? →
- 41. Instale Las Baterías - Parte De Atrás Del Termostato →
- 42. Instale El Termostato En La Placa De Pared →
- 43. Active Nuevamente El Suministro Eléctrico Del Sistema De Cal... →
- 44. Si Su Tipo De Sistema Es: - Calor Y Frío De Una Sola Etapa →
- 45. Guía De Instalación Avanzada - Cómo Cambiar La Configuración →
- 46. Guía De Instalación Avanzada - Función →
- 47. Función 1: Tipo De Sistema - Calefacción Y Refrigeración →
- 48. Guía De Instalación Avanzada - Función 2: Válvula Inversora ... →
- 49. Función 3: Control Del Ventilador Para Calefacción - Sistema... →
- 50. Guía De Instalación Avanzada - Función 5: Velocidad Del Cicl... →
- 51. Función 6: Índice Del Ciclo De Calefacción En La Etapa 2 - S... →
- 52. Guía De Instalación Avanzada - Sistema De Calefacción Eléctr... →
- 53. Function 12: Cambio Manual/automático - Cambio Manual: (cale... →
- 54. Guía De Instalación Avanzada - Función 14: Visor De La Tempe... →
- 55. Función 27: Máxima De Temperatura - La Configuración Máxima ... →
- 56. Guía De Instalación Avanzada - Función 28: Mínima De Enfriam... →
- 57. Rthl3550 - Si Las Etiquetas No Coinciden Con Las Letras Del ... →
- 58. Guía De Instalación Avanzada - Conecte Los Cables: Bomba De ... →
- 59. Cableado Alternativo (para Bombas De Calor Únicamente) - Con... →
- 60. Guía De Instalación Avanzada - Dificultades →
- 61. El Sistema - Decalefacción O Enfriamiento No Responde →
- 62. Guía De Instalación Avanzada - Ayuda Al Cliente →
- 63. Devolución De Mercaderías De Honeywell - Garantía →
- 64. Aviso De Mercurio - Precaución →


