
Home > ESi Controls > ESi Controls ESRTERFW Wireless Digital Room Thermostat Installation Guide
ESi Controls ESRTERFW Wireless Digital Room Thermostat Installation Guide






Technical Data
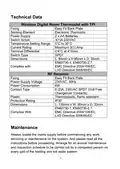
Wireless Digital Room Thermostat with TPI
Fixing
Easy Fit Back Plate
Electronic Thermistor
2 x AA Batteries
Sensing Element
Power Supply
Switch Action
3(1)A 230VAC
Temperature Setting Range 5°C to 30°C
Current Rating
Terminal Differential
Switch Type
Maximum 3(1) Amp
0.6°C at 4°/hour
SPDT
Dimensions
L: 85mm x H:85mm x D: 35mm
EN60730-1, EN60730-2.7,
EMC Directive 2004/108/EC,
LVD Directive 2006/95/EC
Complies with
RF Receiver
Fixing
Easy Fit Back Plate
Power Supply Voltage
Power Consumption
Contact Type
230VAC, 50Hz
6W
6 (2)A, 230VAC SPDT (Volt Free
Changeover Contacts)
Thermoplastic, flame retardant
IP30
L: 135mm x W: 90mm x D: 33mm
EN60730-1, EN60730-2.7,
EMC Directive 2004/108/EC,
LVD Directive 2006/95/EC
Plastic
Protection Rating
Dimensions
Complies With
Maintenance
Always isolate the mains supply before commencing any work,
servicing or maintenance on the system. And please read all the
instructions before proceeding. Arrange for an annual maintenance
and inspection schedule to be carried out by a competent person on
every part of the heating and hot water system.
4

| General | Details |
|---|---|
| Name | ESi Controls ESRTERFW Wireless Digital Room Thermostat Installation Guide |
| Make | ESi Controls |
| Language | English |
| Filetype | PDF (Download) |
| File size | 0.17 MB |
 (1 votes, average: 5.00 out of 5)
 Loading...

ESi Controls ESRTP4TOUCH Programmable Room Thermostat Instruction Manual


uponor D Plus RH T-247 BUS Smatrix Base Thermostat Instruction Manual

Wiser CCTFR6100 Radiator Thermostat Instruction Manual

sinop TH1134ZB Smart Line Voltage Thermostat Installation Guide

BEOK CONTROLS TGT70 WIFI Fan Coil Thermostat Owner’s Manual

LuxPro T10-1141 Heat Thermostat Instruction Manual

Danfoss TPOne-B Electronic Programmable Room Thermostat User Guide

Olympia BS-812-P Programmable Thermostat User Manual

Honeywell TH8321WF02 Vision Pro WiFi Programmable Thermostat User Manual

HomePilot 13501001 Wireless Room Thermostat User Guide

bandary FC660 Smart Thermostat User Guide