Home > BEOK CONTROLS > BEOK CONTROLS TDS75 Series Thermostat User Guide
BEOK CONTROLS TDS75 Series Thermostat User Guide
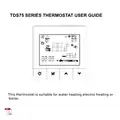


TDS75 SERIES THERMOSTAT USER GUIDE
This thermostat is suitable for water heating,electric heating or
boiler.

| General | Details |
|---|---|
| Name | BEOK CONTROLS TDS75 Series Thermostat User Guide |
| Make | BEOK CONTROLS |
| Language | English |
| Filetype | PDF (Download) |
| File size | 1.16 MB |


BEOK CONTROLS TDR83 WiFi Heating Thermostat User Guide

BEOK CONTROLS TCR7 IPS Colorful LCD Screen Smart Thermostat Owner’s Manual

BEOK CONTROLS TDR89 Thermostat User Guide

BEOK CONTROLS BOT-R7X Wireless Gas Boiler Heating Thermostat Instructions

BEOK CONTROLS TCR8 IPS Colorful LCD Screen Smart Thermostat Owner’s Manual

BEOK CONTROLS TGW60 Touch Screen Boiler Thermostat User Guide

BEOK CONTROLS TGR86 WiFi Thermostat User Guide

BEOK CONTROLS BOT-323W Series Boiler Thermostat Instruction Manual

BEOK CONTROLS TDS72 Digital Screen Thermostat Instruction Manual

BEOK CONTROLS BOT-R6W Gas Boiler Thermostat Instruction Manual

BEOK CONTROLS TDS75 Series Thermostat User Guide Overview
Summary of Contents
- Page 1: TDS75 series thermostat user guide This thermostat is suitable for water heating, electric heating, or boiler.
- Page 2: Product summary The digital heating liquid crystal temperature controller adopts the advanced microcomputer control chip and detects the temperature through a high-precision sensor inside the thermostat. Main functions and characteristics Large screen display and touch key design. Power-off memory function. Real-time data save function. 5+2 or 6+1 or 7 days six periods program schedule. Anti-freezing function. 3 sensor modes can be set. Child lock function. Adapts to 86x86mm square mounting box or 60mm European round box.
- Page 3: Technical parameters include power supply specifications of 200 ~ 240V and 50-60Hz. The current load for water heating/boiler is ≤ 3A and for electric heating is ≤ 16A. Power consumption is less than 0.3W. The sensing element is an NTC. The set temperature range is from 5 to 60℃ with a temperature hysteresis of ± 1℃, adjustable between 0.5-3℃. The floor set temperature range is also from 5 to 60℃. The dimensions of the device are 86x86x15mm. Button functions include a power button for on/off, a mode button to switch between manual and auto modes, and buttons to adjust temperature and parameters.
- Page 4: Display and function description Manual mode, manual control Heating User notes Please read this manual carefully. Improper operation may damage the product or cause dangerous conditions. The installation personnel must be well-trained and experienced service technicians. After installation, please read this manual carefully and operate the product according to the instructions. Caution: Risk of electric shock
- Page 5: Wiring diagram for TDS75-WP. Wiring diagram for TDS75-EP. Wiring diagram for TDS75-WPB.
- Page 6: Installation instruction for the product. Suitable for standard 86*86mm wall box. Compatible with 60mm European round box.
- Page 7: Open the main control board and lift it up slightly to open the hook. Remove the back cover and power supply, and wire it correctly according to the wiring diagram. Fix the back cover to the cassette with M4 screws. Connect the lower cover cable to the upper cover board. Hang the upper two hooks at a 30-degree angle. Press the two corners below the thermostat slightly to lock the upper casing. Please strictly follow the wiring diagram. Do not let water, mud, and other debris enter the thermostat. Failure to follow these instructions may result in damage to the thermostat.
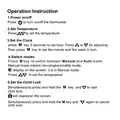
- Page 8: Operation instruction Power on/off: Press to turn on/off the thermostat. Set temperature: Press to set the temperature. Set the clock: Press M key for 5 seconds to set hour, then adjust with or keys. Switch modes: Press M key to switch between Manual and Auto mode. Manual mode: Means non-programmable mode. Display on the screen indicates Manual mode. Set the child lock: Simultaneously press and hold the M key and child lock key. Child lock will display on the screen. Press M key and child lock key again to cancel.
- Page 9: Set the Auto Mode (programming mode) in power off state. Press and M at the same time to display LOOP and MonTueWedThuFri. Select the control way: 5(working day)+2(rest day), 6(working day)+1(rest day), or 7(working day) programming settings. MonTueWedThuFri indicates 5+2, MonTueWedThuFriSat indicates 6+1, and MonTueWedThuFriSatSun indicates 7. Press M to enter the temperature adjustment. Set the temperature and press M to enter the time adjustment. Set the hour and press M to set the minute. The first time period has been set. Press M to enter the next time period setting. In Auto Mode, the thermostat will run at the programmed temperature and time.
- Page 10: If the thermostat is manually adjusted during any period of operation in Auto Mode, it will enter Manual Mode. The defaulted temperature of period 3 and period 4 is the same as period 2. Please change it according to the request. Do not set the last time point of each day beyond 23:59. When setting temperature is 00, this period is power off.
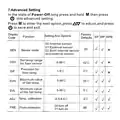
- Page 11: Advanced setting allows access to various configuration options. To enter advanced settings, long press and hold M while in power-off state. Press M to navigate through options and use to save and exit. Options include factory settings and various function settings. Sensor mode can be set to internal, external, or both. Temperature range for the floor sensor can be adjusted between 5-99℃. Precision for floor temperature can be set between 1-9℃. Maximum and minimum values for the set temperature can be configured. Temperature calibration and frost-protection settings are available. Frost-protection can be turned on or off.
- Page 12: Turn off Turn on Temperature hysteresis 0.5-3℃ Set temp > Room temp relay output Set temp < Room temp relay output Factory reset After adjusting the value to 00, press M to cut back to the main page Sensor error: Please select the correct sensor mode If no external sensor is connected, do not set it to 01 or 02 Check floor temp: When using both internal and external sensors.
- Page 13: Antifreeze function activates heating equipment when the room temperature is below 5°C. The thermostat switches off the output when the temperature rises to 7°C. Only TDS75 WPB has the Opt function. For installation, choose plumbing 1.5-2.5mm2 hard wire.
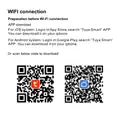
- Page 14: Turn on your mobile phone's Bluetooth and Wi-Fi. Please make sure your mobile phone is connected to 2.4Ghz Wi-Fi. 2.4Ghz Wi-Fi names and passwords consist of numbers and letters only, and do not contain symbols or special characters. Activate the thermostat WiFi module in power off state. When the thermostat is power off, press and hold the button for 10 seconds.
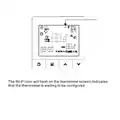
- Page 15: The Wi-Fi icon will flash on the thermostat screen. Indicates that the thermostat is waiting to be configured.
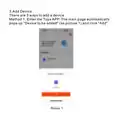
- Page 16: Add device There are 3 ways to add a device. Method 1. Enter the Tuya AP. The main page automatically pops up Device to be added and click Add.
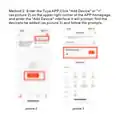
- Page 17: Method 2: Enter the Tuya AP Click Add Device or + on the upper right corner of the APP homepage. Enter the Add Device interface. It will prompt: find the device to be added and follow the prompts.
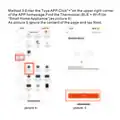
- Page 18: Enter the Tuya AP. Click + on the upper right corner of the app homepage. Find the thermostat (BLE + Wi-Fi) in Small Home Appliance. Ignore the content of the page and tap Next.
- Page 19: Page 19
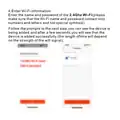
- Page 20: Enter Wi-Fi information. Enter the name and password of the 2.4Ghz Wi-Fi. Make sure that the Wi-Fi name and password contain only numbers and letters and not special symbols. Follow the prompts to the next step. You can see the device is being added. After a few seconds, you will see that the device is added successfully. The length of time will depend on the strength of the Wi-Fi signal.
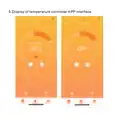
- Page 21: Display of temperature controller app interface
- Page 22: If you encounter any problems during the use of the product, please feel free to contact us through the purchase platform. We will try our best to help you.

NT NetX X5N-SM Thermostat Installation Guide

GEYER GS-THWF Wifi Water Heating Thermostat Owner’s Manual

Carrier EB-STATE3LTICB-01 lLite Smart Thermostat Instructions

HWGL2 Hotwire Thermostat Instructions

Centrometal TU-DT-2024-ENG Thermostat Instruction Manual

EMERSON ST75W Sensi Touch Wi-Fi Smart Thermostat Installation Guide

Danfoss Next Plus Electronic Intelligent Timer Thermostat Installation Guide

GENERAL LIFE HT300S Digital Room Thermostat User Manual

Danfoss ECtemp 130 Electronic Thermostat Installation Guide

GENERAL LIFE FH104 Underfloor Heating Thermostat User Manual