Home > AVATTO > AVATTO TRV06 Wireless Smart Radiator Thermostat User Manual

AVATTO TRV06 Wireless Smart Radiator Thermostat User Manual

TRV06 Wireless Smart  
Radiator Thermostat  
User Manual • Uživatelský manuál •  
Užívateľský manuál • Használati utasítás •  
Benutzerhandbuch  
GeneralDetails
NameAVATTO TRV06 Wireless Smart Radiator Thermostat User Manual
MakeAVATTO
LanguageEnglish
FiletypePDF (Download)
File size0.73 MB
Download PDF
1 Star2 Stars3 Stars4 Stars5 Stars (1 votes, average: 5.00 out of 5)
Loading...
AVATTO WT598 Smart Thermostat Instruction Manual
AVATTO WT598 1T1 Smart Thermostat

AVATTO TRV06 Wireless Smart Radiator Thermostat User Manual
Get the free PDF manual for the AVATTO TRV06 Wireless Smart Radiator Thermostat User Manual and access setup steps, usage instructions, and troubleshooting tips. 👉 View online or download now to keep your thermostat running smoothly!

AVATTO TRV06 Wireless Smart Radiator Thermostat User Manual Overview

Summary of Contents

  • Page 1: TRV06 Wireless Smart Radiator Thermostat User manual
  • Page 2: Page 2
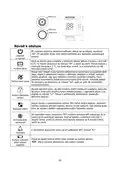
  • Page 3: Operating instruction Please turn the knob until the screen displays OF when you turn off the machine. You only need to turn the knob to adjust the required temperature when you start the machine. Switch on and off When the window is opened, causing the room temperature to drop more than 6°C within 4 minutes, the main screen displays OP and close the valve. Windowing function If the heat sink is not fully opened within two weeks or used for a long time, the valve will be blocked due to silting-up. The controller will automatically open the valve fully every two weeks. Anti-scale function In order to prevent the settings of the controller from being mistakenly modified by children, long press the knob to activate the child lock function. Child lock function When TRV is in auto mode, if you want to manually change the temperature, turn the button to adjust the current temperature you want to set. Temporary mode This temperature will last until the next programmed time period starts. Anti-freezing Under OFF state, the mobile APP shows that the anti-freezing function is on. When room temperature is lower than 5 degrees Celsius, the valve opens.
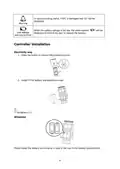
  • Page 4: In normal working status, if NTC is damaged, Er will be displayed. When the battery voltage is too low, the alarm symbol will be displayed to remind the user to replace the battery. Low voltage warning function. Controller installation. Press the button to remove the protective cover. Install 2 AA batteries and protection cover. Please install the battery according to the + and - pole of the icon in the battery compartment.
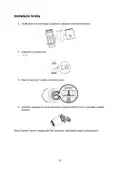
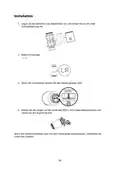
  • Page 5: Installation steps Put the battery in the battery compartment and cover it with a protective cover. Screen display. When the push rod is drawn flush with the bottom. Place the controller on the valve of the M30*1.5mm threaded connection and tighten the copper ring. If your valve interface does not match the controller, install the accessory first.
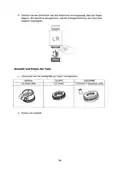
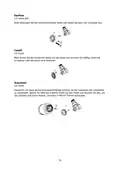
  • Page 6: Press the rotation button to display the controller matching the valve stroke. The initial setting will be entered after the match. Check the valve size on your valve body. Danfoss, Caleffi, and Giacomini are mentioned as brands. 1/2 valve (RA) is specified for Danfoss. Accessories installation is required. Fix the valve interface directly and then tighten the screw.
  • Page 7: Caleffi 1/2 valve requires fittings to be pressed hard onto the valve to ensure a secure connection. Giacomini 1/2 valve needs a short ejector rod accessory installed at the bottom of the controller. Press hard to ensure the accessories and valve are securely connected before screwing into the ME167 driver. To pair the TRV network, rotate the knob to adjust the temperature and press and hold for 5 seconds to enter network configuration mode. The WIFI icon will start flashing rapidly during the connection process with the Zigbee gateway. For gateway distribution network, a green light and fast flashing red light indicate the state of network distribution. Refer to the operating instructions of the gateway for details on network configuration status.
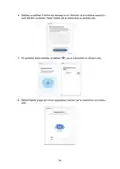
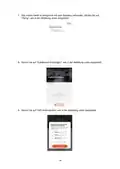
  • Page 8: APP connection instruction Before configuring WIFI, please make sure your phone is connected to 2.4GHz WIFI. Use your mobile phone to scan the QR code below to download the Tuya Smart app. Open the Tuya Smart app and click Add Device. After clicking Gateway Control, select and click Router (Gateway).
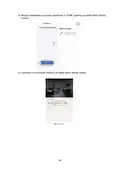
  • Page 9: Click Confirm the indicator is on and then click Next as shown in the figure below. After searching for the gateway, click as shown in the figure below. The mobile phone enters the device search connection mode as shown in the figure below.
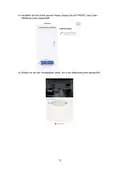
  • Page 10: The mobile device is successfully connected to the gateway. Click Done as shown in the figure below. Click Add sub-devices as shown in the figure below. Click LED already blink as shown in the figure below.
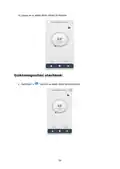
  • Page 11: After searching for the device, click DONE as shown in the figure below. Click the added device as shown in the figure below.
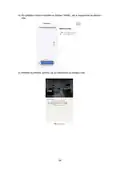
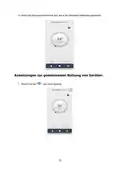
  • Page 12: Enter the main interface as shown in the figure below. Device sharing instructions: Click “ ” as shown below.
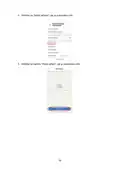
  • Page 13: - Click Share Device as shown below. - Click Add Sharing as shown below.
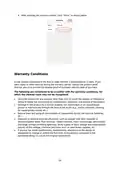
  • Page 14: After entering the account number, click Done as shown below. Warranty conditions A new product purchased in the Alza.cz sales network is guaranteed for 2 years. If you need repair or other services during the warranty period, contact the product seller directly. You must provide the original proof of purchase with the date of purchase. Using the product for any purpose other than that for which the product is intended may conflict with the warranty conditions. Damage to the product by a natural disaster or unauthorized intervention may not be recognized under warranty. Natural wear and aging of consumables or components during use are not covered by the warranty. Exposure to adverse external influences may void the warranty. Modifications or alterations to the product compared to the purchased design may affect warranty coverage.
  • Page 15: EU Declaration of Conformity This equipment is in compliance with the essential requirements and other relevant provisions of EU directives. WEEE This product must not be disposed of as normal household waste in accordance with the EU Directive on Waste Electrical and Electronic Equipment (WEEE - 2012/19 / EU). It shall be returned to the place of purchase or handed over to a public collection point for recyclable waste. By ensuring this product is disposed of correctly, you will help prevent potential negative consequences for the environment and human health. Contact your local authority or the nearest collection point for further details. Improper disposal of this type of waste may result in fines in accordance with national regulations.
  • Page 16: Děkujeme vám za zakoupení našeho produktu. Před prvním použitím si prosím pečlivě přečtěte následující pokyny a uschovejte si tento návod k použití pro budoucí použití. Zvláštní pozornost věnujte bezpečnostním pokynům. Pokud máte k přístroji jakékoli dotazy nebo připomínky, obraťte se na zákaznickou linku.
  • Page 17: Návod k obsluze Při vypínání přístroje otáčejte knoflíkem, dokud se na displeji nezobrazí OF. Když se otevře okno a teplota v místnosti klesne během 4 minut o více než 6 °C, na hlavní obrazovce se zobrazí OP a ventil se zavře. Pokud není chladič zcela otevřen během dvou týdnů, dojde k zablokování ventilu. Aby bylo zajištěno normální používání chladiče, řídicí jednotka automaticky každé dva týdny ventil plně otevře. Abyste zabránili tomu, že děti omylem změní nastavení ovladače, aktivujte funkci dětské pojistky. Pokud chcete v automatickém režimu TRV ručně změnit teplotu, otočením tlačítka nastavte aktuální teplotu. Ve vypnutém stavu mobilní aplikace APP zobrazuje, že je funkce proti zamrznutí zapnutá. Když je teplota v místnosti nižší než 5 stupňů Celsia, ventil se otevře. V normálním pracovním stavu se při poškození NTC zobrazí Er. Pokud je napětí baterie příliš nízké, zobrazí se symbol alarmu, který uživateli připomene, aby baterii vyměnil.
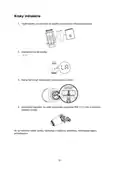
  • Page 18: Instalace ovladače Způsob napájení elektřinou Stisknutím tlačítka sejměte ochranný kryt. Nainstalujte baterii 2 AA a ochranný kryt. Baterie AA x 2 Baterii instalujte podle +- pólu ikony v přihrádce na baterie.
  • Page 19: Instalační kroky Vložte baterii do přihrádky na baterii a zakryjte ji ochranným krytem. Když je tlačná tyč v jedné rovině se dnem. Umístěte regulátor na ventil závitového připojení M30*1,5 mm a utáhněte měděný kroužek. Pokud rozhraní ventilu neodpovídá řídicí jednotce, nainstalujte nejprve příslušenství.
  • Page 20: Stiskněte tlačítko otáčení, na obrazovce se zobrazí, že regulátor začne porovnávat zdvih ventilu, a po porovnání se zadá počáteční nastavení. Zkontrolujte velikost ventilu na tělese ventilu. Instalace příslušenství. Připevněte rozhraní ventilu přímo a poté šroub utáhněte.
  • Page 21: Caleffi 1/2 ventilu. Šroubení nasaďte přímo na ventil a silně na něj zatlačte, aby se šroubení a ventil zasekly. Giacomini 1/2 potřebuje nainstalovat krátké příslušenství vyhazovací tyče do spodní části ovladače. Nasaďte příslušenství přímo na ventil a silně zatlačte, aby příslušenství a ventil seděly. Párování sítě TRV: Otáčením knoflíku nastavte teplotu ve stavu OF, stiskněte a podržte knoflík po dobu 5 sekund. Ikona WIFI začne rychle blikat, poté ji připojte k bráně zigbee podle následujícího návodu. Brána distribuční sítě: Zelené světlo svítí a červené světlo rychle bliká, to vstoupilo do stavu distribuce sítě. Stav síťové konfigurace brány naleznete v návodu k obsluze brány.
  • Page 22: Pokyny pro připojení APP Před konfigurací WIFI se ujistěte, že je telefon připojen k 2,4 GHz WIFI. Pomocí mobilního telefonu naskenujte níže uvedený QR kód a stáhněte si aplikaci Tuya Smart. Otevřete aplikaci Tuya Smart a klikněte na tlačítko Přidat zařízení. Po kliknutí na Gateway Control vyberte a klikněte na Router (Gateway).
  • Page 23: Klikněte na tlačítko Confirm the indicator is on a poté klikněte na tlačítko Next. Po vyhledání brány klikněte na tlačítko. Mobilní telefon přejde do režimu vyhledávání zařízení.
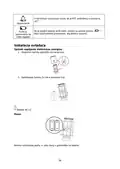
  • Page 24: Mobilní zařízení je úspěšně připojeno k bráně, klikněte na tlačítko Hotovo. Klikněte na tlačítko Přidat dílčí zařízení. Klikněte na LED již bliká.
  • Page 25: Po vyhledání zařízení klikněte na tlačítko DONE. Klikněte na přidané zařízení.
  • Page 26: Vstupte do hlavního rozhraní, jak je znázorněno na obrázku níže. Pokyny pro sdílení zařízení: Klikněte na tlačítko.
  • Page 27: Klikněte na Sdílet zařízení, jak je znázorněno níže. Klikněte na tlačítko Přidat sdílení, jak je znázorněno níže.
  • Page 28: Po zadání čísla účtu klikněte na tlačítko Hotovo. Na nový výrobek zakoupený v prodejní síti Alza.cz se vztahuje záruka 2 roky. V případě potřeby opravy nebo jiného servisu v záruční době se obraťte přímo na prodejce výrobku. Je nutné předložit originální doklad o koupi s datem nákupu. Za rozpor se záručními podmínkami, pro který nelze reklamaci uznat, se považují následující skutečnosti: Používání výrobku k jinému účelu, než pro který je výrobek určen, nebo nedodržování pokynů pro údržbu, provoz a servis výrobku. Poškození výrobku živelnou pohromou, zásahem neoprávněné osoby nebo mechanicky vinou kupujícího. Přirozené opotřebení a stárnutí spotřebního materiálu nebo součástí během používání. Působení nepříznivých vnějších vlivů, jako je sluneční záření a jiné záření nebo elektromagnetické pole. Pokud někdo provedl úpravy, modifikace, změny konstrukce nebo adaptace za účelem změny nebo rozšíření funkcí výrobku.
  • Page 29: EU prohlášení o shodě Toto zařízení je v souladu se základními požadavky a dalšími příslušnými ustanoveními směrnic EU. Tento výrobek nesmí být likvidován jako běžný domovní odpad v souladu se směrnicí EU o odpadních elektrických a elektronických zařízeních (WEEE - 2012/19 / EU). Místo toho musí být vrácen na místo nákupu nebo předán na veřejné sběrné místo recyklovatelného odpadu. Tím, že zajistíte správnou likvidaci tohoto výrobku, pomůžete předejít možným negativním důsledkům pro životní prostředí a lidské zdraví. Další informace získáte na místním úřadě nebo na nejbližším sběrném místě. Nesprávná likvidace tohoto typu odpadu může mít za následek pokuty v souladu s vnitrostátními předpisy.
  • Page 30: Ďakujeme vám za zakúpenie nášho výrobku. Pred prvým použitím si pozorne prečítajte nasledujúce pokyny a uschovajte si tento návod na použitie pre budúce použitie. Venujte osobitnú pozornosť bezpečnostným pokynom. Ak máte akékoľvek otázky alebo pripomienky k zariadeniu, obráťte sa na zákaznícku linku.
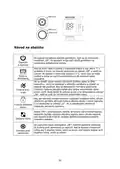
  • Page 31: Návod na obsluhu Po vypnutí zariadenia otáčajte gombíkom, kým sa na obrazovke nezobrazí „OF. Po spustení stroja stačí otočiť gombíkom na nastavenie požadovanej teploty. Keď sa otvorí okno a teplota v miestnosti klesne o viac ako 6 °C, na hlavnej obrazovke sa zobrazí „OP a ventil sa zatvorí. Ak teplota v miestnosti stúpne o 3 °C, tento stav sa môže uvoľniť a môže sa uvoľniť automaticky po 48 minútach alebo manuálne. Ak sa chladič úplne neotvorí do dvoch týždňov alebo sa dlho nepoužíva, ventil sa zablokuje. Riadiaca jednotka každé dva týždne automaticky úplne otvorí ventil. Aby ste zabránili omylom zmenám nastavení ovládača deťmi, dlhým stlačením gombíka aktivujte funkciu detskej zámky. Keď je TRV v automatickom režime, ak chcete ručne zmeniť teplotu, otočením tlačidla nastavte aktuálnu teplotu. Vo vypnutom stave mobilná aplikácia zobrazuje, že funkcia proti zamrznutiu je zapnutá. Keď je teplota v miestnosti nižšia ako 5 stupňov Celzia, ventil sa otvorí.
  • Page 32: V normálnom pracovnom stave, ak je NTC poškodený, zobrazí sa „Er. Ak je napätie batérie príliš nízke, zobrazí sa symbol alarmu. Funkcia upozornenia na nízke napätie. Inštalácia ovládača. Spôsob napájania elektrickou energiou. Stlačením tlačidla odstráňte ochranný kryt. Nainštalujte batériu 2× AA a ochranný kryt. Batériu nainštalujte podľa +– pólu ikony v priehradke na batérie.
  • Page 33: Kroky inštalácie Vložte batériu do priestoru na batérie a zakryte ho ochranným krytom. Keď je tlačná tyč vytiahnutá v jednej rovine s dnom. Umiestnite regulátor na ventil závitového pripojenia M30 × 1,5 mm a utiahnite medený krúžok. Ak sa rozhranie vášho ventilu nezhoduje s riadiacou jednotkou, nainštalujte najprv príslušenstvo.
  • Page 34: Stlačte tlačidlo otáčania, na obrazovke sa zobrazí regulátor, ktorý začne porovnávať zdvih ventilu, a po porovnaní sa zadá počiatočné nastavenie. Skontrolujte veľkosť ventilu na telese ventilu. Inštalácia príslušenstva. Rozhranie ventilu upevnite priamo a potom utiahnite skrutku.
  • Page 35: Caleffi 1/2 ventil requires direct attachment of fittings to the valve with strong pressure to secure them. Giacomini 1/2 needs to install short accessory of the ejector rod at the bottom of the controller. Attach the accessory directly to the valve and press firmly to snap it in place, then screw it into the ME167 controller. To configure the TRV network, turn the knob to set the temperature to OF. Press and hold the button for 5 seconds to enter network configuration mode, indicated by the rapidly blinking WIFI icon. Connect to the Zigbee gateway according to the provided instructions. The distribution network gateway shows a green light and a rapidly blinking red light, indicating it has entered network distribution mode. The status of the gateway's network configuration can be found in the gateway's user manual.
  • Page 36: Pokyny na pripojenie APP Pred konfiguráciou WiFi sa uistite, že je telefón pripojený k 2,4 GHz WiFi. Pomocou mobilného telefónu naskenujte nižšie uvedený kód QR a stiahnite si aplikáciu „Tuya Smart. Otvorené aplikáciu „Tuya Smart a kliknite na „Pridať zariadenie. Po kliknutí na položku „Gateway Control vyberte a kliknite na položku „Router (Gateway).
  • Page 37: Kliknite na „Confirm the indicator is on a potom kliknite na „Next. Po vyhľadaní brány kliknite na tlačidlo. Mobilný telefón vstúpi do režimu vyhľadávania zariadenia.
  • Page 38: Mobilné zariadenie je úspešne pripojené k bráne, kliknite na tlačidlo „Hotovo. Kliknite na tlačidlo „Pridať podzariadenia. Kliknite na položku „LED už bliká.
  • Page 39: Po vyhľadaní zariadenia kliknite na tlačidlo „DONE. Kliknite na pridané zariadenie.
  • Page 40: Vstúpte do hlavného rozhrania, ako je znázornené na obrázku nižšie. Pokyny na zdieľanie zariadenia: Kliknite na „ , ako je znázornené nižšie.
  • Page 41: Kliknite na tlačidlo „Zdieľať zariadenie. Kliknite na „Pridať zdieľanie.
  • Page 42: Po zadaní čísla účtu kliknite na tlačidlo „Hotovo. Na nový výrobok zakúpený v predajnej sieti Alza.cz sa vzťahuje záruka 2 roky. V prípade potreby opravy alebo iných služieb počas záručnej doby sa obráťte priamo na predajcu výrobku. Je potrebné predložiť originálny doklad o kúpe s dátumom nákupu. Za rozpor so záručnými podmienkami sa považujú nasledujúce skutočnosti: Používanie výrobku na iný účel, než na aký je výrobok určený, alebo nedodržiavanie pokynov na údržbu, prevádzku a servis výrobku. Poškodenie výrobku živelnou pohromou, zásahom neoprávnenej osoby alebo mechanicky vinou kupujúceho. Prirodzené opotrebovanie a starnutie spotrebného materiálu alebo komponentov počas používania. Pôsobenie nepriaznivých vonkajších vplyvov, ako je slnečné žiarenie a iné žiarenia. Ak niekto vykonal úpravy, modifikácie, zmeny dizajnu alebo adaptácie s cieľom zmeniť alebo rozšíriť funkcie výrobku.
  • Page 43: Vyhlásenie o zhode EÚ Toto zariadenie je v súlade so základnými požiadavkami a ďalšími príslušnými ustanoveniami smerníc EÚ. WEEE Tento výrobok sa nesmie likvidovať ako bežný domáci odpad v súlade so smernicou EÚ o odpade z elektrických a elektronických zariadení. Namiesto toho sa musí vrátiť na miesto nákupu alebo odovzdať na verejnom zbernom mieste recyklovateľného odpadu. Zabezpečením správnej likvidácie tohto výrobku pomôžete predísť možným negatívnym dôsledkom pre životné prostredie a ľudské zdravie. Ďalšie informácie získate na miestnom úrade alebo na najbližšom zbernom mieste. Nesprávna likvidácia tohto druhu odpadu môže mať za následok pokuty.
  • Page 44: Köszönjük, hogy megvásárolta termékünket. Kérjük, az első használat előtt figyelmesen olvassa el az alábbi utasításokat. Őrizze meg ezt a használati útmutatót a későbbi használatra. Fordítson különös figyelmet a biztonsági utasításokra. Ha bármilyen kérdése vagy észrevétele van a készülékkel kapcsolatban, kérjük, forduljon az ügyfélvonalhoz.
  • Page 45: Használati utasítás Kérjük, a gép kikapcsolásakor fordítsa el a gombot, amíg a képernyőn az OF felirat nem jelenik meg. Ablak funkció Ha az ablakot kinyitják, és a helyiség hőmérséklete 4 percen belül több mint 6°C-ot csökken, a főképernyőn megjelenik az OP felirat, és a szelep bezáródik. Anti-vízkő funkció A gyermekzár funkció aktiválásához nyomja meg hosszan a gombot, és a képernyőn megjelenik az LC. Ideiglenes üzemmód Ha a TRV automatikus üzemmódban van, ha manuálisan szeretné megváltoztatni a hőmérsékletet, akkor a gombot elforgatva állítsa be az aktuális beállítandó hőmérsékletet. Fagyásgátló KIKAPCSOLT állapotban a mobil APP azt mutatja, hogy a fagyásgátló funkció be van kapcsolva. Figyelmeztetés Normál üzemállapotban, ha az NTC megsérült, és az Er felirat jelenik meg a kijelzőn. Alacsony feszültség figyelmeztető funkció Ha az akkumulátor feszültsége túl alacsony, a meg, hogy emlékeztesse a felhasználót az akkumulátor cseréjére riasztási szimbólum jelenik meg.
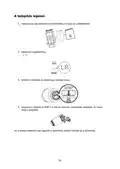
  • Page 46: Vezérlő telepítése Nyomja meg a gombot a védőburkolat eltávolításához. Szerelje be a 2 AA akkumulátort és a védőburkolatot. Kérjük, az elemet az elemtartóban lévő ikon pólusának megfelelően helyezze be.
  • Page 47: A telepítés lépései Helyezze az akkumulátort az elemtartóba, és fedje le a védőfedéllel. Képernyő megjelenítése. Amikor a tolórudat az aljával egy vonalba húzza. Helyezze a vezérlőt az M30*1,5 mm-es menetes csatlakozás szelepére, és húzza meg a rézgyűrűt. Ha a szelepcsatlakozó nem egyezik a vezérlővel, először szerelje be a tartozékot.
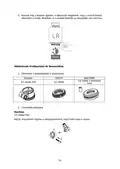
  • Page 48: Nyomja meg a forgatás gombot, a képernyőn megjelenik, hogy a vezérlő elkezd illeszkedni a szelep löketéhez. A kezdeti beállítás az illeszkedés után kerül be. Ellenőrizze a szelepméretet a szelepházon. Tartozékok telepítése. Kérjük, közvetlenül rögzítse a szelepcsatlakozót, majd húzza meg a csavart.
  • Page 49: Caleffi 1/2 szelep: A szerelvényeket közvetlenül a szelepre helyezze, és erősen nyomja meg, hogy a szerelvények és a szelep csatlakozzon. Giacomini 1/2 szelep: Telepítse a rövid kidobó rúd tartozékot a vezérlő aljára, majd nyomja meg erősen, hogy a tartozékok és a szelep csatlakozzon. TRV hálózati párosítás: Forgassa el a gombot az OF állapot hőmérsékletének beállításához, nyomja meg és tartsa lenyomva a gombot 5 másodpercig. A WIFI ikon gyorsan villogni kezd, majd csatlakoztassa a zigbee átjáróhoz a következő utasítás szerint. Gateway elosztóhálózat: Zöld fény egy és piros fény gyorsan villog, és belépett a hálózati elosztás állapotába.
  • Page 50: A WIFI konfigurálása előtt győződjön meg arról, hogy a telefon 2,4 GHz-es WIFI-re van csatlakoztatva. A mobiltelefonoddal szkenneld be az alábbi QR-kódot a Tuya Smart alkalmazás letöltéséhez. Nyissa meg a Tuya Smart alkalmazást, és kattintson az Eszköz hozzáadása gombra. Az Átjáró vezérlés gombra kattintás után válassza ki és kattintson az Útválasztó (átjáró) gombra.
  • Page 51: Kattintson a A jelző bekapcsolásának megerősítése gombra, majd kattintson a Tovább gombra, ahogy az alábbi ábrán látható. Miután megtalálta az átjárót, kattintson a látható gombra, ahogy az alábbi ábrán. A mobiltelefon az alábbi ábrán látható módon lép be a készülék keresési módjába.
  • Page 52: A mobileszköz sikeresen csatlakozik az átjáróhoz, kattintson a Kész gombra. Kattintson az Al-eszközök hozzáadása gombra. Kattintson a LED már villog gombra.
  • Page 53: Miután megkereste az eszközt, kattintson a DONE gombra az alábbi ábrán látható módon. Kattintson a hozzáadott eszközre az alábbi ábrán látható módon.
  • Page 54: Lépjen be az alábbi ábrán látható fő felületre. Eszközmegosztási utasítások: Kattintson a gombra az alábbi ábrán látható módon.
  • Page 55: Kattintson az Eszköz megosztása gombra az alábbi ábrán látható módon. Kattintson a Megosztás hozzáadása gombra az alábbi ábrán látható módon. A számlaszám megadása után kattintson a Kész gombra, ahogy az alábbiakban látható.
  • Page 56: Jótállási feltételek Az Alza.cz értékesítési hálózatában vásárolt új termékre 2 év garancia vonatkozik. A vásárlás dátumával ellátott eredeti vásárlási bizonylatot kell bemutatnia. A termék rendeltetésétől eltérő célra történő használata a jótállási feltételekkel ellentétes. A termék mechanikai sérülése, amely természetes katasztrófa vagy illetéktelen beavatkozás következménye, nem érvényesíthető. A fogyóeszközök vagy alkatrészek természetes elhasználódása a jótállás hatálya alá nem tartozik. Káros külső hatások, mint például folyadék behatolása vagy elektromágneses mezők, a jótállást érvénytelenítik. A termék módosítása vagy nem eredeti alkatrészek használata a jótállás elvesztéséhez vezet. A jótállási igények elutasításának okai közé tartozik a nem megfelelő karbantartás. A jótállás érvényesítése érdekében a vásárlás dátumának bizonyítása szükséges.
  • Page 57: Vielen Dank für den Kauf unseres Produkts. Bitte lesen Sie die folgenden Anweisungen vor dem ersten Gebrauch sorgfältig durch und bewahren Sie diese Bedienungsanleitung zum späteren Nachschlagen auf. Beachten Sie insbesondere die Sicherheitshinweise. Wenn Sie Fragen oder Kommentare zum Gerät haben, wenden Sie sich bitte an den Kundenservice.
  • Page 58: Betriebsanleitung Drehen Sie den Knopf, bis auf dem Bildschirm OF angezeigt wird, wenn Sie das Gerät ausschalten. Wenn das Fenster geöffnet wird und die Raumtemperatur innerhalb von 4 Minuten um mehr als 6°C sinkt, wird auf dem Hauptbildschirm OP angezeigt und das Ventil geschlossen. Wird der Kühlkörper nicht innerhalb von zwei Wochen vollständig geöffnet oder über einen längeren Zeitraum eingezogen, wird das Ventil durch Verschlammung blockiert. Um die normale Nutzung des Kühlkörpers zu gewährleisten, öffnet das Steuergerät das Ventil automatisch alle zwei Wochen vollständig. Um zu verhindern, dass die Einstellungen des Steuergeräts versehentlich von Kindern geändert werden, drücken Sie lange auf den Knopf, um die Kindersicherungsfunktion zu aktivieren.
  • Page 59: Wenn sich das TRV im Automatikmodus befindet und Sie die Temperatur manuell ändern möchten, drehen Sie den Knopf, um die aktuelle Temperatur einzustellen, die bis zum Beginn des nächsten programmierten Zeitraums gilt. Im AUS-Zustand zeigt die mobile APP an, dass die Gefrierschutzfunktion eingeschaltet ist. Wenn die Raumtemperatur unter 5 Grad Celsius liegt, wird das Ventil geöffnet, wenn die Temperatur auf 8 Grad Celsius ansteigt, wird das Ventil geschlossen. Im normalen Betriebszustand, wenn der NTC beschädigt ist, wird Er angezeigt. Wenn die Batteriespannung zu niedrig ist, wird das Alarmsymbol angezeigt, um den Benutzer daran zu erinnern, die Batterie zu ersetzen.
  • Page 60: Controller installation involves the following steps. Press the button to remove the protective cover. Insert the 2 AA batteries and the protective cover. Use 2 AA batteries. Caution: Please insert the battery according to the + and - symbols in the battery compartment.
  • Page 61: Installation Legen Sie die Batterie in das Batteriefach ein und decken Sie es mit einer Schutzabdeckung ab. Wenn die Schubstange bündig mit dem Boden gezogen wird. Setzen Sie den Regler auf das Ventil des M30*1,5mm-Gewindeanschlusses und ziehen Sie den Kupferring fest. Wenn Ihre Ventilschnittstelle nicht mit dem Steuergerät übereinstimmt, installieren Sie zuerst das Zubehör.
  • Page 62: Drücken Sie den Drehknopf, auf dem Bildschirm wird angezeigt, dass der Regler beginnt, den Ventilhub abzugleichen, und die Anfangseinstellung wird nach dem Abgleich eingegeben. Überprüfen Sie die Ventilgröße auf Ihrem Ventilgehäuse. Danfoss, CALEFFI, GIACOMINI. 1/2 Ventil (RA), 1/2 Ventil, 1/2 Ventil + Espulsore corto. Einbau von Zubehör.
  • Page 63: Danfoss 1/2 Ventil (RA) Bitte befestigen Sie die Ventilschnittstelle direkt und ziehen Sie dann die Schraube fest. Caleffi 1/2 Ventil Bitte setzen Sie die Armaturen direkt auf das Ventil und drücken Sie kräftig, damit die Armaturen und das Ventil nicht klemmen. Giacomini 1/2 Ventil Giacomini 1/2 muss die kurze Auswerferstange Zubehör an der Unterseite des Controllers installieren. Setzen Sie bitte das Zubehör direkt auf das Ventil und drücken Sie fest, um das Zubehör und Ventil zu verbinden, und dann in ME167 Treiber schrauben.
  • Page 64: TRV Netzparing: Drehen Sie den Knopf, um die Temperatur des OF-Status einzustellen. Drücken und halten Sie den Knopf für 5 Sekunden, um den Netzwerk-Konfigurationsmodus zu aktivieren. WIFI-Symbol blinkt schnell, dann verbinden Sie es mit dem Zigbee-Gateway. Grünes Licht ein und rotes Licht blinkt schnell, es ist in den Zustand der Netzwerkverteilung eingetreten. Vergewissern Sie sich, dass Ihr Telefon mit 2.4GHz WIFI verbunden ist. Scannen Sie mit Ihrem Mobiltelefon den QR-Code, um die Tuya Smart-App herunterzuladen. Öffnen Sie die App Tuya Smart und klicken Sie auf Gerät hinzufügen.
  • Page 65: Nachdem Sie auf Gateway Control geklickt haben, wählen Sie Router (Gateway) aus und klicken Sie darauf. Klicken Sie auf Bestätigen Sie, dass der Indikator eingeschaltet ist und dann auf Weiter.
  • Page 66: Klicken Sie nach der Suche nach dem Gateway auf unten dargestellt. Das Mobiltelefon wechselt in den Modus Gerät suchen.
  • Page 67: Das mobile Gerät ist erfolgreich mit dem Gateway verbunden. Klicken Sie auf Fertig, wie in der Abbildung unten dargestellt. Klicken Sie auf Subdevices hinzufügen, wie in der Abbildung unten dargestellt. Klicken Sie auf LED blinkt bereits, wie in der Abbildung unten dargestellt.
  • Page 68: Nachdem Sie das Gerät gesucht haben, klicken Sie auf FERTIG. Klicken Sie auf das hinzugefügte Gerät.
  • Page 69: Rufen Sie die Hauptschnittstelle auf, wie in der folgenden Abbildung dargestellt. Anweisungen zur gemeinsamen Nutzung von Geräten: Klicken Sie auf , wie unten gezeigt.
  • Page 70: Klicken Sie wie unten gezeigt auf Gerät freigeben. Klicken Sie wie unten gezeigt auf Freigabe hinzufügen.
  • Page 71: Nachdem Sie die Kontonummer eingegeben haben, klicken Sie auf Fertig. Auf ein neues Produkt, das im Vertriebsnetz von Alza gekauft wurde, wird eine Garantie von 2 Jahren gewährt. Wenn Sie während der Garantiezeit eine Reparatur oder andere Dienstleistungen benötigen, wenden Sie sich direkt an den Produktverkäufer. Sie müssen den Originalkaufbeleg mit dem Kaufdatum vorlegen. Verwendung des Produkts für einen anderen Zweck als den, für den das Produkt bestimmt ist, oder Nichtbeachtung der Anweisungen für Wartung, Betrieb und Service des Produkts, führt zu einem Widerspruch gegen die Garantiebedingungen. Beschädigung des Produkts durch Naturkatastrophe, Eingriff einer unbefugten Person oder mechanisch durch Verschulden des Käufers führt ebenfalls zu einem Widerspruch. Natürlicher Verschleiß und Alterung von Verbrauchsmaterialien oder Komponenten während des Gebrauchs sind von der Garantie ausgeschlossen. Exposition gegenüber nachteiligen äußeren Einflüssen wie Sonnenlicht, Flüssigkeiten oder chemischen Prozessen kann die Garantie ungültig machen. Änderungen, Modifikationen oder die Verwendung nicht originaler Komponenten führen ebenfalls zu einem Widerspruch gegen die Garantiebedingungen.
  • Page 72: EU-Konformitätserklärung Dieses Gerät entspricht den grundlegenden Anforderungen und anderen relevanten Bestimmungen der EU-Richtlinien. WEEE Dieses Produkt darf gemäß der EU-Richtlinie über Elektro- und Elektronik-Altgeräte (WEEE - 2012/19 / EU) nicht über den normalen Hausmüll entsorgt werden. Stattdessen muss es an den Ort des Kaufs zurückgebracht oder bei einer öffentlichen Sammelstelle für wiederverwertbare Abfälle abgegeben werden. Indem Sie sicherstellen, dass dieses Produkt ordnungsgemäß entsorgt wird, tragen Sie dazu bei, mögliche negative Folgen für die Umwelt und die menschliche Gesundheit zu vermeiden. Wenden Sie sich an Ihre örtliche Behörde oder an die nächstgelegene Sammelstelle, um weitere Informationen zu erhalten. Die unsachgemäße Entsorgung dieser Art von Abfall kann gemäß den nationalen Vorschriften zu Geldstrafen führen.