IMIT TA5 Mechanical Thermostat User Manual

11/12/24, 8:59 AM
TA5 - TA5 A - TA5 B - TA5 C - Manuali - Imit Control System s.r.l.
The product model and code (6 digits) are printed on the sticker on the outside or the inside of the battery
compartment cover. The manual may not be available in the selected language.
TA5 – TA5 A – TA5 B – TA5 C
COD. 546770
COD. 546730
COD. 546710
COD. 546750
PRODUCT DESCRIPTION
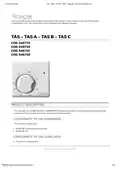
This is an easy-to-use MECHANICAL THERMOSTAT. It allows an accurate room temperature adjustment in the
hosting room, thus meeting any users’ needs as far as room comfort.
CONFORMITY TO THE STANDARDS
This product complies with:
EN 60730-1 and subsequen revisions
EN 60730-2-9
CONFORMITY TO THE GUIDELINES
This product complies with:
We use cookies to ensure that we give you the best experience on our website. If you continue to use this site we
will assume that you are happy with it.
1/10

| General | Details |
|---|---|
| Name | IMIT TA5 Mechanical Thermostat User Manual |
| Make | IMIT |
| Language | English |
| Filetype | PDF (Download) |
| File size | 0.47 MB |


IMIT TA5 Mechanical Thermostat User Manual Overview
Summary of Contents
- Page 1: The product model and code are printed on the sticker on the outside or the inside of the battery compartment cover. The manual may not be available in the selected language. This is an easy-to-use mechanical thermostat. It allows an accurate room temperature adjustment in the hosting room. This product complies with EN 60730-1 and subsequent revisions. This product complies with EN 60730-2-9. This product complies with LVD 2014/35/EU. Class ErP I (+1%) – EU 811/2013.
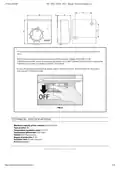
- Page 2: It is recommended to install the appliance strictly in compliance with all safety and law provisions in force. Before connecting the thermostat, make sure that the supply voltage of the unit to be controlled is not connected and that it matches the indication given inside the appliance. In case of repeated malfunctioning, please call our technical service. Maximum capacity of the contacts is 16(2,5)A/250V~. Type of action is 1B. Temperature regulation range is 5°÷30°C. Temperature differential is 0,4K÷0,8K. Degree of protection is IP 20. Insulation class is double insulation. Storage temperature is 0°÷50°C.
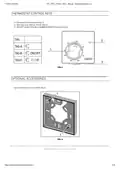
- Page 3: Thermostat control keys include a temperature setting knob, a warning lamp, and an ON/OFF or SUMMER/WINTER switch. Optional accessories include a sub-base fitting and a special fitting for temperature range restrictions or temperature lock at a pre-set value.
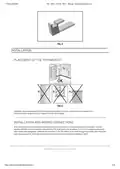
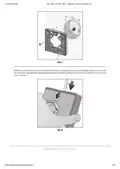
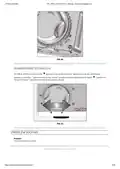
- Page 4: Installation Placement of the thermostat Install the thermostat away from heat sources and away from doors/windows, at approx. 1.5 m height from the floor. Installation and wiring connections In case the thermostat shall be installed in a round built-in box or on an uneven wall surface, it is recommended to use a sub-base fitting. Fix the fitting to the wall through two holes other than the ones marked as B-B, which are exclusively provided for the thermostat installation.
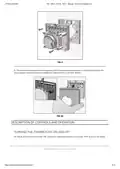
- Page 5: Remove the front cover from the thermostat base by releasing the provided clip. Fix it to the wall or to the sub-base fitting through the provided holes and tighten it by means of suitable screws having a maximum of 3.5 mm. We use cookies to ensure that we give you the best experience on our website. If you continue to use this site we will assume that you are happy with it.
- Page 6: Thread the power supply wires through the slot in the base and connect them to the terminals as per the wiring diagram sketched inside the appliance. Snap the front cover back. Description of controls and operation. Turning the thermostat on and off. On TA5-B, put the switch onto the “ON” position to start the equipment or onto the “OFF” to turn it off.
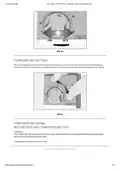
- Page 7: Temperature setting involves adjusting the knob to the desired room temperature. Temperature range restriction and temperature lock operations must be carried out by qualified personnel only. Remove the front cover from the thermostat base by releasing the provided clip.
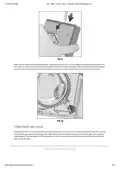
- Page 8: Insert the provided fitting in the knob at the desired limit points according to the corresponding values marked on the knob body. Make sure that the metal retainer remains in its correct position between the min. and max. limit points. Position the knob to correspond with the desired temperature value, then separate the base from the cover by pressing the appropriate retaining tooth. Insert the two special accessories on the sides of the metal stop in order to prevent the handle from moving. Put the lid back on the product. We use cookies to ensure that we give you the best experience on our website. If you continue to use this site we will assume that you are happy with it.
- Page 9: Summer/winter switch allows setting for air conditioning or heating modes. To set the summer operation mode, place the switch in the designated position. To set the winter operation mode, place the switch in the appropriate position. Common problems include the system not starting. Check for wrong wiring as a potential issue. Ensure the set room temperature has already been reached. Verify that the switch is in the ON position. Check for incorrect settings on the summer/winter switch. Refer to the problem-solving section for troubleshooting guidance. Consult the manual for further instructions and diagrams.
- Page 10: Check if the wiring connections to the thermostat terminals were carried out as per wiring diagram. Increase or reduce the set temperature value according to the system application. Put switch onto ON position. Make sure the switch is on position for heating or air conditioning system. The ambient temperature does not correspond to the temperature set on the thermostat. Incorrect positioning of the thermostat within the room may be a possible cause. Air draughts coming from the electrical wires conduit can affect temperature readings. Follow the instructions of paragraph “Placement of the thermostat.” Seal the conduit to prevent warm or cold air draughts.

ENSTO ECO16TOUCH Combination Thermostat Instruction Manual

Micro-Air EasyTouch RV 353 Touch Screen Thermostat Instruction Manual

Beca BAC-1000 Series WiFi Thermostat User Guide

BEOK TDR89 Glass Screen Thermostat Instruction Manual

finder 1C.B1 Bliss2 Smart Thermostat User Manual

SUNRICHER SR-ZG9092A Zigbee Heating Thermostat Installation Guide

GREYSTONE TLOSF24X01 TLOS Series Outside Low Limit Thermostat Instruction Manual

EAE Technology EAE-KNX MONA Series Thermostat Instruction Manual

EPH CONTROLS COMBIPACK2 Smart Thermostat with Automation and Optimum Start Instructions

ENGO CONTROLS E10-MBUSW Wi-Fi Modbus Thermostat User Guide