TRANE XR202 Programmable Thermostat User Guide


Trane XR202 Programmable Thermostat
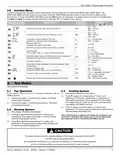
4.6 Installer Menu
To prevent changes that may affect system performance, this thermostat has an INSTALLER MENU and a USER MENU. The
INSTALLER MENU provides access to every option, while the USER MENU provides access to items that will not affect system
performance. To access the INSTALLER MENU press the Menu button for 8 seconds. The display will show item 30 in the table below.
Use Next and back to navigate through menu items. Press or or to change a menu setting.
INSTALLER MENU
(HOLD MENU 8 SECONDS)
DESCRIPTION
DEFAULT
(FLASHING ICONS)
SETTINGS
(PRESS
OR
)
SLO – slow
MEd – medium
FAS – fast
Heat Cycle Rate (how often the heat will turn on)
MEd
30
35
CR
CR
CL
SLO – slow
MEd – medium
FAS – fast
Cool Cycle Rate (how often the cooling will turn on)
MEd
On
Compressor Lockout / Minimum Off Time
(protects the compressor from short cycling)
On – 5 minute delay
OFF – no delay
50
65
66
Maximum Heat Limit
(maximum set point for heat mode)
99
45
47 to 99
45 to 97
Minimum Cool Limit (minimum set point for cool mode)
7 – 7 Day
5 – 5-1-1 Day
0 – Non Programmable
Schedule Type
(set as either 7-Day, 5-1-1 Day or NonProgrammable)
5
74
Early Start (starts heating or cooling early so your programmed
temperature is reached by the programmed time)
On – start early
OFF – start at program period time
OFF
°F
76
79
E
°F – Fahrenheit
°C – Celsius
Fahrenheit or Celsius
Temperature Display Adjustment (adjust the displayed “Room
Temperature”)
0
-5 to +5
81
Continuous Display Light
(keep the backlight always on – “C” wire required)
On – always on
OFF – momentarily
OFF
OFF
83
86
dL
1 to 12 – reminder time (months)
OFF – no filter reminder
On – disable buttons
Change Air Filter (set up a monthly reminder)
Keypad Lock (prevent unwanted changes to the thermostat)
OFF
OFF – all buttons are active
99
5. Test Modes
Turn on power to the system.
5.3 Cooling System
1.) Move System Switch to Cool position.
5.1 Fan Operation
If your system does not have a G terminal connection, skip to
Heating System.
2.) Press to adjust thermostat setting 1° below room
temperature. The blower should come on immediately on
high speed, followed by cold air circulation The thermostat
will indicate Cool On. There can be up to a 5 minute delay,
(see INSTALLER MENU, item 50).
1.) Press the fan button to select the On position. The blower
should begin to operate.
2.) Press the fan button to select the Auto position. The blower
should stop immediately.
3.) Press to adjust thermostat setting to 1° above room
temperature. The cooling system should stop operationg and
the thermostat will indicate Cool.
5.2 Heating System
1.) Move System Switch to Heat position.
2.) Press to adjust thermostat setting to 1° above room
temperature. The system should begin to operate and the
thermostat will indicate Heat On.
Note: If Starting Soon is shown on the display, the compressor lock-
out feature is operating.There will be up to a 5 minute delay before
the compressor turns on (see INSTALLER MENU, item 50).
3.) Press to adjust thermostat setting to 1° below room
temperature. The heating system should stop operating and
the thermostat should indicate Heat.
CAUTION
!
To prevent compressor and/or property damage, if the outdoor temperature is below 55°F,
DO NOT operate the cooling system.
Do not allow the compressor to run unless the compressor oil heaters have been operational
for 6 hours and the system has not been operational for at least 5 minutes.
Pub. No. 18HD51D1-1C-EN 09/2020 Part No. 37-7769005
9
| General | Details |
|---|---|
| Name | TRANE XR202 Programmable Thermostat User Guide |
| Make | Trane |
| Language | English |
| Filetype | PDF (Download) |
| File size | 0.33 MB |


TRANE BAYECON089A Programmable Touch Screen Thermostat Instruction Manual

TRANE XR102 Non-Programmable Thermostat User Guide

TRANE XR103 Non-Programmable Heat Pump Thermostat User Guide

TRANE SC360 Link System Controller and Smart Thermostat Instructions


Ensto ECO16BT-IN-WW Floor Heating Thermostat User Guide

sensi 1F76U-22WFB Lite Smart Thermostat User Manual

Honeywell RLV4300 5-2 Programmable Thermostat Owner’s Manual

network thermostat NetX X Series Thermostat Instruction Manual

Danfoss ECtemp 610 Electronic Thermostat Installation Guide

hysencontrol HY01RF Wireless Thermostat User Manual

FantiniCosmi C820RQ LED Thermostat Instruction Manual

TSTATBBEWF-01 Bryant Smart Thermostat Owner’s Manual

Owon Technology PCT 523-W-TY Tuya WiFi 24VAC Thermostat User Guide

Danfoss RET230P Electronic Thermostat Instruction Manual