Home > Telethings > telethings TELESWITCH – 2L Smart LoRaWAN Thermostat User Manual
telethings TELESWITCH – 2L Smart LoRaWAN Thermostat User Manual


USER MANUAL
TELESWITCH – 2L
TELETHINGS D.O.O.
A: Gračaničkih gazija b.b., 75320 Gračanica, Bosna i Hercegovina
T: +387 (0)35 700 209 • F: +387 (0)35 700 201 • E: iot@telethings.com • W: www.telethings.com

| General | Details |
|---|---|
| Name | telethings TELESWITCH – 2L Smart LoRaWAN Thermostat User Manual |
| Make | Telethings |
| Language | English |
| Filetype | PDF (Download) |
| File size | 0.19 MB |


telethings teleRelays-2D Tele Thermostat User Manual

telethings teleRelays-2L Device Thermostat User Manual

telethings 2D Smart LoRaWAN Thermostat User Manual

telethings TELESWITCH – 2L Smart LoRaWAN Thermostat User Manual Overview
Summary of Contents
- Page 1: Page 1
- Page 2: Overview Basic information Work principle of the device Add device to Telethings IoT cloud, set settings and monitor data Data protocol teleSwitch – 2L data packet Troubleshooting and support
- Page 3: Overview Power supply: 1xCR2450 battery Dimensions: 8.6x8.6x0.7mm Storage temperature: -10°C ~ 60°C Operating temperature: 0°C ~ 60°C Energy consumption: 1.2-2 µA in idle state, 5.2 mA in active state LoRaWAN frequency: EU: 868 MHz, US: 915 MHz Activation method: Over-The-Air Activation (OTAA) teleSwitch-2L is a wireless device which enables remote control via the LoRaWAN network. The device is powered by a CR2450 battery and it belongs to the group of devices with extremely low consumption.
- Page 4: Work principle of the device LoRaWAN is a low-power, wide area networking protocol suitable for transmitting small size payloads over long distances. It wirelessly connects devices to the internet and manages communication between end-node devices and network gateways. The teleSwitch-2L device enables remote control via LoRaWAN technology. By pressing any button, the ID of the pressed button is transmitted to the server. The paired device is managed according to the adjusted settings. It is possible to set the teleSwitch-2L device to send ON commands, OFF commands, alternate sending ON-OFF, as well as DELAY ON and DELAY OFF commands. Those commands are defined on Telethings IoT Cloud. It works in combination with teleRelays-2L devices.
- Page 5: Add device to Telethings IoT Cloud, set settings and monitor data. Log in at the Telethings IoT Cloud. If a user account has not been created, register on Telethings IoT Cloud and activate your profile. If the user does not have any device on their profile, the Home Dashboard opens after signing in. Click on the Claim Device option and activate the QR Code Scanner. Scan the QR code to claim the device. A message about the success of the device claim will be displayed after scanning. A new option with the device type teleSwitch will appear if the claim is successful. It is possible to claim new devices by repeating the procedure.
- Page 6: Telethings By clicking on teleSwitch option, the teleSwitch Device List is opened. There are options for renaming the device and for adjusting its settings. To adjust the settings of a specific device, click on the Settings icon button. The dashboard for adjusting the device settings will open. This dashboard contains various widgets. A widget for adjusting the settings of each button on the device is available. BUTTON: ID of the button on button device.
- Page 7: Mode refers to the type of command that the server forwards from the button device to the controlled device. The ON command turns on the connected device when the corresponding key is pressed. The OFF command turns off the connected device when the corresponding key is pressed. The TOGGLE command switches the device on if it is off and off if it is on when the corresponding key is pressed. DELAY ON sends a command to hold the ON state for a specified timeout period before reverting to the logical 0. DELAY OFF sends a command to hold the OFF state for a specified timeout period before reverting to the logical 1. RELAY ID is the identifier of the device being controlled by the teleSwitch device. RELAY OUTPUT indicates the number of the output on the relay device, ranging from 1 to 8. TIMER VALUE specifies the timeout value for DELAY ON or DELAY OFF commands. The teleSwitch device can be configured for multifunctional control of TeleRelay devices, with options like delayed ON managed by the teleRelay device.
- Page 8: teleSwitch device widget represents virtual device buttons that enable control of connected devices. An indication of a button being pressed via the widget or directly on the device is a change in the color of the button for one second. History widget allows viewing the pressed keys in the selected time interval.
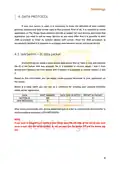
- Page 9: Data protocol If your own server is used, it is necessary to know the definition of data transfer protocol, packets and data format used in that protocol. It is required to create an application on The Things Stack platform for your devices and add as many devices as needed. Once the JOIN procedure is successfully finished, it is possible to exchange data between server and joined device. teleSwitch device sends a simple data packet that is 1 byte in size and contains the ID of the button that was pressed. Based on this information, you can easily create a payload formatter in your application on the server. Below is a table which you can use as a reference for creating user payload formatter inside server application. After every successful join, the device sends a test byte to confirm that data transfer is working without problems. If you want to integrate our device to your stack, scan the QR code on the device and send us an email with the serial number.
- Page 10: Troubleshooting and support For assistance, please contact Telethings support. Hours: Mon-Fri 8 AM – 4 PM.

ESi Controls ESRTERFW Wireless Digital Room Thermostat Installation Guide

LUTRON 653 Right Thermostat Control Datasheet

Ensto ECO16BT-IN-WW Floor Heating Thermostat User Guide

LEHNER VERSAND 01477 Easymaxx Digital Radiator Thermostat User Manual

GENERAL LIFE FC220 Digital Fan Coil Thermostat User Manual

Spacio Innovations Inc 13EA2A7RI Remote Thermostat User Manual

SIEMENS M3182 Room Thermostat Instruction Manual

SIEMENS TH192 HC Heating-Cooling Room Thermostat Instruction Manual

Honeywell Home T6 Pro Smart Programmable Thermostat User Guide

Honeywell Programmable Thermostat T4 Pro Installation Guide