Home > MAGNUM FIRST > MAGNUM FIRST M9-TS1 24 Volt Intelligent Thermostat Owner’s Manual
MAGNUM FIRST M9-TS1 24 Volt Intelligent Thermostat Owner’s Manual
M9-TS1
24 Volt Intelligent Thermostat (with 4.3” LCD Display)
24 Volt Intelligent Thermostat
(With 4.3” LCD Display)
Mx-TS1
Description:
The Bi-Directional, intelligent thermostat uses wireless communication to provide quick and easy implementation of
energy saving HVAC controls. When the thermostat receives an “occupied” signal from a switch or sensor, the user
immediately gains full control over the HVAC settings. When the thermostat receives an “unoccupied” signal, it sets the
room back to the preset unoccupied temperature. It is designed for use with most basic gas/electric furnace/air conditioning
units, PTHP/PTAC systems, 4-pipe, or 2-pipe fan coil systems.
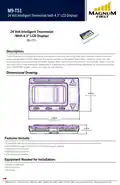
Dimensional Drawing:
4.38 in
(111.252 mm)
6.63 in
(168.402 mm)
1.16 in
(29.464 mm)
Features Include:
• Compatible with key card switch, occupancy sensor, window/door sensor and other wireless transmitters.
• Controllable through smart phone as well as VenergyUI software
• Optional humidity sensor
• Optional manual controls
• Two way communication
Equipment Needed for Installation:
• Phillips Screwdriver
• Electrical Tape
• Wire Nuts
| General | Details |
|---|---|
| Name | MAGNUM FIRST M9-TS1 24 Volt Intelligent Thermostat Owner’s Manual |

| Make | MAGNUM FIRST |
| Language | English |
| Filetype | PDF (Download) |
| File size | 1.05 MB |

MAGNUM FIRST M9-TS1 24 Volt Intelligent Thermostat Owner’s Manual Overview
Summary of Contents
- Page 1: 24 Volt Intelligent Thermostat (with 4.3” LCD Display) Description: The bi-directional, intelligent thermostat uses wireless communication to provide quick and easy implementation of energy saving HVAC controls. When the thermostat receives an “occupied” signal from a switch or sensor, the user immediately gains full control over the HVAC settings. When the thermostat receives an “unoccupied” signal, it sets the room back to the preset unoccupied temperature. It is designed for use with most basic gas/electric furnace/air conditioning units, PTHP/PTAC systems, 4-pipe, or 2-pipe fan coil systems. Features Include: - Compatible with key card switch, occupancy sensor, window/door sensor and other wireless transmitters. - Controllable through smart phone as well as VenergyUI software. - Optional humidity sensor. - Optional manual controls. - Two way communication. Equipment Needed for Installation: - Phillips screwdriver. - Electrical tape. - Wire nuts.
- Page 2: 24 Volt Intelligent Thermostat (with 4.3” LCD Display) Planning for Installation: - Take a moment to prepare for installation and ensure optimal communications with other system components in the space. - Always utilize a qualified installer. - Create separation distance between interfering electronics such as fluorescent tube ends, ballasts, electronic transformers, and motors. - Obstructions of metal, concrete and dense building materials will reduce the range. WARNING: To avoid risk of fire, shock, or death, TURN OFF POWER at circuit breaker or fuse and verify that it is OFF before installation begins. Select ONE of the Following Thermostat Configurations: OPTION A: Heat Pump Configuration Installation - If retrofitting an old thermostat, remove the old device, carefully noting the wire connections on the old unit. - Install mounting bracket to the junction box with provided mounting screws. - Wire thermostat according to function as shown in Figure A. OPTION B: 4-Pipe Fan Coil Configuration - Read all steps for this option before taking any action to install thermostat. - If retrofitting old thermostat, remove old device, carefully noting the wire connections on the old unit. - Install mounting bracket to the junction box with provided mounting screws. OPTION C: 2-Pipe Fan Coil Configuration - Continuous fan is not available on 2-Pipe with Aquastat systems. - Follow instructions for a 4-Pipe installation but using Figure C for 2-Pipe Fan Coil with Aquastat or Figure D for 2 Pipe Fan Coil with Electric Heat.
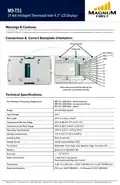
- Page 3: 24 Volt Intelligent Thermostat (with 4.3” LCD Display) Warnings & Cautions: • High voltage: A qualified installer or electrician must install this device. Follow all applicable electrical codes for installation. Connections & Correct Backplate Orientation: *Back plate mounted to the wall. Be sure connectors are oriented correctly. Technical Specifications: Part Numbers (Frequency Dependant): - M9-TS1 (902 MHz - North America) - M8-TS1 (868 MHz - Europe and China) - MJ-TS1 (928 MHz - Japan) Input Voltage: 24 V Max Loads: 24 V (1.5 amp / circuit) Temperature Monitor Range: 32°F to 99.9°F (0°C to 37.7°C) Operating Temperatures: 14°F to 131°F (-10°C to 55°C) Display format: Liquid Crystal Display (LCD) Heat / Cool Control: 1 heat and 1 cool circuit; Heat pump reversing valve circuit Dimensions: 4.38” x 6.63” x 1.16”
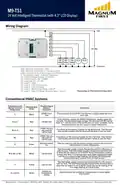
- Page 4: 24 Volt Intelligent Thermostat (with 4.3” LCD Display) Wiring Diagram Commonly Used Wiring Terminal Designators Possible Signal Names / Functions Possible Wire Color Comments 24VAC Common 24VAC Hot Activate blower fan Call for heat Call for cool Outside air temperature display