Honeywell RTH2510/RTH2410 Thermostat Installation Guide


Quick Installation Guide
Mount New Wallplate
4
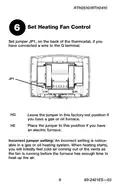
1. Loosen the locking screw at the bottom of the
thermostat. Note that the screw is captive and cannot
be removed from the wallplate.
2. Separate the thermostat from the wallplate as per
Figure 1.
3. Position the wallplate against the wall and mark hole
positions with a pencil.
NOTE: Levelling is for esthetics only and will not affect
the performance of the thermostat.
4. Drill holes at the marked positions and insert supplied
wall anchors.
5. Pass the wires through the large opening located at
the bottom center of the wallplate as per Figure 2.
6. Secure the wallplate to the wall with supplied mounting
screws as per Figure 3.
7. Connect the wires to the terminals.
Figure 1
Figure 2
Figure 3
69-2421ES—03
4
| General | Details |
|---|---|
| Name | Honeywell RTH2510/RTH2410 Thermostat Installation Guide |
| Make | Honeywell |
| Language | English |
| Filetype | PDF (Download) |
| File size | 0.61 MB |


Honeywell T6 Pro Programmable Thermostat User Manual

Honeywell D1-528 Direct Thermostat Installation Guide

Honeywell FocusPRO P200 Programmable Thermostat User Guide

Honeywell RCHT8610WF Series Smart Thermostat Installation Guide

Honeywell T9 Smart Thermostat Installation Guide

Honeywell TH2320WF4011 FocusPRO Smart S200 Series Thermostat User Guide

Honeywell TL116A Thermostat Installation Guide

T10 Pro Smart Thermostat with Redlink Room Sensor

Honeywell TH6320WF2003 Lyric T6 Pro Wi-Fi Programmable Thermostat User Guide

Honeywell RLV3100 Digital Thermostat Installation Guide


EPH CONTROLS HRT Room Thermostat User Guide

BEOK BOT-R6X Wireless Gas Boiler Thermostat User Manual

SALUS TS600 Remote-Only Thermostat User Guide

SECURE radbot 1 Intelligent Radiator Thermostat Instruction Manual

AFRISO RT 10 D 230 Room Thermostat Instruction Manual

Wiser CCTFR6100 Radiator Thermostat Instruction Manual

sinope TH1134ZB Smart Line Voltage Thermostat Installation Guide

Honeywell RLV450 Programmable Thermostat User Guide

SunTouch 113901 SunStat ConnectPlus Thermostat User Manual

FantiniCosmi C820RQ LED Thermostat Instruction Manual