Honeywell RLV3100 Digital Thermostat Installation Guide


This is a legacy product document
supported by Resideo. It is no
longer manufactured
Digital
Non-programmable
Thermostat
RLV3100
Owner’s Manual
Read and save these
instructions.
For help please visit
yourhome.honeywell.com
Application
The RLV3100 thermostat can be used to control an electric heating system such as an
electric baseboard heater, a radiant ceiling, a radiant floor, a convector, etc.
The thermostat cannot be used with the following:
•
•
•
•
•
a resistive load under 2 A
a resistive load over 12.5 A
Temperature display
systems driven by a contactor or a relay (inductive load)
fan-forced heating systems
central heating systems
Supplied Parts
Percentage of
heating time *
•
•
•
One (1) thermostat
Two (2) 6-32 mounting screws
Two (2) solderless connectors
100%
75–99%
50–74%
25–49%
1–24%
M35686
Temperature adjustment
buttons
* The thermostat displays the percentage of heating time required to maintain the desired
temperature. For example, is displayed when heating is activated 40 percent of the time.

| General | Details |
|---|---|
| Name | Honeywell RLV3100 Digital Thermostat Installation Guide |
| Make | Honeywell |
| Language | English |
| Filetype | PDF (Download) |
| File size | 0.82 MB |


Honeywell T6 Pro Programmable Thermostat User Manual

Honeywell D1-528 Direct Thermostat Installation Guide

Honeywell FocusPRO P200 Programmable Thermostat User Guide

Honeywell RCHT8610WF Series Smart Thermostat Installation Guide

Honeywell T9 Smart Thermostat Installation Guide

Honeywell TH2320WF4011 FocusPRO Smart S200 Series Thermostat User Guide

Honeywell TL116A Thermostat Installation Guide

T10 Pro Smart Thermostat with Redlink Room Sensor

Honeywell TH6320WF2003 Lyric T6 Pro Wi-Fi Programmable Thermostat User Guide

Honeywell RTH9580 Wi-Fi Color Touchscreen Programmable Thermostat User Guide

Honeywell RLV3100 Digital Thermostat Installation Guide Overview
Summary of Contents
- Page 1: This is a legacy product document supported by Resideo. It is no longer manufactured. The RLV3100 thermostat can be used to control an electric heating system such as an electric baseboard heater, a radiant ceiling, or a radiant floor. The thermostat cannot be used with a resistive load under 2 A, a resistive load over 12.5 A, systems driven by a contactor or a relay, fan-forced heating systems, or central heating systems. Supplied parts include one thermostat, two mounting screws, and two solderless connectors. The thermostat displays the percentage of heating time required to maintain the desired temperature.
- Page 2: Attention: Mercury recycling notice This product does not contain mercury. This product may replace a product that contains mercury. Mercury and products containing mercury should not be discarded in household trash. For more information on how and where to properly recycle a thermostat containing mercury in the United States, please refer to the Thermostat Recycling Corporation. For mercury thermostat recycling in Canada, please refer to Switch the Stat. If you have any questions about the operation of your thermostat, please go to Honeywell's customer assistance. Turn off power of the heating system at the main power panel to avoid electric shock. Loosen the screw underneath the thermostat and separate the front plate from the base plate. Connect the thermostat wires to the power and to the load using solderless connectors for copper wires. The thermostat wires are not polarized; meaning either wire can be connected to the load or to the power supply.
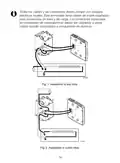
- Page 3: All cables and connections must comply with local electrical codes. This thermostat has tinned copper wires for line and load connections. Special CO/ALR solderless connectors must be used if these wires will be connected to aluminium conductors. 2-wire installation. 4-wire installation.
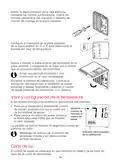
- Page 4: Mount the back plate to the electrical box using the provided screws. Set the switch on the back of the front plate to °C or °F to select the temperature display format. Re-install the front plate of the thermostat on the base plate and secure it in place with the screw underneath the thermostat. If there is a protective film or sticker on the display, peel it off. Apply power to the heating system. Verify the installation by checking that the heater can be turned On and Off by raising and lowering the setpoint using the buttons. The thermostat normally displays the actual (measured) temperature. To view the set temperature (setpoint), press once on either of the temperature adjustment buttons. To change the setpoint, press the appropriate button until the desired value is displayed. The display is backlit for 10 seconds when you press any button. The setpoint is stored in non-volatile memory and is not erased when there is a power outage.
- Page 5: Troubleshooting Thermostat is hot. This is normal. Under normal operation, the thermostat housing can reach a temperature between 95 °F (35 °C) and 104 °F (40 °C). Displayed temperature is wrong. Correct if any of the following conditions apply: The thermostat is exposed to air draft, the sticker on the thermostat’s screen has not been removed, or the thermostat is located near or above a heat source. Display disappears and reappears after a few minutes. The thermal protection device on the heater was temporarily opened due to overheating or sensitivity. Display looks faded when heating is activated. The heating system is less than the required minimum load. Specifications include supply voltage, resolution, minimum and maximum load, storage temperature, dimensions, display range, and approval. 1-year limited warranty. Honeywell warrants this product to be free from defects in workmanship or materials under normal use for one year from the date of purchase. If the product is defective, return it with proof of purchase or contact Honeywell Customer Care for assistance. This warranty does not cover removal or reinstallation costs and is void if damage occurred while in the consumer's possession. This warranty gives specific legal rights, which may vary from state to state.
- Page 6: Thermostat non programmable Veuillez lire le mode d’emploi et le conserver en lieu sûr. Le thermostat RLV3100 peut servir à commander un appareil de chauffage électrique. Ce thermostat ne peut pas être utilisé si la charge résistive est inférieure à 2 A. Ce thermostat ne peut pas être utilisé si la charge résistive est supérieure à 12,5 A. Ce thermostat ne peut pas être utilisé si l’appareil est muni d’un contacteur ou d’un relais. Affichage de la température. Le thermostat affiche le pourcentage d’utilisation du chauffage requis pour maintenir la température désirée. Un (1) thermostat. Deux (2) vis de montage 6-32. Deux (2) connecteurs sans soudure.
- Page 7: Attention : avis relatif au recyclage du mercure. Ce produit ne contient aucun mercure. Cependant, ce produit peut remplacer un produit qui contient du mercure. Le mercure et les produits contenant du mercure ne doivent pas être jetés aux ordures ménagères. Pour obtenir plus d’informations sur le recyclage d’un thermostat contenant du mercure aux États-Unis, consultez l’organisme de recyclage des thermostats. Pour le recyclage de thermostats contenant du mercure au Canada, consultez l’organisme Switch the Stat. Si vous avez des questions sur le fonctionnement de votre thermostat, veuillez consulter le site de Honeywell. Mettre le système de chauffage hors tension afin d’éviter tout risque de choc électrique. Desserrer la vis sous le thermostat et séparer la plaque frontale du thermostat de sa base. Brancher le thermostat à l’alimentation et à la charge avec des connecteurs sans soudure pour fils de cuivre.
- Page 8: Tous les câbles et les raccordements doivent être conformes au code d’électricité local. Les fils du thermostat qui servent aux raccordements de ligne et de charge sont étamés. Des connecteurs CO/ALR spéciaux doivent être utilisés si ces fils doivent être reliés à des conducteurs d’aluminium. Installation à 2 fils. Installation à 4 fils.
- Page 9: Fixer la base sur une boîte électrique à l’aide des vis fournies. Positionner le commutateur à l’arrière de la plaque frontale du thermostat en °C ou °F pour sélectionner le format d’affichage de la température. Replacer la plaque frontale du thermostat sur sa base et resserrer la vis sous le thermostat. Mettre le système de chauffage sous tension. Vérifier l’installation en s’assurant que le système de chauffage puisse être activé et désactivé. Le thermostat affiche normalement la température réelle (mesurée). Pour afficher la température de consigne, appuyer une fois sur l’un des boutons de réglage de la température. L’écran est rétroéclairé pendant 10 secondes lorsqu’on appuie sur n’importe quel bouton. Garder les ouvertures d’aération du thermostat propres et non obstruées. La température de consigne est sauvegardée dans une mémoire non volatile durant une panne de courant.
- Page 10: Problèmes et solutions Le thermostat est chaud. Ceci est normal. En fonctionnement normal, le boîtier du thermostat peut atteindre une température entre 35 °C (95 °F) et 40 °C (104 °F). La température affichée est erronée. Corriger si l’une des conditions suivantes existe : il y a un courant d’air à proximité, l’autocollant sur l’écran du thermostat n’a pas été enlevé, le thermostat est situé près ou au-dessus d’une source de chaleur. L’affichage disparaît et ne réapparaît qu’après quelques minutes. La protection thermique de la plinthe était temporairement ouverte. L’affichage est pâle lorsque le chauffage est activé. Le système de chauffage est inférieur à la charge minimale requise. Fiche technique : Alimentation : 240 V c.a., 50/60 Hz. Plage de réglage : 5 °C à 30 °C (40 °F à 85 °F). Charge minimale : 500 W (2 A résistive uniquement). Charge maximale : 3000 W (12,5 A résistive uniquement). Garantie limitée d’un an. Honeywell garantit ce produit contre tout défaut de pièce ou de main-d’œuvre, durant une période d’un an à partir de la date d’achat. Certaines provinces ne permettent pas l’exclusion ou la restriction des dommages indirects ou accessoires. La présente garantie donne au consommateur des droits spécifiques et certains autres droits qui peuvent varier d’une province à l’autre.
- Page 11: Termostato digital no programable RLV3100 Lea y guarde estas instrucciones. El termostato RLV3100 puede ser utilizado para controlar un sistema de calefacción eléctrica. El termostato no puede ser utilizado con una carga resistiva por debajo de 2 A. El termostato no puede ser utilizado con una carga resistiva por sobre 12,5 A. El termostato no es compatible con sistemas accionados por contactor o relé. El termostato no es adecuado para sistemas de calefacción con ventilador. El termostato no es adecuado para sistemas de calefacción central. Partes suministradas incluyen un termostato, tornillos de montaje y conectores sin soldaduras. El termostato muestra el porcentaje de tiempo de calefacción requerido para mantener la temperatura deseada.
- Page 12: Atención: aviso para el reciclaje del mercurio. Este producto no contiene mercurio, pero puede reemplazar uno que sí lo contenga. El mercurio no debe desecharse con los desperdicios domésticos. Para más información sobre el reciclaje de termostatos que contengan mercurio en los Estados Unidos, consulte con Thermostat Recycling Corporation. Para el reciclaje en Canadá, consulte con Switch the Stat. Si tiene preguntas sobre el funcionamiento de su termostato, visite el sitio web de Honeywell o comuníquese con su atención al cliente. Apague el sistema de calefacción en el panel de distribución principal para evitar descargas eléctricas. Afloje el tornillo debajo del termostato y separe la placa anterior de la placa posterior. Conecte los cables del termostato a la fuente de alimentación y a la carga mediante conectores sin soldaduras. Los cables del termostato no están polarizados.
- Page 13: Todos los cables y las conexiones deben cumplir con códigos eléctricos locales. Este termostato tiene cables de cobre estañados para conexiones de línea y de carga. Los conectores especiales sin soldaduras de cobre/aluminio deben ser utilizados si estos cables estarán conectados a conductores de aluminio. Instalación a dos hilos. Instalación a cuatro hilos.
- Page 14: Instale la placa posterior de la caja eléctrica mediante los tornillos suministrados. Configure el interruptor de la parte posterior de la placa anterior en ºC o ºF para seleccionar el formato del visor de temperatura. Vuelva a instalar la placa anterior del termostato en la placa posterior y asegúrela en su lugar con el tornillo que se encuentra debajo del termostato. Encienda el sistema de calefacción. Controle la instalación verificando que el calefactor se pueda encender y apagar levantando y bajando el control de ajuste mediante los botones. El termostato normalmente muestra la temperatura real (medida). Para ver la temperatura establecida, presione una vez en cada uno de los botones de ajuste. Para cambiar el control de ajuste, presione el botón adecuado hasta que se muestre el valor deseado. La pantalla se ilumina durante 10 segundos cuando se presiona un botón. Mantenga los orificios de ventilación del termostato limpios y sin obstrucciones en todo momento. El control de ajuste se almacena en una memoria no volátil y no se borra en caso de un corte de electricidad.
- Page 15: Resolución de problemas El termostato está caliente. La carcasa del termostato puede llegar a una temperatura de entre 95 ºF (35 ºC) y 104 ºF (40 ºC). La temperatura que se muestra es errónea. Hay una corriente de aire cerca. No se retiró el autoadhesivo de la pantalla. El termostato está situado cerca o encima de una fuente de calor. El visor desaparece y vuelve a aparecer después de unos minutos. El dispositivo de protección térmica del calentador está abierto. La pantalla aparece pálida cuando la calefacción está activada. El sistema de calefacción tiene una carga menor que la carga mínima requerida. Especificaciones: Alimentación: 240 VAC, 60 Hz. Carga mínima: 500 W (sólo resistiva 2 A). Carga máxima: 3,000 W (sólo resistiva 12,5 A). Garantía limitada de 1 año. Honeywell garantiza este producto, a excepción de la batería, por el término de un (1) año contra cualquier defecto de fabricación o de los materiales. Si el producto tiene defectos, la presente garantía es la única garantía expresa que Honeywell proporciona respecto de este producto. Esta garantía no cubre los costos de extracción o reinstalación.
- Page 16: Automation and control solutions. Honeywell International Inc. © 2015 Honeywell International Inc. Printed in U.S.A.

Moes ZigBee 002 Series Thermostat User Manual

PBU 2 Degrees 2 Save Thermostat User Manual

king K702E-2 SimplStat Electronic Thermostat Instruction Manual

PECO T372P Thermostat Instruction Manual

DAIKIN DKN509 Wireless Communicating Thermostat Instruction Manual

Honeywell Home FocusPRO 200 Series Programmable Thermostat Installation Guide

Wagner AL8010F Refrigeration or Heating Digital Thermostat User Manual

Honeywell Home S200 Series FocusPRO Smart Thermostat User Guide

ELKO ep TEV-1 Thermostat Owner’s Manual

GE current WTS10 Daintree Wireless Thermostat Installation Guide