EMSQ22 Daikin ONE Lite Smart Thermostat User Manual


DAIKIN ONE LITE
SMART THERMOSTAT
Homeowner Guide

| General | Details |
|---|---|
| Name | EMSQ22 Daikin ONE Lite Smart Thermostat User Manual |
| Make | Daikin |
| Language | English |
| Filetype | PDF (Download) |
| File size | 1.45 MB |

DAIKIN One Lite Smart Thermostat User Guide

Daikin One Lite Smart Thermostat Instruction Manual

DAIKIN DTST-ONE-ADA-A One Touch Smart Thermostat Installation Guide

DAIKIN IM 1368 Vertical Stack WSHP Thermostat Instruction Manual
DAIKIN IM 1366 Remote Integrated Thermostat Instruction Manual
DAIKIN TRC-11 One Lite Connected Thermostat Instruction Manual
DAIKIN ONE Smart Thermostat Instructions

DAIKIN DKN509 Wireless Communicating Thermostat Instruction Manual
DAIKIN SQNSQ22 One Touch Smart Thermostat User Manual

DAIKIN S21 One Lite Smart Thermostat User Guide

EMSQ22 Daikin ONE Lite Smart Thermostat User Manual Overview
Summary of Contents
- Page 1: Daikin One Lite smart thermostat homeowner guide.
- Page 2: Welcome! This homeowner guide features an overview of functions and/or features available through the Daikin One lite smart thermostat. The Daikin One home app is the preferred means of accessing these features, but the instructions that follow are helpful if the app is not used.
- Page 3: Create a Daikin One home app account After installing the Daikin One home app from the App Store or Play Store, select “Create Account”. Review the documents and select “I Agree”. Enter your name, email address, and a password that meets the length and complexity requirements. Check your email account for an email with your account verification code. Enter the verification code in the app and select “Confirm Code”. When successful, you will next be asked about enabling biometrics, and then navigated to the “my home” screen. To learn more about operating the Daikin One lite smart thermostat, visit our how-to videos.
- Page 4: Add location name and address to the Daikin One home app. After creating a Daikin One home account, you will be prompted to add a location. If you already have a location and want to add another, select “add location” on the “settings” screen. Enter the location name and address, then select “Next.” Verify the location address on the map. Move the pin to the correct location if needed, then select “Save This Location.” You will be navigated to the “my home” page where you can add a thermostat.
- Page 5: Connect thermostat to Wi-Fi using the Daikin One home app. After creating a Daikin One home account and adding a location, select “Add Device” to add a thermostat. To add additional thermostats, select “add device” found in the drop down menu at the top left of the “my home” screen. Select “Daikin One lite smart thermostat” from the list, select a location, and press “Next”. Select “Connect to Wi-Fi”. Press the fan button for 5 seconds, then press the cooler/down button to put the thermostat in “AP MODE”, then return to the app and select “Next”. Follow these instructions to directly connect the phone Wi-Fi to the thermostat, then select “Next” in the app.
- Page 6: Connect thermostat to Wi-Fi using the Daikin One home app. Follow these instructions to go to your phone’s Wi-Fi settings to connect the phone Wi-Fi directly to the thermostat. Return to the Daikin One home app and select “Next.” Select “choose network,” then select the appropriate Wi-Fi network from the list. Enter the password and select “Connect.” Confirm that the Wi-Fi icon appears on the thermostat screen, then select “Finish.”
- Page 7: Connecting to the Daikin One home app After creating a Daikin One home account and connecting the Lite thermostat to Wi-Fi, select Add Device from the my home screen. To add additional thermostats, select add device found in the drop-down menu at the top left of the my home screen. Select Daikin One lite smart thermostat from the list, select a location, and press Next. Press the up/warmer button on the thermostat to display the 6-digit pairing code, then return to the app and select Next. Press and hold the fan button on the thermostat for 5 seconds to put the thermostat in Wireless Setup mode, then select Next in the app. Confirm that the newly added thermostat appears on the My Home screen. You are now able to control your thermostat from your phone using the Daikin One home app! Enter the pairing code and select Add.
- Page 8: Control / interface overview Limited segment display Mode button Fan button Up or warmer button Down or cooler button LED indicator Mode selection Press the mode button cycles through available modes. As each mode is selected, its name appears in the upper left corner of the display.
- Page 9: Adjust setpoint Increasing the temperature Press the up arrow button to raise the setpoint. Off mode Heat or cool mode Decreasing the temperature Press the down arrow button lowers the setpoint. Raising and lowering the setpoint Button presses raise and lower the temperature by 1 degree when using Fahrenheit degree units. When set to heat or cool modes, pressing the up arrow button raises the setpoint.
- Page 10: Setting fan settings can be changed more easily on the air quality screen of the Daikin One home app. Pressing the fan button on the thermostat will turn the fan on and off. Press and hold the fan button for 2 seconds to access the fan settings. For the cool and heat fan speeds, press the up and down buttons to cycle through the available fan speeds of auto and 1 (low) through 5 (high). The cool and heat louver position settings are available for indoor units that support these settings. When the vertical or horizontal louver swing is turned on, the louvers will oscillate in the relevant direction. A fixed direction can be set by turning the appropriate swing setting off when the louvers are in the desired position. Press and hold the mode button for 2 seconds at any time to exit the home screen. The system will return to the home screen automatically after 2 minutes of inactivity. Press the fan button to return to the home screen.
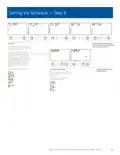
- Page 11: Setting the daily schedule can be accomplished more easily using the Daikin One home app. A schedule automatically uses different heat and/or cool setpoints for different days of the week and different periods of each day. The schedule repeats each week and can have up to 4 schedule events per day, each with its own heat and cool setpoints. Press and hold the fan and warmer (up) buttons for 2 seconds to enter schedule mode for programming a schedule. While in schedule mode, press the mode button to advance through each setting for each day of the week and each time period of each day. To exit schedule mode and return to the home screen at any time, press and hold the mode button for 2 seconds. The system will return to the home screen automatically after 2 minutes of inactivity. Warmer (Up) and cooler (Down) buttons toggle schedule on and off.
- Page 12: Setting the schedule involves choosing the day of the week. Press the mode warmer (up) or cooler (down) buttons to advance to the next step. Warmer (up) button selects the next day, cooler (down) button selects the previous day. Enable or disable the morning event using the warmer and cooler buttons. Press the mode button to advance to the next event. Press the mode button when the event is on to set the event start time. FSD cycles through the selected day and displays it. The day of the week being scheduled appears below the FSD. FSD automatically advances to the next screen after cycling through the options.
- Page 13: Setting the schedule involves several steps. You can set the morning event start time using warmer and cooler buttons. Adjust the morning event cool setpoint with the warmer and cooler buttons. Set the morning event heat setpoint using the same buttons. The day of the week being scheduled appears below the FSD. Repeat the steps for the day event, including enabling it and setting the start time. Adjust the day event cool setpoint and heat setpoint. Follow similar steps for the evening event. The FSD cycles through various options. This guide is for the Daikin One Lite smart thermostat.
- Page 14: Setting the schedule involves enabling evening and night events. You need to set the evening event start time and cool setpoint. It's also necessary to enable the evening event heat setpoint. For the night event, you should set the start time and cool setpoint as well. Additionally, enable the night event heat setpoint.
- Page 15: Setting the schedule Press the mode button for two seconds to return the thermostat UI to the primary screen. Press the mode button to return to the screen where you select a day of the week to schedule. Press the warmer (up) button to copy the events from the day you just completed to the next day and advance one day. For example, if you complete Monday you can press the warmer (up) button to copy those settings to Tuesday. You may then press warmer (up) again to copy those settings to Wednesday and so on. FSD cycles through the following: choose day of the week. Continue programming individual days. Warmer (up) button selects the next day, cooler (down) button selects the previous day. FSD displays the name of the currently selected day.
- Page 16: Setting away setpoints allow you to save energy by limiting heating and cooling when you are away from home. The Away setpoints are used when geofencing is enabled in the Daikin One Home App. Press and hold the mode and cooler “down” buttons to enter the settings for Away mode. Press the mode button to advance through the away mode settings. Use the warmer (up) and cooler (down) buttons to change each setting. To exit to the home screen, press and hold the mode button for 2 seconds. The system will return to the home screen automatically after 2 minutes of inactivity. Press and hold the fan and cooler (down) buttons to enter the settings for Away mode. Press the warmer (up) and cooler (down) buttons to toggle away on or off. Display cycles through the modes as you press the mode button.
- Page 17: Locking/Unlocking the Keypad To prevent unauthorized use of the thermostat, the front panel buttons may be disabled by locking them. To disable, or “lock” the keypad, press and hold the mode button. While holding the mode button, press the warmer (up) and cooler (down) buttons together, for two seconds. The lock icon will appear on the display, then release the buttons. To unlock the keypad, press and hold the mode button. While holding the mode button, press the warmer (up) and cooler (down) buttons together, for two seconds. The lock icon will disappear from the display, then release the buttons.
- Page 18: Page 18
- Page 19: Important notes This device complies with Part 15 of the FCC Rules. Operation is subject to two conditions: it may not cause harmful interference and must accept any interference received. Changes or modifications not expressly approved by Daikin could void the user’s authority to operate the equipment. This equipment has been tested and found to comply with the limits for a Class B digital device. These limits are designed to provide reasonable protection against harmful interference in a residential installation. If this equipment does cause harmful interference to radio or television reception, the user is encouraged to try to correct the interference. This device contains license-exempt transmitter(s)/receiver(s) that comply with Innovation, Science and Economic Development Canada’s license-exempt RSS(s). Operation is subject to two conditions: it may not cause interference and must accept any interference. L’émetteur/récepteur exempt de licence contenu dans le présent appareil est conforme aux CNR d’Innovation, Sciences et Développement économique Canada.
- Page 20: For additional resources and instructional videos, scan code or visit Daikin One. If you encounter any issues or would like assistance with setting up your Daikin One lite smart thermostat, please contact Daikin support. Before purchasing this appliance, read important information about its estimated annual energy consumption, yearly operating cost, or energy efficiency rating that is available from your retailer.

hansgrohe 15763003 Shower Select Thermostat Instruction Manual
BARD THERMOSTAT Menu Driven Display 1120-445A User Manual

Honeywell N100 Series Non Programmable Thermostat Installation Guide

CORDIVARI Ardesia Electric Radiators with Digital Thermostat Instruction Manual

Danfoss VIMCB20F Icon2 / 24V On Wall Mount Room Thermostat Installation Guide

HyperStat 7C-HS-C2W-X Wall Mount Thermostat Installation Guide

FantiniCosmi C820RQ LED Thermostat Instruction Manual

HEAT-MY-HOME HMH200 WiFi Thermostat User Guide

SALUS HTR230 Dial Thermostat User Manual

TFC Group OP-WFSTAT Wi-Fi Thermostat User Guide